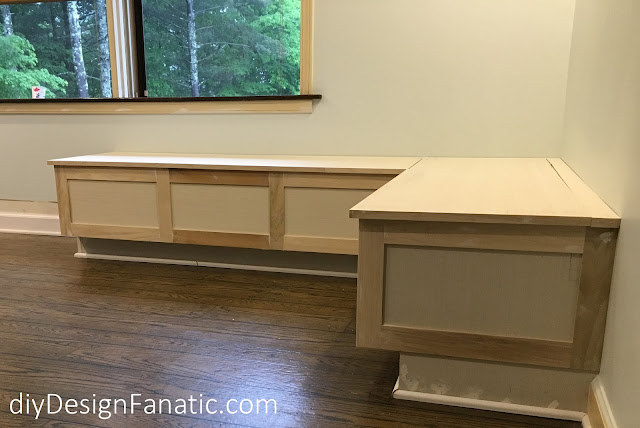
I'm so excited to have this project finished!
Mr. DIY did a great job building it and he did everything from building to finishing. The only thing I did was design and consult on the design of the banquette.
We've known from day one that we wanted a built in banquette in the kitchen at the mountain cottage. This is the only eating space in the house since there's no dining room. A banquette saves a lot of space and makes sense in a kitchen/dining room combination.
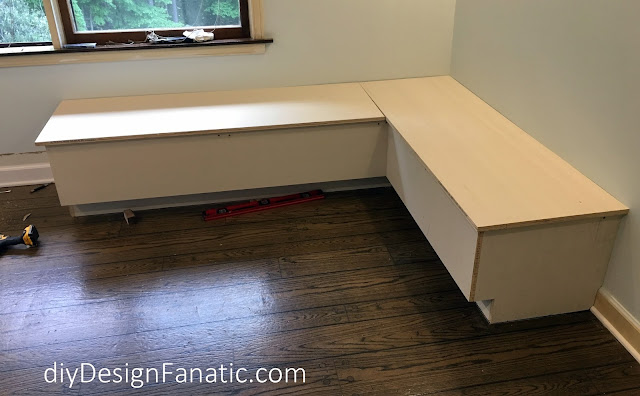
After deciding how long and deep the seats were going to be, Mr. DIY taped it out on the floor just to be sure. (update):After taping the floor, he removed the baseboard heater and will install one to the left of the bench under the windows.
I really felt there should be a toe kick, so the banquette was made with a toe kick that would accommodate the existing baseboard in the kitchen.
We decided that the banquette would be 21" deep and 17 1/2" high and each seat would be 60" wide.
Since the top would be 3/4" thick and have an overhang, the box is 20" deep and 16 3/4" high, with a 4 3/4" high x 4"deep toe kick cut out. The boxes are made out of plywood.
Using his Kreg Jig, Mr. DIY covered up the toe kick space just so it would look cleaner and nothing would fall through.
Then, he used 2 x 4s for the bracing. We reused these from another project.
He had to cut around the outlets.
He then cut the tops out of plywood. The front and side overhangs are 3/4".
He then cut the board lengthwise at 2". In retrospect, 2 1/2" would have been better so they will stay open better on the window sill side. He will be adding a support hinge/lid stay later so that the tops will stay open and not fall on someone.
He covered the unfinished edge of the plywood with 3/4" x 1/4" strips cut from 1/4" x 2 1/2" pieces of wood.
He attached the tops with piano hinges.
I wanted the front and sides of the banquette to look like the Kraftmaid cabinet doors, so, after marking where the "doors" would go...
he cut the 1/4" thick poplar boards down to 2 1/4" wide and attached them to the box. At the ends, the sides where it meets the corner were cut down to 2", so that when the side panel was put on (which is 1/4" thick,) they would still be 2 1/4"
He wrapped baseboard and 3/4" base shoe all the way around the banquette.
Here's how clean the inside looks once it was primed and painted. The tops of the braces and the top edge of the box, as well as the top of seats were finished with a coat of clear poly to minimize sticking.
All finished!
Today, Mr. DIY installed our new fan. I really wanted a square wood X chandelier and he was willing to make it, but our little cottage really needs a fan in the kitchen. I found the fan on Amazon and it is the perfect size (at 44") for the space.
These are affiliate links, which means I'll make a small commission should you purchase through one of these links.


Wow I am so imressed! I always wanted a banquette in our kitchen dining area. I like the details you put into this and the new fan. Kudos to your hubby once again for his talents and efforts!
ReplyDeleteWhat type table and chairs would you use for this type? Rectangle/circle?
ReplyDeleteI plan on getting the cross backed bistro dining chairs. https://www.wayfair.com/Lark-Manor-Hyacinthe-Crossback-Solid-Wood-Dining-Chair-Set-LRKM3988.html?piid=24099477#readmoremodal1
DeleteHi Pam,
ReplyDeleteI really like your banquett seating, and great work to your hubby. However as I am also a hard core DIYer and I'm thing l9st if your viewers have not even thought about your baseboard heat! Did your hubby remove the long unit and just replace with a shorter one. As that is what I would have done! Again mostvofvyour followers are most likely female, and that would not have been something they might even notice, butbyou didnt mention it in your blog. Just saying. Lol
As I'm not a blogger, you can contact me if you wish at: Pollyaclements@gmail.com
Thanks Polly! Yes, Mr. DIY removed the long baseboard heater. He just put in another heater in the wall to the left of the bench under the window. Maybe I'll go back and mention it. Thanks for pointing that out!
Delete