Mr. DIY is so patient.
The kitchen walls and ceiling were prepped and primed and ready for paint.All he had to do was paint the room and then he'd be able to bring in the cabinets we've been wanting to install for soooooo long.
I was spending a little time on Pinterest looking at Cottage Kitchens. Y'all know what happened next...
They all had planked ceilings!
So, I asked Mr. DIY what he thought of a planked ceiling.
Oy, why do I do this?
At that point, installing a planked ceiling would mean several more weeks doing a new project...before the cabinets could be brought inside from the workshop.
As I said, he is so patient.
He painted the walls Sherwin Williams Topsail and marked the joists in the ceiling.

After picking up enough packs of these V-Groove Panels at Lowe's, We got to work priming. It was my job to fill the holes and imperfections in the wood that I felt were necessary for the look I wanted. Mr. DIY would rather have a more rustic look, so I did the work.
We bought the planks at our local Lowe's and did all the prep work in our basement
We painted the planks with a first coat of paint and Mr. DIY installed them after that. Here's a pic of the planks up on the ceiling with 1 coat of white semi-gloss on them.
Do you see that hole in the ceiling at the top of the photo?
That was another detour project. We had previously discussed having a light there, but had forgotten about it. I gave Mr. DIY the option of doing the wiring and adding a box before continued with the ceiling. It took him a little over an hour, but I think it was definitely worth it.
After the crown was installed, Mr. DIY filled all the nail holes from installation and primed the spots and painted the whole ceiling with a 2nd coat of paint.
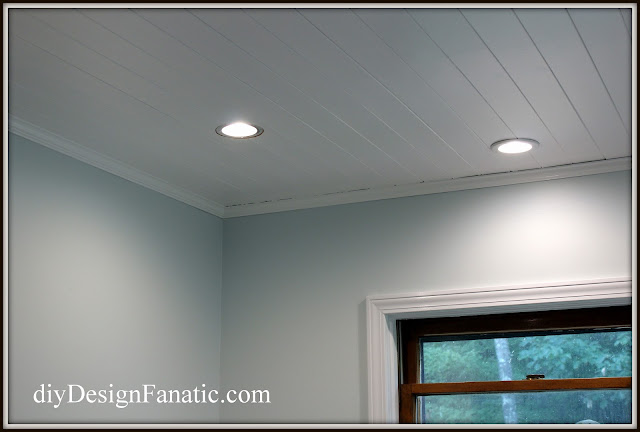
I'm loving this wall. We're planning to have a built in banquette and table under these lights.
Here's a pic of the finished plank ceiling!
As you can see, we brought the cabinets in and placed them where they'll go in the kitchen.
I'm finally getting the white painted kitchen I've always wanted!
That's where we stand with the kitchen reno.
Mr. DIY will be customizing a cabinet that our large apron front sink will go into since there wasn't a sink base that would fit the one we purchased.
That's the next project when we go back in a couple of weeks. Once the cabinets are in, the countertop, appliances and sink are sure to quickly follow.
Can't wait to have a working kitchen again at that point, even if it will take us several months to finish ALL the projects in the kitchen we have planned.
The planked ceiling project cost us about $300, including the small crown molding and paint. We bought 13 packs at $15.98 and spent $71 on the crown.
I can't say it was an easy project and it certainly wasn't a quick one. I think the most difficult part for Mr. DIY was fitting the planks together...on the ceiling. It took him a little more than an hour to do the whole length of the room 4 planks wide. I wasn't much help with that part of the project, but I did a lot of the prep work.
I'm so glad Mr. DIY is a patient man and puts up with my "little" detour projects.
Pam


I'm liking the looks of this a lot! Mr. DIY is an angel! Those extra details make a place so special and down the road you'll look back at it with pride. I do love those lights that are above the banquette area. This kitchen is taking on a whole new look compared to what it was- can't wait to see it all together!
ReplyDeleteYour husband is something else!!!! This looks SO beautiful Pam, and worth every minute, right? You are a lucky lady to have such a man!
ReplyDeleteOh wow, it looks amazing.
ReplyDeleteI'm so jealous! I would love to do that in one of our bedrooms.
ReplyDelete