
I'm finally going to share how we made the barn doors for our basement Family Room.
I've always thought barn doors were awesome and wanted to put them somewhere in our house, but didn't know where. It finally hit me that barn doors over the existing patio doors in the basement would serve two purposes; the first being for privacy and second for security. The barn doors fit over the existing blinds that we have installed on the patio doors, but I am thinking of taking them off because no sun ever hits the windows due to the deck covering the patio just outside.

Mr. Fanatic bought galvanized barn door hardware at Tractor Supply and I spray painted the pieces an oil rubbed bronze, which is almost black.

Here are the 8ft unpainted galvanized box rails.

Mr. Fanatic marked the studs in the wall with tape.

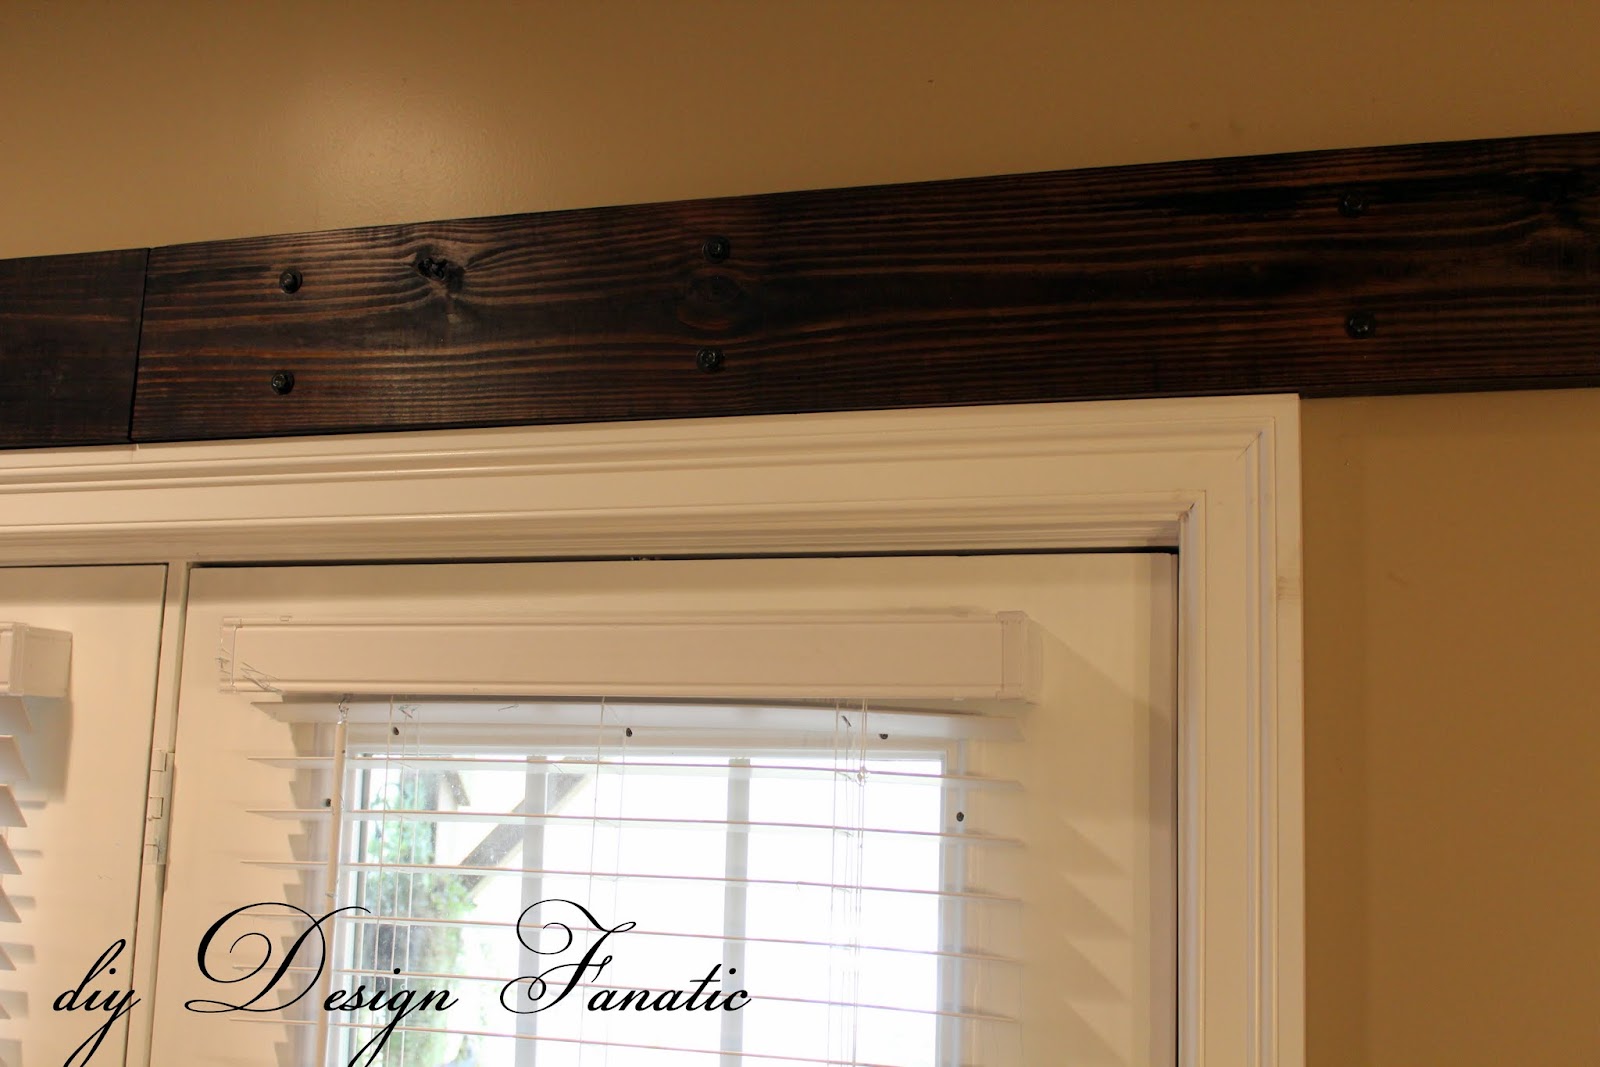
He then marked where the studs were on the pine 2 x 8 for the left side and then on a 2 x 8 for the right side. The two 2 x 8's were used as a header to hang the rail for the doors on. After marking the headers, Mr. F pre-drilled holes in them.

I stained the two headers with oil based Jacobean stain by Minwax. You can see the pre-drilled holes in the header.

After the stain was dry, Mr. F installed the header. I knew as soon as the header went up that the barn doors were going to look great.

He attached the header to the studs with 1/2" diameter x 5" lag screws (with washers)
He attached a small piece of 2 x 4 (that was my stain sample) to test out how to adjust the hangers.

To make the doors, Mr. Fanatic used eight 2 x 6's, which are roughly each 5 1/2" each, making each door 44". (Each door covers the exterior door plus the width of the width of the molding and the center frame between the two doors).
The eight 2 x 6's were clamped together with pipe clamps and sanded down.

Since 2 x 6's are not all perfect, Mr. F hammered them down so they wouldn't stick up quite so much. He used a wood block so the hammer wouldn't leave marks.


After that, he measured the height that he wanted for the door, then cut the door to length.

He then layed out the 1 x 4's that would hold the boards together. We chose a Z pattern.

Mr. F used 1 1/2" torx drive screws to hold the boards together.

Once the first door was made, Mr. F. hung the door to make sure it would all work.

After Mr. F made the 2nd door, I stained the first coat on the first side. You can see the 2nd door on the pool table.

I stained each side with two coats of stain and let the stain dry 2 days between each coat. I did the same for the other sides of the doors.

Mr.F had to change out the cable connector to one that turned 90 degrees and the plugs on the TV to flat plugs (on the left side of the doors and lamp on the right side of the door) in order for the barn doors to open while everything was plugged in.

Mr. Fanatic still has to the handles, slide bolts, guides, and will add stops to the ends of the rails.
Can't wait to get the handles on.

In the meantime, we can still enjoy the barn doors.
I think they really make the room.
Here's the before:

And After:

Mr. F's next projects include making some coordinating shutters for the little window next to the fireplace and a heavier door to the unfinished part of the basement.
The projects list for 2013 is getting longer.
Pam
ps: just in case you're wondering, we spent approximately $650 on the doors and all hardware...$550 for what is shown in the last photo. (yep, we splurged on the handles and gate latches & they're bee u tee ful!)
Disclaimer: The above post is how we made our barn doors. I don't take any responsibility for any errors or results obtained from using this information. When using power tools, use safety equipment.
ps: just in case you're wondering, we spent approximately $650 on the doors and all hardware...$550 for what is shown in the last photo. (yep, we splurged on the handles and gate latches & they're bee u tee ful!)
UPDATE: if you'd like to see the fancy hardware we put on the Barn Doors, click here.
We purchased 2 of these from Amazon if you're wondering where to get them:
We purchased 2 of these from Amazon if you're wondering where to get them:
.
Disclaimer: The above post is how we made our barn doors. I don't take any responsibility for any errors or results obtained from using this information. When using power tools, use safety equipment.
If you order from Amazon by clicking the link, I will make a commision on them.
Pam the hubby did an awesome job on those doors, they look fabulous!! The shutter on that window will finish the room off perfectly! Love it!!
ReplyDeleteThose look soooooo good and you sure have one hard working handy man.
ReplyDeleteThe doors look amazing I love them. Really does make a huge difference in the room. Hugs, Marty
ReplyDeleteGreat doors, they really go well with the style of your room!
ReplyDeleteYou two do amazing work. I love the "Z" on the doors.
ReplyDeleteThey look gorgeous! Thanks so much for sharing this tutorial. :)
ReplyDeleteAMAZING!! It changes the entire feel of that room
ReplyDeleteYou two can do anything!!! It looks fabulous!
ReplyDeleteGorgeous! Love the rich and rustic look they give your room.
ReplyDeleteWonderful job! When they are closed you can have the perfect theatre lighting (or lack of). They look beautiful.
ReplyDeleteLove these so much! They add so much character to your room! You guys are amazing!
ReplyDeleteThey look great! I love the creativity in creating them. Well done!
ReplyDeletePam
Wow! Wow! Wow!!! Pam those look fantastic!!
ReplyDeletePam they look excellent! What a great job you both did! Can't wait to see your fabulous hardware!
ReplyDeleteWow! Those look so good. Your husband is amazing! What a cozy basement you have now too. I love it!
ReplyDeleteSo happy I saw you barn doors on Hometalk. My first large project for 2013 is a barn door for the stairway for upstairs. We live in a cabin and the doorway is just an opening in the wall. We only us the upstairs for company and it would be a great way to address the area.
ReplyDeleteThese are fantastic, you have a hubby like mine, a great handyman.
ReplyDeleteCynthia
Your project is absolutely wonderful Pam. Fabulous work and looks fantastic! I need to show this to J. We have no place for these, now, but who knows...maybe sometime.:-)
ReplyDeleteWhat?! These are amazing! I love them!!
ReplyDeleteWOW! Beautiful! Can't believe you guys made those beauties! love it! :-)
ReplyDeleteWow, Pam, they are incredible! You and your hubby make quite the DIY team! The doors are an amazing addition to your beautiful space and will be quite the conversation piece!
ReplyDeleteThese doors are fabulous! They definitely make the room.
ReplyDeleteMary Alice
The barn doors add such a rustic element to the room which goes perfectly with your gorgeous stone fireplace. So cozy and inviting! How inventive to think of putting them right over the existing patio doors! You and Mr. Fanatic did a fantastic job - isn't it wonderful to have a "handy hubby"?! I think I'm going back to look again!
ReplyDeleteDD
Wow I am so impressed with those barn doors. It gives the room such a cozy feel. I would love for you to come and share this at my Winter Blues Wednesday party going on right now. Hope to see you there.
ReplyDeleteLove the looks of the doors, your husband done a wonderful job!
ReplyDeleteLove it! I have been trying to figure out where to hang them in my own home, perfect idea!
ReplyDeleteAbsolutely amazing! You both did such a great job and what a stunning effect it has on the room! I love barn doors! Can I ask how often you will open and close them??
ReplyDeleteYou have my mind in a whirl of ideas!
Nancy
http://wildoakdesigns.blogspot.com
Pam those turned out fabulous! My 2013 project list keeps getting longer and longer as well!;)
ReplyDeleteLove it!
ReplyDeleteWowzers! Awesome job. TOtally looks like a salvaged barn door. WooHoo to the Hubs!!
ReplyDeleteThe barn doors look fantastic! My hubby is building a garden building and has put 2 barn doors on it -- the doors are so gorgeous, they really should be inside our home somewhere!
ReplyDeleteOMG!!! Those doors are amazing and look so great. I have a thing for doors in my home too and I love this idea. It will look great and finish the room when she gets the windows done too. So beautiful.
ReplyDeleteKris
I love love love these doors. Great job!
ReplyDeletethat is just beautiful! well done. Love the dark stain
ReplyDeleteWhat a fantastic project. Just beautiful! I would love these in our home.
ReplyDeleteGorgeous barn doors!!! Happy to be your newest follower <3. Blessings ~ Judy @ www.vintagestreetdesigns.com
ReplyDeleteMy goodness Pam, those are unbelievable!! Really, what a project!! They look great and what a great idea for added security. Looking at the photos I was thinking...what a great dining table one door would make too! Then I think that way. They look great and you both did such a great job! It would sure be great if you guys were closer:-)
ReplyDeleteI had to come by again and take another look at those awesome barn doors! Love the look and feel of the room!
ReplyDeleteWOW! Love these doors, they turned out gorgeous!! And I love that fireplace, btw!! Such a pretty home!
ReplyDeletePam, those barn doors are amazing and what a change to the room! I actually live in a converted barn but alas the original barn doors were long gone before we moved in *sigh* By the way, having a hubs that is totally a-mechanical your hugs should be called Mr. Fantastic instead of Fanatic :D
ReplyDeletethanks for sharing the details...
Hugs,
Beth P
I cant believe how beautiful these came out!!!! Could you possibly outline the pieces you used from tractor supply? (What should I buy, in other words!!) I am doing a standard door frame size and I have a 6 ft galvanized box rail but cannot figure out the correct hardware for the rest of the project!!
ReplyDeleteWow, these look amazing! Can you post a complete list of the hardware from tractor supply with links? I don't know what I need to make these.
ReplyDeleteThanks!
Wow Pam! Simply stunning! Well done.
ReplyDeleteI recently did a blog about barn doors http://billiemakesahome.info/?p=299 and just today stumbled across your blog.
You have given me the extra inspiration I needed - thanks.
Billie
Um..yeah...Mr. Fanatic? I think not. How about Mr. FANTASTIC! (Can't be the first time you've heard that but I am far too lazy to read all the comments).
ReplyDeleteThis is beyond awesome. I LOVE it. You've got me thinking! Thanks.
I'd love to do this in our piano room to muffle the sound some. 2x6s look like they'd do the trick, but I'm worried about the weight. How heavy was this thing? It looks gorgeous!
ReplyDeleteThanks! Our doors are pretty heavy.You could make some doors out of lighter material for interior doors between rooms. 1 x 4's would be much lighter.
DeleteDear Pam,
ReplyDeleteMay I ask you what would be the measurements if the doors I would like to attempt and build are going to be gates outdoors? I would like them to be four feet wide and about six feet high. I loved your design and I would like to make a gate on each side of my home. I am not sure what kind of space to leave for the hinges that will attach to the frame for the gates. I am a novice, but I love the doors!
Lu, I'm not quite sure what you are asking. Are you hinging the gates on the sides like a regular door, or are you doing a barn style door with hangers at the top?
DeleteJust built mine. Thanks for the inspiration!
ReplyDeleteThis looks beautiful. How did you attach the box rails to the header?
ReplyDeleteThanks! The box rails are attached to the header with box rail bracket. Here's a link to one on Amazon. http://www.amazon.com/NATIONAL-N104-349-10SGL-Bracket-Galvanized/dp/B000BQYG4O/ref=pd_bxgy_60_img_3?ie=UTF8&refRID=1J1QT0JEQPTEYYEA6101
Delete