Showing posts with label patio. Show all posts

Thursday, June 23, 2011

A Touch Of Vintage

Hasn't this week been fun with all the blog parties??? It's so inspiring to see all the great projects everyone has done. It's amazing how creative you all can be with a little paint and a drop cloth and a few accessories to remake your outdoor spaces!

If you haven't heard, I'm all about getting out the pretty things I have and using them more often. I encourage  you ladies to do the same! Enjoy what you have. If you have kids, teach them to enjoy and take care of them too!

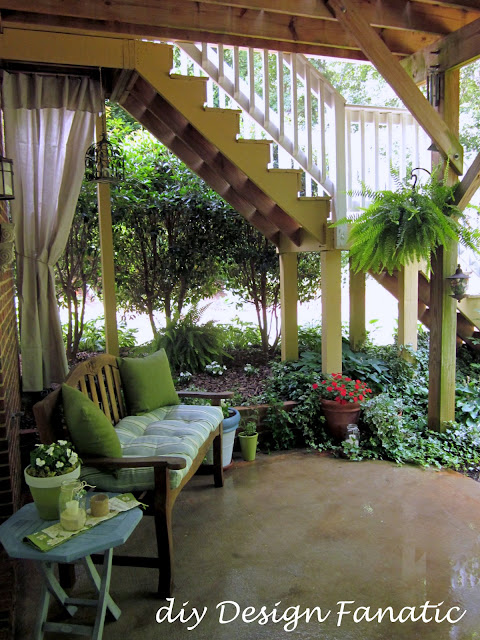
A few days ago my favorite place to sit and enjoy the outdoors looked like this after sprucing it up with a drop cloth curtain, new candle chandelier and some painted pots with new seasonal flowers. I love sitting in this shady spot on these warm southern summer evenings or in the morning before it gets too warm.


Since there's going to be A Vintage Summer party tonight over at Common Ground   and A Shabby Cottage Summer party at French Country Cottage, I was inspired to bring out a few of my pretty vintage things.


This glass pitcher was my grandmothers, probably from the 1940's, but I'm just guessing.


The glass is vintage, too... many of you know it's called "Boopie" and was made by Anchor Hocking and was popular in the 1950's and 60's.  The white napkin was a Goodwill find.


Now, I know the handmade throw/tablecloth was my grandmother's, but I'm not sure if she made it. She made some pretty amazing things, which I've shared with you before. You can see them HERE if you missed the post. I'm going to have to ask my sister if she knows who made this beauty. She has a good memory for remembering all the details of our family history. The pillow isn't vintage...it's from HomeGoods.


The large embroidered doily that covers the table was given to me by my mother in law.

Here's how the patio looks with a few vintage touches.


Thanks so much for stopping by. I hope you enjoyed seeing my vintage touches on my patio. 
If you don't already follow along, click on the Google Friend Connect on my sidebar or "like" me on Facebook.  That way, your sure to never miss a post!

I hope everyone has a blast at the parties tonight!

Pam


Transformation Thursday
Photobucket


Tuesday, June 21, 2011

My Favorite Outdoor Space 2011

So glad you stopped by to see my favorite outdoor space. Every year my front porch, patio in the woods, deck and our lower level porch/patio need sprucing up, even if it's just adding some seasonal flowers. This year, along with planting a few flowers, I repainted a few pots, painted the little blue table top, added a drop cloth curtain, added some candles and hung this candle chandelier. The whole project cost less than $25 because I already had most of the supplies.

I already showed you the little blue table a few days ago...

Yesterday... the drop cloth curtain...

Here's what the whole patio looks like


In the evening, it's really wonderful to sit and watch the fireflies and listen to the frogs down by the creek.

You can't tell by the photo, but we have a couple of strings of lights above on the deck and along with the candles. They give just the right amount of light. I had to turn on one of the outside lights so the photo wouldn't be too dark.
 While we're on the subject of my favorite outdoor space... I plan to show you how I make this space feel a little more cozy by adding a few vintage pieces. 
Hope you'll come back to see it!  
Follow along by clicking on the Google Friend Connect on my sidebar if you don't already do so!
Hope you'll also stop by and visit the other great bloggers participating in the blog party, too!

Pam


Monday, June 20, 2011

Adding A Little Something...

My basement patio is one of my favorite places to sit and listen to the birds sing. The patio is much cooler than the deck above it, especially in the morning and early afternoon. I've been wanting to add a drop cloth curtain just to give a little more privacy between the neighbors on our north side, especially when I go outside and sit when I'm still in my pj's . 
C'mon, I know y'all do the same thing!


The only thing I had to purchase for this project was a 6' x 9' drop cloth, which was less than $12. I had everything else... a dowel, bronze spray paint, clip on curtain rings and jute twine. After spray painting the clips (they were black) and the rod, Mr. Fanatic attached the rod to the underside of the deck with a u shaped nail.

Then, he folded over the drop cloth so it wouldn't drag on the ground

I braided some of the twine for a tie back. Mr. F. attached a hook to the brick.

Drop cloth curtains have got to be the easiest project there is! There isn't any sewing because the edges are already sewn. I "made" drop cloth curtains for my youngest daughter's room and they look great! 

Here's a  bigger peek of my basement patio.
I still have even more to show you for this outdoor space. Hope you'll come back to see it!


Pam

p.s. follow along on Google Friend Connect on my sidebar so you don't miss it!


Tuesday, April 20, 2010

Solar Patio Lights

I guess since everyone is celebrating earth day, a post on solar patio lighting is apropos. I just chose solar lights because they were easy to install, don't add to the electric bill, they serve the intended purpose & they look great!
As most of you know, I am getting my house ready to sell. We are also planning to throw a  High School Graduation party for my oldest daughter in June. For both of these reasons I am decorating & sprucing up my home & garden. Our patio on the edge of our woods has always needed lighting since we use it often at night.
 
So, a whole aisle full of solar patio lights  at Walmart on a recent visit caught my eye. They had several different styles in different price points. There were also 3 different finishes in this style light.I purchased 12 of these lights for $5 each and brought them home.

Before I installed them I tested one of the lights out to see if they would work since they were going to be installed in a shaded area. On the "test" day the sun never even came out, but the light collected enough sunlight to burn the light & it was still lit at 11 pm.
Installing these lights is really easy. The first thing that needs to be done to activate the light is take off the cap & pull out the orange strip.
Next, pull the stake out of the bottom part of the tube & attach it with the point down. No tools needed :)

Then you just stick it in the ground where you want it placed. That's it. No wires & no electricity needed : )


Don't they look great?
Just had to throw in a photo of my little birdies I found on an anniversary weekend up in the mountains. I love those little guys.


The lights aren't super bright, but they provide enough light so that we can walk back to the house in the dark without tripping on anything and I am very happy with them. I have also seen similar solar lights at Lowe's, Home Depot & Target. Some are as low as $3 each.
I love working out in the garden any chance I get and am decorating & planting some flowers on basement patio & the patio in the woods. I hope to show you those soon. Hope you will come back for a visit soon.

Thanks for stopping by,

Pam