Showing posts with label Basement Storage. Show all posts

Friday, December 28, 2012

End Of The Year Wrap Up 2012

Just a few more days until a brand new year. Don't ya just love a new start? The end of the year is also a time of reflections for me; I like to look back over what was accomplished.  I even forgot about a few of the projects I did this past year. Must be getting old ;)

The Two pillows I made for the vintage chairs in my Foyer were easy to make. I'm hoping to do a few more simple sewing projects in 2013.


Another easy project for January was a wood sign made from a leftover 2 x 6. 


The post on how to make Wax Paper Crayon Hearts was viewed 12,500 times. I was surprised at the count since it was such a simple craft.


I had fun making  some Valentine Hearts. These were made with vintage fabric that my grandmother made me a dress out of when I was 8 years old.

Raised beds  in our North Garden were finished in March.

My Wax Paper Transfer project was really fun. Thank you Graphics Fairy!


I made some Pretty Little Pillows for our daughter in California in June.


One of my favorite projects of the year was the Jewelry Organizer  Mr. Fanatic and I made for our youngest daughter.

I was so happy to show you our New Paint For The Family Room... It only took me several years to pick a color. lol.


Who doesn't love a super easy paint makeover? The Painted Side Table on our basement patio got a fresh coat of paint last summer.

Everyone seemed to love  Make A Basket From A Wine Box and Baskets Made From Cardboard Boxes, as they have been viewed over 59,000 times. Whooda thunk?


Spent some time in the kitchen sharing How To Dry Basil that I grew in my herb garden. I dried enough to last me until the next harvest. In just a few months, it will be time to start thinking about the Spring garden.


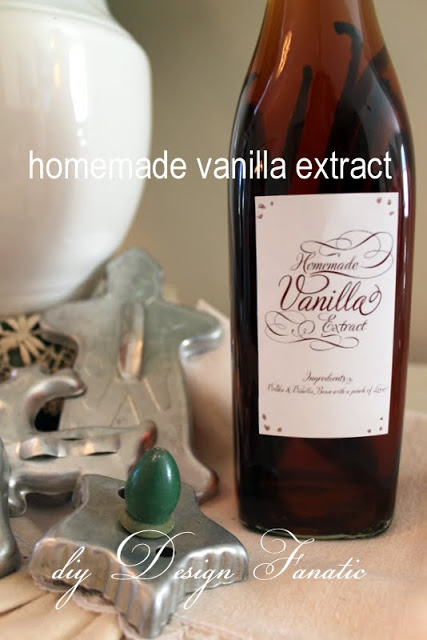
Making Homemade Vanilla Extract couldn't be easier. 

I must have struck a nerve in October with How To Store Your Stuff because it was clicked on 63,000 times. Guess there are lots of people who have a bunch of stuff to store!

We're all still loving the  Solar Tube Mr. Fanatic installed in our upstairs bath. The light it brings into the room is fantastic.

Finally, Christmas decorating in December. My favorite room to decorate is our Breakfast Room.


Fortunately for ya'll, I've left a few projects out, otherwise, we could be here for hours.

Even though we built our Barn Doors for the Basement, I haven't shared them yet because there's still a debate on diy Design Fanatic Facebook page and at Casa Fanatic about which door pulls to choose. I shared this photo the other day, which shows a peek of the Barn Doors in our Basement Family Room. Hopefully, you will see them all finished soon!

Thank you all for stopping by all these months and for leaving your nice comments. Ya'll are just too nice.
I am so grateful to have so many wonderful blog friends and I'm looking forward to "meeting" some new friends in 2013.

Happy New Year to you and your family!

Pam


Thursday, November 1, 2012

Dropped Ceiling For The Basement Storage Room

Wanted to share a good alternative to a sheetrocked ceiling in a basement storage room


As usual, we've taken a long time between having all this work done until finally finishing the ceiling. We do things as we have the time and money and since it's in the basement, and a storage room, it really affect how we live in the house. It took us 4 years to finish the basement family room and bathroom but this area only took a few years ;) So much for timeliness.
Sorry for the rabbit  trail!

Mr. F was going to leave the walls unfinished and just put the shelving up, but since we had a BUNCH of paint samples and some partial gallons, he decided to mix it all up and finish the walls. The containers shown in this pic were used for the undercoat, which turned out to be a beige color. The beige samples were purchased in my decision to find the perfect beige for our Family Room. He used my 10 assorted Benjamin Moore grey paint samples for the topcoat. The grey samples were left over from when I was choosing what color to paint our Kitchen. lol...anyone else have a problem deciding on paint colors?

Here's the room all painted.The color is perfect...not too light and not too dark. Sooo glad to have more room on. my paint shelves in the garage. hmmmmm


Now about the ceiling...
One great thing about having an unfinished basement is being able to get to pipes and wiring for the projects upstairs. Mr. F thought about leaving the ceiling unfinished like this for easy access, but he just couldn't do it because the walls looked so great, painted and all.
So, he decided to put in a dropped ceiling. There are some pretty fancy dropped ceilings out there, but this is a storage room after all, so we opted for the cheapest ceiling tiles. Sheetrock would have been a lot cheaper than a dropped ceiling, but we needed to have access to the pipes and wiring, especially if there's ever a problem, so it was worth the added cost to have access, but we weren't going to spend more money on fancy tiles. It's a fairly easy project. 
Mr. Fanatic started by putting up the tracks around the edge of the room.
The next step is to add the tracks lengthwise in the center.

Then he added the tracks that connected the lengthwise tracks.

The tracks are suspended by wire to the ceiling joists.


Once all the tracks are up, then the ceiling tiles are put in and sit on the tracks. You just push up on the tiles to get access to the ceiling.

Mr. F installed two can(pot) lights in the ceiling, which now looks clean and finished.


This storage room looks so clean and organized now and the drop ceiling allows for easy access to the pipes and wiring above....


We need to work on the Barn Doors for the Basement and finish up the Solar Tube Skylight, which is partially installed. 

So many projects, so little time.

What do you have on your project list and how do you prioritize it?

Pam

Monday, October 15, 2012

DIY STORAGE~ HOW TO STORE YOUR STUFF

*this post contains affiliate links...


 These DIY storage shelves are a really simple solution for storing your stuff easily and without breaking the bank. 
We all have things we need to store and keep  organized so we can find it when you need it. I've found that storing your things in  tubs on simple storage shelves made with 2 x 4s and OSB is the easiest and most efficient way to keep you storage accessible.

Being organized saves you money, because if you can't find your stuff when you need it, you will go out and buy another one...

So, how do you store your stuff?

storage, diydesignfanatic.com, storage shelves, diy storage shelves, basement storage, garage storage


Here are some tips on how to store your stuff:

1. Assess Your Space and stuff to be stored.
When organizing a room, I assess what is kept in the space. This means measuring everything. 

2. Build storage shelves to fit your stuff

This storage room had two storage shelves in it before, but the shelves weren't spaced correctly and stuff got piled up. 

The shelves didn't fit the stuff we needed to store and things got piled up
Mr. DIY took these shelves apart and reused the wood and OSB to make another shelf that fit our stuff. That's living frugally. (I know having all this stuff isn't living frugally, though)

storage shelves, diydesignfanatic.com, garage storage, basement storage


3. Store your stuff in containers with labels to make it look more organized

 I store almost everything in 18 gallon Sterilite (made in America) plastic tubs or totes. Most of my stuff fits in these plastic containers. There are also clear containers if you would like to see what's in them. 

Sterilite 18 gallon totes with lid


Sterilite 66 qt clear view totes with lid

Here's what the basement storage room looks like. The room is about 15 ft x 11 1/2 ft.
 

storage shelves, diy storage shelves, basement storage, garage storage


Mr. DIY reused all of the materials from the old shelving units and bought some extra 2 x 4's to make a 3rd shelving unit.
Even if you had to buy all of the wood, these shelves are still a cost effective way to store your stuff. Have you seen the price of sturdy shelving?

Here's how we made the shelving:
These shelving units are simple to make. He just used two  8 ft long 2 x 4's and cut two more 2 x 4's  down to 24" for the ends. The total length of the unit is 8ft, so the long 2 x 4's have to be cut down a little because you are adding the short 2 x 4's to the end. 
He screwed them all together as you see in this photo. Screws are so much better to put shelving together because this allows you to take them apart if you have to rework them another time. It would have been much more difficult to take apart the old shelves to make the new ones had he used nails.
Mr. DIY used torx head, 3" self tapping deck screws.
storage shelves, diy storage shelves, basement storage, garage storage

Mr. DIY then screwed  1/2" thick OSB  to the 2 x 4 frame. He made 3 of these for each unit. 
storage shelves, diy storage shelves, basement storage, garage storage

Then he attached 2 x 4's on each corner to complete the unit. The shelves are spaced the height of the plastic storage boxes we have plus 1 1/2 to 2" extra space.
These shelves are super easy to make and are inexpensive, as far as shelving goes.
storage shelves, diy storage shelves, basement storage, garage storage


 He made this shelving unit a little shorter so that the plastic storage containers could be double stacked on the top shelf. I organized this shelving unit to hold my girls childhood toys, books and clothing they wanted to keep.  The clear boxes on the bottom right hold their artwork and school mementos.
storage shelves, diy storage shelves, basement storage, garage storage


The shelving unit on other side of the room holds Christmas and seasonal decorations. The armoire holds hunting clothes and heavy winter coats. 
We found the Ikea Armoire on Craigslist.
storage shelves, diy storage shelves, basement storage, garage storage


storage, diydesignfanatic.com, storage shelves, diy storage shelves, basement storage, garage storage


It's such a good feeling to get all of my storage organized and 
If you don't have a basement and are limited on space, store stuff under beds, high up in closets, space under sofas, your garage and attic .


UPDATE:
 At our new house, Mr. DIY splurged a bit and installed cabinets to store most of his tools. You can see the post HERE
storage, diydesignfanatic.com, storage shelves, diy storage shelves, basement storage, garage storage


Mr. DIY Also installed a rail organizing system HERE
storage, diydesignfanatic.com, storage shelves, diy storage shelves, basement storage, garage storage


At our new house, we have a high crawl space instead of  a basement, so Mr. DIY built a different shelving system to store our stuff. You can see it HERE.
storage, diydesignfanatic.com, storage shelves, diy storage shelves, basement storage, garage storage

Where  do you store your stuff and how do you keep it organized? Leave me a short comment (or a long one) - I read every one!


Pam 


Click HERE to see how we cleaned up and organized our garage.  Our storage shelves above would we awesome in a garage, as well.
storage shelves, diy storage shelves, basement storage, garage storage


If you love organizing and functional,pretty storage, here's another great project we did in our oldest daughter's bedroom...
 We took a Craigslist Armoire and transformed it into lots of storage for our oldest daughter. 

You can see the details by clicking HERE
organized armoire, jewelry armoire, diydesignfanatic.com, bling-eez,cottage, organization, organize


Disclaimer: The above post is how we made our shelves.  We don't take any responsibility for any errors or results obtained from using this information. When using power tools, use safety equipment.

*this post contains affiliate links, which means, I'll make a small commission should you purchase something from one of these links.