Showing posts with label Building project. Show all posts

Monday, February 12, 2018

How To Build A Trash & Recycle Bin Screen

*this post contains affiliate links...

How to build a trash and recycle bin screen, trash enclosure, trash screen, diyDesignFanatic.com


A few weeks ago, our town delivered a large rolling recycle bin the size of our trash can. We had a small enclosure to hide the single trash bin, but  with the addition of another rolling bin, the enclosure wasn’t large enough to accommodate both and a new enclosure was needed.

Here are the supplies needed and how to make one if you find yourself in need of a trash and recycle bin enclosure:

Supplies
4 -  4x 4s 6 ft long
14 – 1 x 6s 8 ft long
3 – 2 x 4s 8ft long
Caps were made from scrap
you can purchase caps or make them from 1- 2 x 6 - 3 ft long
1 box 3” framing nails
3 - 4” long lag screws

MAKING THE ENCLOSURE FRAME:

DETERMINE THE WIDTH YOUR ENCLOSURE WILL BE
Measure your bins and add 2- 3 inches on either side- this will be your width.
Measure the depth of your bins and add 5 or 6 inches. This will be The length of your enclosure.
The width of our short side is 38 1/2”from the edge of the house to the outer edge of the 4 x 4 post.
The depth of our long side is 75 3/4” from the outer edges of the 4 x 4 posts.
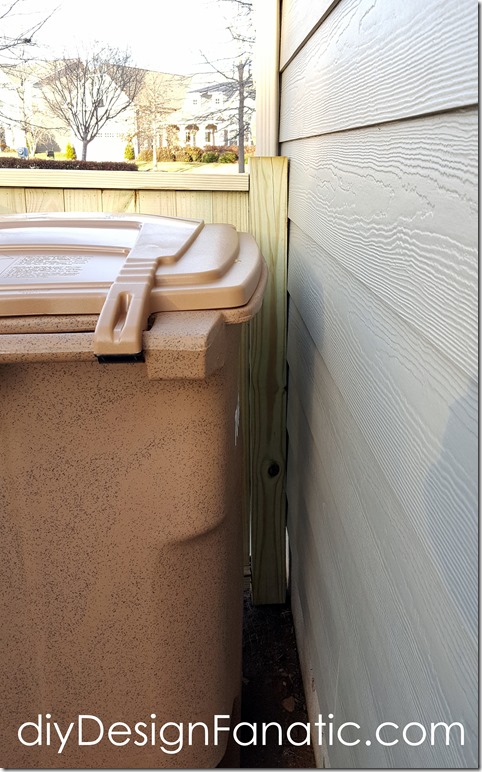
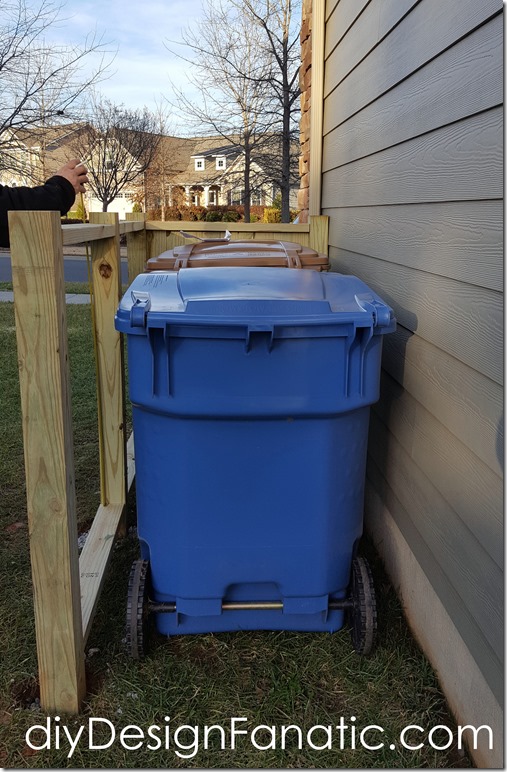
Trash & Recycle Bin enclosure, trash enclosure, trash screen, diyDesignFanatic.com


Trash & Recycle Bin enclosure, trash enclosure, trash screen, diyDesignFanatic.com


CUT THE POST THAT ATTACHES TO THE HOUSE
Our finished height is 47” without caps – 2” so that it doesn’t touch the ground
Attach above shortened post to the house with the 3- 4” lag screws (counter bored).

DIG HOLES FOR THE POSTS
Our posts are 35 5/8” on center.
After the post that attaches to the house was cut, a post hole digger was used to dig 3  holes 30” deep apx 8"-10” wide
Pour a couple of inches of gravel in the bottom and set the posts in the holes. Pour more gravel to hold them in place. Start with the one that attaches to the house, then lift (carefully) a little bit so that each post will be level with the others.
Trash & Recycle Bin enclosure, trash enclosure, trash screen, diyDesignFanatic.com


CUT CROSS BRACES
Cut the two that come out from the house 31 1/2” long each.
Cut four for the long side 32 5/8” each.
Then nail them in place using the framing nails.
The bottom brace is a couple inches from the ground about an inch and a half from the top. We have 39 1/2” between the braces.


Trash & Recycle Bin enclosure, trash enclosure, trash screen, diyDesignFanatic.com


Trash & Recycle Bin enclosure, trash enclosure, trash screen, diyDesignFanatic.com


CUT FIELD BOARDS
Cut field boards (out of 1 x 6 x 8s) to 39 1/2” long.
Then rip 9 of them lengthwise to 3 1/2” wide
Rip 18 of them lengthwise to 3 5/8” wide.
Trash & Recycle Bin enclosure, trash enclosure, trash screen, diyDesignFanatic.com


ATTACH FIELD TRIM
Cut out of scrap from cutting field boards – Rip 1/2” wide
2 piece 31 1/2”
4 pieces 32 5/8”
With 1 1/4” finishing nails, nail shorter field trim
to the top and bottom of the cross braces of the shorter side that extends from the house. Recess  the trim piece 3/4” from the face of outside of the cross brace.The field trim will hold the field boards in place)
Repeat the same process on the long side with the four 32 5/8” pieces.
All 3 panels should have trim pieces on the top and bottom.
Trash & Recycle Bin enclosure, trash enclosure, trash screen, diyDesignFanatic.com


INSTALL FIELD BOARDS
Short side of the frame –
Take the 9 – 3 1/2” wide field boards and place them one at a time, starting at the 4”x4” post attached to the house and nail in each end at an angle, toenailed, 2 nails on end of each board. If you find the last board too big to fit (nothing is ever perfect) then rip a little bit off lengthwise so it’ll fit, then nail it in place.
Long side – Same as above, but use the 3 5/8” boards. 18 total.
I found that my 4”x4” posts were not exactly upright and I had small (1/8” to 1/4”) gaps at each end of the field boards, so I ripped more 1/2” trim to attach vertically inside of each panel to cover these gaps.
I then ripped more trim pieces to nail along the tops and bottoms of the inside, to make sure the field boards would be held in place.


Trash & Recycle Bin enclosure, trash enclosure, trash screen, diyDesignFanatic.com


Trash & Recycle Bin enclosure, trash enclosure, trash screen, diyDesignFanatic.com


Trash & Recycle Bin enclosure, trash enclosure, trash screen, diyDesignFanatic.com


These are affiliate links, which means if you purchase something from one of these links, we'll make a small commission. Thanks!


MAKE THE CAPS
I took some scrap 2'”x6” I had and crosscut squares for the caps. We decided the flat edge would be 5/8” to I set my rip fence that far away from the blade. Then I angled the blade to 10 degrees to cut the tops to an angle.
Trash & Recycle Bin enclosure, trash enclosure, trash screen, diyDesignFanatic.com


I took some of the scrap from ripping the field boards and ripped that down to 5/8”x5/8” and then routed a nice edge on it and then using my miter saw I cut the trim pieces and tacked them on the bottom.
Trash & Recycle Bin enclosure, trash enclosure, trash screen, diyDesignFanatic.com


Another view of the trim attached to the bottom of a cap.
Trash & Recycle Bin enclosure, trash enclosure, trash screen, diyDesignFanatic.com


Right now the caps re just sitting on each post, but I’ll probably attach them with some liquid nails  just to keep them on!
The cap on the post attached to the house was cut off on one side so it would fit properly on that post.
Trash & Recycle Bin screen, trash enclosure, trash screen, diyDesignFanatic.com


how to build aTrash & Recycle Bin screen, trash enclosure, trash screen, diyDesignFanatic.com

How to build a trash and recycle bin screen, trash enclosure, trash screen, diyDesignFanatic.com


There it is – all finished. We will finish the enclosure when we have a week where it isn’t raining. We plan to finish it with an opaque stain to match the trim on the house.
If you will be needing on of these in the future, be sure to Pin one of the photos!

thanks for stopping by
Tim (aka Mr. DIY)


We recommend the below products because Mr. DIY uses Dewalt tools and absolutely loves the Rockwell 4 1/2" saw. Rockwell has excellent customer service!.

Rockwell 4 1/2" circular saw - find it HERE

These are affiliate links, which means if you purchase something from one of these links, we'll make a small commission. Thanks!


Disclaimer: The above post is about how we built our recycle and trash screen. We don't take any responsibility for any errors or results obtained from using this information. Using power tools can result in injury. When using power tools, use safety equipment.

Monday, February 20, 2017

How We Store Our Stuff (Now)

this post contains affiliate links*


How To Store Your Stuff is my number one post that is shared everywhere. It shows our diy Storage Shelves in the storage room in the basement of our last home . A basement is great for storage and that house had no lack of it, but many don't have a basement and need storage shelves in their garage. Some people have a shed where they store their stuff. The simple and inexpensive diy storage shelves can be adapted to fit any storage space. 

The Original:
 Mr. DIY built 2 of these super simple and inexpensive with OSB and 2 x 4s. You can find that post HERE.
storage shelves, diy storage shelves, basement storage, garage storage

Saturday, November 5, 2016

How To Make A Cat House/Side Table

Our cat Buddy has been enjoying the cat house Mr. DIY made for him a couple of weeks ago. He took to it right away and spends a lot of time in it snoozing the day away. The side table really is nice to have on the days I spend outside on the porch. The days have been so beautiful lately that I've been out there a lot and it's so wonderful to have a table to set my drink or snacks on.
cat cave, cat house, cat house side table, side table, cottage, farmhouse, diy, diyDesignFanatic.com

The cat house took Mr. DIY a whole day to build. The painting and staining took several days more.
First, the sides, front, back and bottom were cut out of 3/4" B/C plywood.
cat cave, cat house, cat house side table, side table, cottage, farmhouse, diy, diyDesignFanatic.com


With the help of a Kreg Jig,  pocket holes were drilled to connect them all together with screws.  
cat cave, cat house, cat house side table, side table, cottage, farmhouse, diy, diyDesignFanatic.com


cat cave, cat house, cat house side table, side table, cottage, farmhouse, diy, diyDesignFanatic.com


Wood glue was applied to all joints.
cat cave, cat house, cat house side table, side table, cottage, farmhouse, diy, diyDesignFanatic.com


The entrance doorway was cut with a saber saw before all the sides were put together...
cat cave, cat house, cat house side table, side table, cottage, farmhouse, diy, diyDesignFanatic.com


Cleats were screwed around the sides for the shelf to rest on, but to also allow it to be removed for easy cleaning.
cat cave, cat house, cat house side table, side table, cottage, farmhouse, diy, diyDesignFanatic.com


cat cave, cat house, cat house side table, side table, cottage, farmhouse, diy, diyDesignFanatic.com


The legs were made with 1x3's -one side is cut one down so each leg would be symetrical, then nailed together.
cat cave, cat house, cat house side table, side table, cottage, farmhouse, diy, diyDesignFanatic.com


The legs were attached with glue and 4 screws; 2 on each side.
cat cave, cat house, cat house side table, side table, cottage, farmhouse, diy, diyDesignFanatic.com


The top was made from 2x3's attached together with a Kreg Jig, then sanded smooth. Simple hinges on the back allow access to the inside for storage and cleaning.
cat cave, cat house, cat house side table, side table, cottage, farmhouse, diy, diyDesignFanatic.com


Cleats on the bottom side of the top were attached for rigidity and so it wouldn't warp.
cat cave, cat house, cat house side table, side table, cottage, farmhouse, diy, diyDesignFanatic.com


The top was stainedwith Olympics Mountain Cedar and the bottom painted with Valspar "Blackstrap".
cat cave, cat house, cat house side table, side table, cottage, farmhouse, diy, diyDesignFanatic.com


cat cave, cat house, cat house side table, side table, cottage, farmhouse, diy, diyDesignFanatic.com

Buddy loves his new house! It's going to keep him warm on those chilly days coming up when he wants to be outside.


Hope you have a great weekend!

Pam
Dimensions are : Total: 19 1/4" wide, 24" deep and 21" high The box is 18" wide, 21" deep, 20 1/2" high The top is 19 1/4" wide, 22" deep and 1/2" high

*this is how we made our cat house/side table. . We don't take any responsibility for any errors or results obtained from you using this information. Using power tools can result in injury: be sure to wear safety equipment when using them.

Thursday, October 27, 2016

Outdoor Side Table/Cat Cave

Hello Friends!

We are enjoying warm sunny days with lovely cool breezes here in the Carolinas and soon the weather will turn cold.

Our cat Buddy loves to spend his days out on the screened porch rather than being cooped up in the house. Knowing that cooler days are coming, I designed a "cat cave" for him so  he could keep warm on those cooler days. Mr. DIY loves building things and he got right to it. 


The screened porch also needed a side table to put our drinks on so it was designed it with more than one function.


As you can see, there's a hole in the back of the cat cave. The hole is for the cord to an outdoor heating mat made for this very purpose- to keep animals toasty warm outdoors during the winter. 

Here's Kitty checking out Buddy's new cat cave.


After Mr. DIY built the cat cave/side table, I finished the main part in Valspar's Blackstrap in a Satin Finish. The top is stained with Olympic Elite Mountain Cedar with some Polycrylic by MinWax on top of the stain. The Polycrylic helps seal the surface so things won't stick to it. 


Here, you can see that the top is hinged for easy cleaning. Mr. DIY made the cat cave/side table to fit the heating mat.


There's also a little place to store things. This photo was taken before the top was attached.


We'll be ready when the weather turns cold and Buddy will be able to stay warm in his new cat cave.


I'll share how Mr. DIY built the cat cave/side table next time.


Thanks for stopping by!

Pam

You can see how Mr. DIY made Buddy's Cat Cave HERE.

This is the heating pad I purchased for Buddy's Cat Cave. It is a really soft heat and doesn't get too hot.

*this is an Amazon affiliate link. I will make a small commission if you purchase something from this link, but it doesn't change your price. 

Saturday, August 30, 2014

Building A Woodshed

*this post contains affiliate links

While I was in Southern California last week helping my dad, Mr. DIY went to the Mountain Cottage and built a big woodshed on the weekend for all the firewood we have. It took a lot of wood to build the woodshed and he had to make several trips to get it all up there.
As I've said before, PLANNING IS KEY. It's best to draw out your building project to scale before you set out to buy your supplies.
Mountain Cottage, building a wood shed, build a wood shed, diy, cottage, diyDesignFanatic.com


Monday, July 28, 2014

DIY Pottery Barn Inspired Medicine Cabinet

Well,  the worlds smallest half bath at the mountain cottage is fully functional! 

YAY!!!

Mr. DIY installed the sink, countertop and faucet last week and the little bathroom is open for business. 
(no pun intended)

There are a few more details that need to be finished up, so I can't show you the whole bathroom just yet. The wood apron on the underside of the countertop, a fabric skirt needs to be made and hung  and a doorway needs to be painted. 
In the meantime, I can show you an awesome storage detail I designed (and painted and stained) and Mr. DIY constructed... 


...a custom framed medicine cabinet...
custom medicine cabinet, Mountain cottage, mountain cottage upstairs bathroom, wood project, Building project, diyDesignFanatic.com


Adding storage to every room is one of our highest priorities as we renovate the Mountain Cottage.
I figured we could build a deep medicine cabinet set into the wall and make it pretty with a stained framed mirrored door. 

Our inspiration came from Pottery Barn. 
custom medicine cabinet, Mountain cottage, mountain cottage upstairs bathroom, wood project, Building project, diyDesignFanatic.com

(This mirror is no longer available)


Mr. DIY started out using the table saw to make the frame for the mirror out of   1 x 4's. The wood was trimmed down to 3" wide. 
Grooves( a dado) were cut around the frame - allowing the mirror to sit flush in the framed door
Pottery Barn inspired,  medicine cabinet, rustic, farmhouse style, farmhouse, cottage, cottage style, diy

Pottery Barn inspired,  medicine cabinet, rustic, farmhouse style, farmhouse, cottage, cottage style, diy

4 pieces of wood were put together to make the frame for the mirror using screws in pocket holes make with the Kreg Jig. 


Then the mirror was glued in place using construction adhesive.
Pottery Barn inspired,  medicine cabinet, rustic, farmhouse style, farmhouse, cottage, cottage style, diy


The adhesive was smoothed out with a putty knife so that the hardboard would fit in the groove and tightly against the mirror. 

Pottery Barn inspired,  medicine cabinet, rustic, farmhouse style, farmhouse, cottage, cottage style, diy


The Kreg jig was used to create pocket holes so that  the four sides could be screwed together Construction adhesive was used to to glue the mirror into  the frame frame and then to attach hardboard to strengthen and protect mirror
Pottery Barn inspired,  medicine cabinet, rustic, farmhouse style, farmhouse, cottage, cottage style, diy


Here's how the back of the framed mirror looked at this point. 
Pottery Barn inspired,  medicine cabinet, rustic, farmhouse style, farmhouse, cottage, cottage style, diy


The box is just 4 pieces of 1 x 6" cut down to 5" deep.  The Kreg Shelf Pin Jig was used to make holes so that the shelves could be adjustable. 
Pottery Barn inspired,  medicine cabinet, rustic, farmhouse style, farmhouse, cottage, cottage style, diy
You can find the Kreg Shelf Pin Jig HERE


Pottery Barn inspired,  medicine cabinet, rustic, farmhouse style, farmhouse, cottage, cottage style, diy


Here's the medicine cabinet box after a hardboard back had been put in. You can see the shelf pin holes drilled in the sides. The box was primed and painted with several coats of white paint
Pottery Barn inspired,  medicine cabinet, rustic, farmhouse style, farmhouse, cottage, cottage style, diy

The framed mirror door is ready to be stained and the back painted. 
Pottery Barn inspired,  medicine cabinet, rustic, farmhouse style, farmhouse, cottage, cottage style, diy


We found a can of MinWax Provincial stain in the workshop at the mountain cottage and I applied several coats to the frame of the mirror. 
Pottery Barn inspired,  medicine cabinet, rustic, farmhouse style, farmhouse, cottage, cottage style, diy


I thought the stain wasn't quite right next to the countertop, so I bought a can of Rust-oleum Driftwood stain and applied a couple of light coats on top of the Provincial stain. 
It was perfect!
A couple of coats of clear poly was applied over the stain. 
Pottery Barn inspired,  medicine cabinet, rustic, farmhouse style, farmhouse, cottage, cottage style, diy


We didn't like the look of the back of the door because of the gap between the hardboard and the frame and the pocket holes at the top an the bottom,
Pottery Barn inspired,  medicine cabinet, rustic, farmhouse style, farmhouse, cottage, cottage style, diy


 so Mr. DIY found some wood scraps in the woodshed at the mountain cottage and glued them onto the back of the door. I stained the pieces of wood after they were attached. 
Pottery Barn inspired,  medicine cabinet, rustic, farmhouse style, farmhouse, cottage, cottage style, diy

Here's the finished product!
Pottery Barn inspired,  medicine cabinet, rustic, farmhouse style, farmhouse, cottage, cottage style, diy
You can't tell from the photo, but the Provincial stain come through in the knots in the wood and is the color the countertop is stained. (If you follow me on Facebook or Instagram, you've seen how beautiful it turned out)


The door is attached with two 12" x 3/4" piano hinges
The medicine cabinet box is 22 wide x 28 high x 5" deep. 
That's 2.77 square feet of storage!

Pottery Barn inspired,  building project, medicine cabinet, rustic, farmhouse style, farmhouse, cottage, cottage style, diy

Mr. DIY attached a magnetic catch in the lower left corner of the inside of the medicine cabinet.
Pottery Barn inspired,  building project, medicine cabinet, rustic, farmhouse style, farmhouse, cottage, cottage style, diy


Pottery Barn inspired, building projects,  medicine cabinet, rustic, farmhouse style, farmhouse, cottage, cottage style, diy

Our diy Pottery Barn Medicine Cabinet adds a good amount of storage in an otherwise wasted space.

What is one room in your house that could use more storage space???


Pam