Showing posts with label Farmhouse bed. Show all posts

Saturday, September 21, 2019

The Summer Ends Guest Room

I know today is the first day of Fall, but it still feels like late summer. The days are warm with low humidity and mornings and nights are cool. 
The next month are so is perfect weather, just like the end of Winter and the beginning of Spring. 
It's just the right time to get the house ready to transition into Fall....

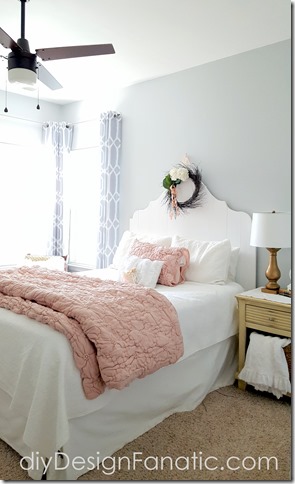
I love our guest room that overlooks the side and backyard. 
It's not too big and it's not too small. 
It has a large closet. 
The windows are in the corner and light comes in from 2 sides of the house. 
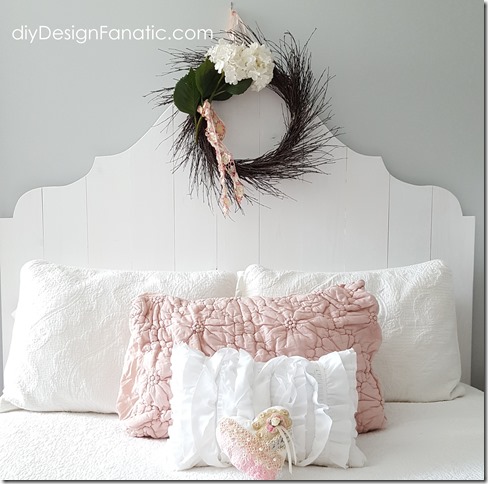
and it has the pretty curvy plank headboard that Mr. DIY made. 
This was our daughter Jenny's room when she lived with us and she picked out the paint, which is pretty and relaxing. 
The whole room feels comfortable. 
guest room, farmhouses bed, curvy farmhouse bed, curvy plank headboard,


guest room, farmhouses bed, curvy farmhouse bed, curvy plank headboard,


I love the curtains too.

guest room, farmhouses bed, curvy farmhouse bed, curvy plank headboard,


I recently found the white comforter at TJMaxx.com. I wasn't sure if I was going to keep it, but I think I will.
guest room, farmhouses bed, curvy farmhouse bed, curvy plank headboard,

I love the textured design. Plus it's soft. 
The textured design reminds me of bedspreads from when I was a child. 
You might call it vintage. 
guest room, farmhouses bed, curvy farmhouse bed, curvy plank headboard,

guest room, farmhouses bed, curvy farmhouse bed, curvy plank headboard,

The bed is really comfy. The mattress has a gel foam topper on it and it's super soft. 
guest room, farmhouses bed, curvy farmhouse bed, curvy plank headboard,

guest room, farmhouses bed, curvy farmhouse bed, curvy plank headboard,


One of these days, I'll get to painting the night table a different color. 
Sadly, so many projects have piled up in the past few years.
Yes, I said years!
guest room, farmhouses bed, curvy farmhouse bed, curvy plank headboard,
I'll make an announcement on my other blog soon with an update about why, but I'm not quite ready to do that just yet. 
I don't want to jinx it.

Thanks for stopping by!
Pam

Friday, January 11, 2019

Building Projects of 2018

Happy New Year everyone!
I don’t know about you, but for me, 2018 was a really tough year and I’m glad to be past it! 
If you’d like to know why, click on my other blog in the sidebar and I'll put a link at the end of this post (just did an update).
I am definitely looking forward to feeling well in 2019!
I’m also looking forward to this year because we have a new grandbaby and we have a wedding to look forward to. Being called a grandma is going to take some getting used to.
I’m really looking forward to being able to work on some projects – even if they’re small ones.


WHICH BRINGS ME TO THE BUILDING PROJECTS WE DID LAST YEAR

We actually did a few great ones!
The first and probably my favorite was the Gustavian Headboard.
farmhouse bed, plank bed, Gustavian headboard, cottage, cottagestyle


I love, love loved this project! It was super simple and very inexpensive.
The cost for the entire headboard was $75!!
farmhouse bed, plank bed, Gustavian headboard, cottage, cottagestyle

You can find out how to build one HERE if you missed it.


Our next building project was not so pretty, but oh, so functional.
Mr. DIY did a fabulous job building it, but really, who would refer to an outdoor trash screen as pretty?
Our town added a large recycle container and our flimsy, purchased lattice screen only hid the trash container,
so Mr. DY built  a double trash screen so they could both be stored outside. (our 2 car garage is too small to hold them)
farmhouse bed, plank bed, Gustavian headboard, cottage, cottagestyle


Mr. DIY painted it to match the trim on the house, but I don’t think I ever took a photo of it!
It’s kind of strange, but every time I pull up to our house I admire it – because Mr. DIY did, indeed, make our trash screen pretty! You can find that post HERE.


The next  building project we Mr. DIY accomplished in 2018 was the Custom Range Hood for our Mountain Cottage.
farmhouse bed, plank bed, Gustavian headboard, cottage, cottagestyle

Getting the Custom Range Hood finished for the kitchen at the Mountain Cottage was really exciting.
After the range hood was installed meant that I could get to the fun part of any project – accessorizing!
The kitchen is 99.9999% accessorized – I have the final and perfect accessory for below the hood and I can’t wait to put it up!
You can see how Mr. DIY built the Custom Range Hood (I finished it) HERE.


Our next building project in 2018 was the Custom Doors for the Workshop at our Mountain Cottage
farmhouse bed, plank bed, Gustavian headboard, cottage, cottagestyle

The crooked bench and rotted plank deck has since been replaced by some BEE U TEE FULL concrete. We hired that project out, but it is purdy.
You can see the Before and After post HERE.

Those are the building projects we finished in 2018. I was still able to do some sewing projects (even with brain fog) and some other craft projects last year.
Mr. DIY also has 2 other BIG building/reno projects he started last year, but will finish this year.
Those two projects are:
The View Porch Deck and Steps
farmhouse bed, plank bed, Gustavian headboard, cottage, cottagestyle

farmhouse bed, plank bed, Gustavian headboard, cottage, cottagestyle


and the downstairs bathroom…
farmhouse bed, plank bed, Gustavian headboard, cottage, cottagestyle
We think this bathroom will eventually be a laundry room, but we’re doing a mini makeover out of necessity,
because the floor was rotted away underneath the toilet.
There you have it…
Our building and reno projects for 2018.
Hoping that you have many successful projects in 2019! 

Pam

If you'd like to see an update on how I'm doing and see some pics of our recent trip to Southern California, click HERE


Friday, December 29, 2017

My Favorite Project From 2017

Hope you all had a wonderful Christmas and are looking forward to 2018! 

I know I am. 

This time of year it's good to look back and see all you've done throughout the year and to plan for the coming year. 

I'm glad I have a blog where I journal some of our projects for these 2 reasons:


1. We can look up how we did something or when it was done.
2. We can see that we really did accomplish something!

This year we've finished some really great projects at the Mountain Cottage.
We've spent a few years on it, but the Mountain Cottage Kitchen is finally coming together.
Here are a few of the projects we finished in the kitchen...

mountain cottage, Kitchen Reno, , drawer organizer, Gallery Wall, Open shelves, crown molding, banquette, Farmhouse bed, bridal shower,  diyDesignFanatic.com


mountain cottage, Kitchen Reno, , drawer organizer, Gallery Wall, Open shelves, crown molding, banquette, Farmhouse bed, bridal shower,  diyDesignFanatic.com


mountain cottage, Kitchen Reno, , drawer organizer, Gallery Wall, Open shelves, crown molding, banquette, Farmhouse bed, bridal shower,  diyDesignFanatic.com

You can see more details here:


Mr. DIY also finished the banquette seating in the kitchen at the Mountain Cottage...
mountain cottage, Kitchen Reno, , drawer organizer, Gallery Wall, Open shelves, crown molding, banquette, Farmhouse bed, bridal shower,  diyDesignFanatic.com


mountain cottage, Kitchen Reno, , drawer organizer, Gallery Wall, Open shelves, crown molding, banquette, Farmhouse bed, bridal shower,  diyDesignFanatic.com


Since our Mountain Cottage is tiny, we keep storage in mind in the design  of everything!
mountain cottage, Kitchen Reno, , drawer organizer, Gallery Wall, Open shelves, crown molding, banquette, Farmhouse bed, bridal shower,  diyDesignFanatic.com
You can see more about how Mr. DIY built the banquette at the Mountain Cottage here:


It seemed like we went without crown molding on the cabinets forever. What was the hold up? I decided there should be a wall cabinet to the left of the refrigerator to balance out the open shelves on the adjacent wall. Then, we had to order more crown molding!  We were warned that the finish probably wouldn't match the other cabinets because it had been over a year between  ordering, but the quality control at Kraftmaid Cabinetry is outstanding and there wasn't any difference. Wood finishes change over time, but our finish is paint, so there wasn't a problem. 
mountain cottage, Kitchen Reno, , drawer organizer, Gallery Wall, Open shelves, crown molding, banquette, Farmhouse bed, bridal shower,  diyDesignFanatic.com


mountain cottage, Kitchen Reno, , drawer organizer, Gallery Wall, Open shelves, crown molding, banquette, Farmhouse bed, bridal shower,  diyDesignFanatic.com


You can see more about how to install crown molding here:


Our daughter moved into her own apartment last June and Mr. DIY took some time out of our project list to build her a bed. I designed and finished it. 
mountain cottage, Kitchen Reno, , drawer organizer, Gallery Wall, Open shelves, crown molding, banquette, Farmhouse bed, bridal shower,  diyDesignFanatic.com


mountain cottage, Kitchen Reno, , drawer organizer, Gallery Wall, Open shelves, crown molding, banquette, Farmhouse bed, bridal shower,  diyDesignFanatic.com


mountain cottage, Kitchen Reno, , drawer organizer, Gallery Wall, Open shelves, crown molding, banquette, Farmhouse bed, bridal shower,  diyDesignFanatic.com


You can read more here:


Not a big project, but one that makes me happy when I walk into the office at our home is the Gallery Wall.  I love having my favorite artwork, and mementos up where I can see them. The bulletin board keeps me organized. I now keep my project designs pinned up and they're easy to find when Mr. DIY has time to make them
mountain cottage, Kitchen Reno, , drawer organizer, Gallery Wall, Open shelves, crown molding, banquette, Farmhouse bed, bridal shower,  diyDesignFanatic.com


mountain cottage, Kitchen Reno, , drawer organizer, Gallery Wall, Open shelves, crown molding, banquette, Farmhouse bed, bridal shower,  diyDesignFanatic.com

You can find out how I designed the Gallery Wall here:


Our daughter's best friend was married this year and she hosted a bridal shower at our home. I helped with the decorations.
mountain cottage, Kitchen Reno, , drawer organizer, Gallery Wall, Open shelves, crown molding, banquette, Farmhouse bed, bridal shower,  diyDesignFanatic.com


Here's a very beautiful and affordable floral centerpiece I made for the shower. 
mountain cottage, Kitchen Reno, , drawer organizer, Gallery Wall, Open shelves, crown molding, banquette, Farmhouse bed, bridal shower,  diyDesignFanatic.com


You can see more about the bridal shower here:


Ya'll know I'm an organizing nerd...or at least I want to be!

This is one of my favorite little projects of the year or ever. lol. 
mountain cottage, Kitchen Reno, , drawer organizer, Gallery Wall, Open shelves, crown molding, banquette, Farmhouse bed, bridal shower,  diyDesignFanatic.com


mountain cottage, Kitchen Reno, , drawer organizer, Gallery Wall, Open shelves, crown molding, banquette, Farmhouse bed, bridal shower,  diyDesignFanatic.com
I'll have another drawer organizer to share , hopefully next week! Oh, if only all my drawers looked this good!
You can see how Mr. DIY made this custom drawer organizer here:


We've done a lot more projects this year, but these are some of my favorite.
You can do a search for something in the Search Box on the right sidebar.

Many wishes for a prosperous, healthy and happy 2018!!!

Pam


Wednesday, August 9, 2017

Distressed Finish Farmhouse Bed

The Farmhouse Bed is finished and our daughter is enjoying sleeping in it in her new apartment!!!

If you remember, our daughter asked Mr. DIY to make her a queen sized bed. He made one for her in 4 days and it took me at least 10 days to finish it. 

We have dinner with our daughter once a week and take turns between her place and ours. It's pretty awesome having a grown up daughter who invites you over for dinner. 
Farmhouse bed, farmhouse style, farmhouse, Farmhouse headboard, cottage, cottage style, distressed headboard, diy, diyDesignFanatic.com


Friday, August 4, 2017

How To Create A Distressed Finish On A Farmhouse Bed

Mr. DIY built our daughter's Farmhouse bed in 4 days. I wish I could say it only took me finishing it! Even though I started on the finish the day after Mr. DIY finished the bed, it took me a good 10 days to get it the way I wanted it.

Getting the perfect distressed finish takes a lot longer than just painting it. There are so many distressed finishes out there, so I thought I'd finish a few samples and let our daughter choose one.


Farmhouse bed, distressed headboard, distressed finish, Farmhouse style, cottage style


I started out with two different wood stains. The one on the left is Minwax Jacobean. The one on the right is Rustoleum Driftwood with a little Jacobean mixed in. One of these would be the base coat.
Farmhouse bed, distressed headboard, distressed finish, Farmhouse style, cottage style


Once the base coat dried, I applied a thin, watered down paint (Lowe's Signature Ultra White in Satin). The sample of the right doesn't have any stain under it. I was hoping our daughter would pick that one since it would be a lot easier. I used some fine grit sandpaper to distress the samples. 
Farmhouse bed, distressed headboard, distressed finish, Farmhouse style, cottage style

 I thought I'd do one more  sample. The sample on the right is full strength paint over Jacobean stain. It looked a little more chippy.
Farmhouse bed, distressed headboard, distressed finish, Farmhouse style, cottage style

I was surprised when she chose the left one.


The funny thing is, (and I didn't realize it until just now) that I should have stained it with Jacobean and instead, I stained it with Driftwood, mixed with Jacobean. Oops!

The first thing I did was stain the back of the headboard...
Farmhouse bed, distressed headboard, distressed finish, Farmhouse style, cottage style


Then, the front.
Farmhouse bed, distressed headboard, distressed finish, Farmhouse style, cottage style


I didn't take a photo of it, but despite applying the wrong stain, I managed to finish the back side of the bottom of the headboard (the brace) and it turned our pretty close to the sample she picked. 
I don't think she liked the finish on the headboard though. When she saw the finish on the headboard, she said that she could always paint it white at another time.
Farmhouse bed, distressed headboard, distressed finish, Farmhouse style, cottage style

I took that to mean she'd like the paint to be whiter. So, I applied 2 thin coats of watered down paint, plus a dry brush coat. I applied this to the frame of the headboard and what I call the brace (below the headboard)
Farmhouse bed, distressed headboard, distressed finish, Farmhouse style, cottage style


The frame has 2+ coats and the center has only 1.
Farmhouse bed, distressed headboard, distressed finish, Farmhouse style, cottage style

It almost looks like the headboard has just been painted at this point, but the grain of the wood still shows through a bit.
Farmhouse bed, distressed headboard, distressed finish, Farmhouse style, cottage style

Once I got the right brightness, I started distressing with fine grit sandpaper.
Farmhouse bed, distressed headboard, distressed finish, Farmhouse style, cottage style


After sanding and removing all the sanded bits, I applied more stain to the sanded spots.
Farmhouse bed, distressed headboard, distressed finish, Farmhouse style, cottage style

Farmhouse bed, distressed headboard, distressed finish, Farmhouse style, cottage style


I didn't like the stain on the paint, so I sanded a bit more, 
Farmhouse bed, distressed headboard, distressed finish, Farmhouse style, cottage style


Then, applied more paint over those spots using a very small amount of watered down paint and with a dry brush.
Farmhouse bed, distressed headboard, distressed finish, Farmhouse style, cottage style


Perfect!
Farmhouse bed, distressed headboard, distressed finish, Farmhouse style, cottage style

I finished the headboard with a coat of clear Polycrylic Satin.

I applied the same technique to the side and foot rails. The whole process took about 10 days. 
Even though the finish on the bed was a little different than the sample, it turned out great!
Farmhouse bed, distressed headboard, distressed finish, Farmhouse style, cottage style


Hope you'll stop by next time to see how the bed looks in our daughter's apartment!

UPDATE: you can see the finished bed HERE.

Pam
these are affiliate links, which means that if you purchase something through these links, I will make a small commission. 

Disclaimer: The above post is about how we built our farmhouse bed. We don't take any responsibility for any errors or results obtained from using this information. Using power tools can result in injury. When using power tools, use safety equipment.