*this post contains affiliate links
We are finally turning our attention to the
living room at our mountain cottage!
This room is pretty small even though it has a vaulted ceiling. I actually think the vaulted ceiling makes it feel smaller, almost like a chute. We must be one of the few couples who dislike having vaulted ceilings in our home and we plan to lower the ceiling to 9 feet and make a loft above. In the loft, we plan to leave the minimum code for ceiling height so that it doesn't qualify for another bedroom. Our septic only rated for a 2 bedroom and if we added another bedroom, we would have to upgrade it and that would cost $$$. Besides, this house needs storage and it needs an office, in case we decide to move here.
Back to the fireplace/living room project....
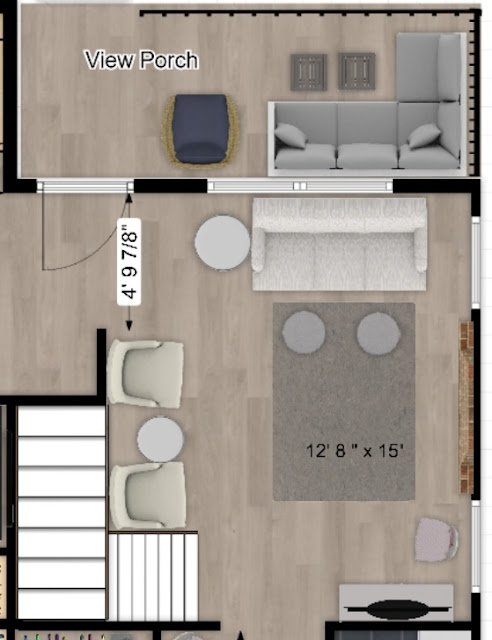
Here is the top view:
The fireplace demo is not pretty, so here's a rendering of how I envision the room .
Now the before pics:
This is entering the living room from the hallway:
Photo was taken when we first bought the house.
See how big that hearth is? I've wanted to remove that monstrosity from day one. The whole fireplace is horribly out proportion for the small room, but we'll fix that!
This photo shows how small the footprint of the room really is.
We had plans to knock down both the hearth and the brick in the firebox and install a wood stove. We've since changed our minds as we really are too old to be chopping wood and building a fire every time we want one. Maybe 15 years ago, but not now. At our age, we just want to flip on a switch and enjoy the warmth.
Now the nitty gritty...
After disconnecting the gas line, Mr. DIY figured that the gas insert would be as simple as removing a few screws .
WRONG
When he took the front of the insert off, he found the box was cemented in when the bricks were laid and he wasn't sure how he was going to remove it.
He had to cut the flue pipe and had to cut the box out piece by piece with a reciprocating saw.
We had always thought that since the house has a full chimney and the brick extends all the way down into the 6 ft high crawl space, that the original owners had a working fireplace, but got tired of it and later installed the gas insert.
NOPE
The firebox wasn't even finished.
This is how it looked after the gas insert was removed.
I stayed home the weekend he did the next part...
Mr. DIY rented a jackhammer for the day and removed the hearth.
We weren't sure if the bricks would easily (I say that relatively) come out or not at all, so he removed a few by hand with a chisel on a weekend we were both up there. Thankfully, the bricks weren't too difficult and he was sure he could remove it.
Mr. DIY said this demo was a VERY physically hard day. First jackhammering it out, then loading up a wagon with the bricks and taking them outside. If he had known it was going to be that exhausting, he would have hired a helper!
Almost there...
Finally, the hearth was completely removed, but brick dust was everywhere in the living room. Thankfully, he had taped off the kitchen and covered all the furniture, to minimize the dust.
Here's the plan:
Hearth is removed, but the firebox height remains. When I was looking for inspiration, I found that many modern fireboxes are raised like this instead of being at floor level. Love that.
We're planning on light manufactured stone and a wood mantel.
Our backup plan in case the brick hearth was too difficult to remove.
Thankfully, it wasn't. The hearth is wayyyyyyyy too large for that small living room.
We don't plan to DIY this whole project ourselves. We've already gotten a reasonable quote from a local company to do install the gas insert. We also know we'll be hiring a good stone installer too.
Here's the holdup: I want the non-structural beams to be removed before the fireplace insert is installed.
We'll be getting an estimate for removing those, and at the same time, we're getting a quote for adding the framing for the loft. We can do the finish work.
We are so excited to get to this far on the house.
It will be so nice to work on this room.
If you'd like to see the other projects and rooms that we've renovated, you can find them HERE.
Thanks for stopping by
Pam
*this post contains affiliate links, which means I'll make a small commission should you purchase something from one of these links.


Wow that is quite an undertaking! It’s going to be great. You always have great vision!
ReplyDeleteIt really was! We thought it would be so simple to take out the insert. At least the hard work is done. We will get back at it next month.
Delete