Friday, May 2, 2025

Mountain Cottage Kitchen Reno 2.0

WHAT?
Our kitchen was one of 3 interior rooms that was completely finished. It took quite a few projects/years to get it to look like this: plank ceiling, custom range hood, installed cabinets, fabricated and stained countertop, vintage pantry, fabricated and installed open shelves, tile backsplash  and banquette. 
It took us several years to do the kitchen projects' the only thing left to do was the floor.
It was pretty wasn't it?
Kitchen reno


Especially, considering how it looked when we bought the place.

kitchen reno, Shenandoah cabinetry, Plumbing leak


Last month, we arrived at our mountain cottage and found there was water on the floor. Turns out the faucet had leaked into the cabinet, under the flooring in the kitchen, under the flooring in the adjoining bedroom and even into the encapsulated crawl space. Thankfully it didn't reach the banquette.
Mr. DIY cut a hole in the bottom of the sink cabinet and, yes, it was wet and all the bottom of the cabinets were damaged. 

The next day, I called our State Farm agent. They called Emergency Restoration Experts who arrived two hours later and sprayed the kitchen with an anti microbial and turned fans on.

I cried when we left after a couple of days and then I got to work redesigning the kitchen and looking at LVP flooring.

Here's what I came up with:
kitchen reno, Shenandoah cabinetry, Plumbing leak


This design shifts the refrigerator to the right and gives us a little more counter space (13 more inches), gives us 3 more drawers and more wall cabinet space because they go to the ceiling. We'll be getting 2 rollout trays in the 24" cabinet to the left of the range. 

The current cabinets are by Kraftmaid. The reason why we chose Kraftmaid the last time was because I wanted a pullout pantry. I tell you, THAT was an expensive cabinet. The problem with having a cabinet there is that it got hot during the summer because that corner of the house gets afternoon sun and we don't keep the AC on when we're not there. 

This time, I think we'll chose Shenandoah cabinetry (American Woodmark). They're good cabinets and offer a good selection. For this house, even the in stock cabinetry would be good enough, but in we need a 39" blind corner cabinet and they don't offer that size. 

More thoughts as I was deciding on a design:
The only time we use the 24" dishwasher is when we stay there a week, but we didn't want to not have one,  so we think an 18" dishwasher would be perfect. That gives us 6 extra inches for a cabinet. . I also don't feel that we needed the 15" pullout pantry (for the reason mentioned above) or the 1 1/2" refrigerator panel. Because of the extra space an 18" drawer bank would fit perfectly. Plus, there's 5+" space to the right of the refrigerator to stick a broom in and a folding step stool.
 
I think we'll have a quartz countertop installed. Mr. DIY is still working on the bathroom, so we'll be having the cabinets and countertop installed. 
The only project he will do is re-installing the range hood and possibly the backsplash, but that's it.
Mr. DIY is retired as of March 1st, but he already has enough projects.

The current flooring is sheet vinyl and it's throughout the whole house(except for the bathrooms), so all the flooring has to be replaced. We're going to choose Malibu Wide Plank French Oak in Alturas finish from the Home Depot. We'll have to order extra to finish the stairs and the upstairs bedroom. 

Malibu wide plank French Oak Alturas
Malibu wide plank French Oak Alturas from Home Depot


What do you think? Anything I forgot? Anything to add?

Thanks for stopping by,
Pam


Saturday, April 26, 2025

A Little More Organizing

This post contains affiliate links...


I don't know about you, but our pantry needs cleaning out and re organizing every couple of months. Cough, cough...
It's been longer than that! 
organization


Our pantry is really small, so we utilize the space on the back of the door, but I never liked the one we had that was on the pantry door when we moved into our house almost 9 years ago. 
Pantry organization, organization, organize your pantry

So, after looking on Amazon, I found a more functional and better looking back of the door organizer and ordered it.
After throwing a quite a few things away, and finding a more efficient home for a few other items, here's the after:


It's a little narrower, but it's deeper and our supplies fit better.  Plus, it has more baskets than our previous organizer.  You can find it on Amazon HERE
Pantry organization, organization, organize your pantry


Pantry organization, organization, organize your pantry


This shows the depth and height of the baskets.
Pantry organization, organization, organize your pantry


I bought another back of the door organizer for my "backup" supplements. I previously had them in a basket and I had a difficult time digging thru the basket to see what I had. Now, I can see what I have at a glance. Notice, I have a couple extra because I didn't know that I had a backup already. Oops.
Organizing my supplements this way was Mr. DIY's idea. I think it's a good one!

You can find this back of the door organizer HERE
Pantry organization, organization, organize your pantry


If you'd like an update on my health, stop by my other blog HERE. 

Thanks for stopping by today!
Pam


This post contains affiliate links, which means, I'll make a small commission should you click on the link and purchase something after clicking on one of these links.

Saturday, September 21, 2024

Perry Kitchen Makeover


*this post contains affiliate links...


I work with a very talented friend who renos houses in Colorado. I'm in North Carolina, so it's a rare treat when I get to see one of the kitchens I've designed fully finished. My friend sent me a link to the t
he house is currently up for sale in Denver Colorado. I'll link the house on the Realtor's website below.
Kitchen reno, shaker cabinets, hardwood, J&K cabinetry, Top Knobs Ascendra


The house didn't start out so pretty:
Kitchen reno, shaker cabinets, hardwood, J&K cabinetry, Top Knobs Ascendra


There's another closet just past this doorway, so I decided the pantry is where the refrigerator would go.
Kitchen reno, shaker cabinets, hardwood, J&K cabinetry, Top Knobs Ascendra


The kitchen is the tiny room with the tiled floor. Much of the dining room wall was opened up to make it appear larger.
Kitchen reno, shaker cabinets, hardwood, J&K cabinetry, Top Knobs Ascendra


Here's a top view of my design with notes for installation.
Kitchen reno, shaker cabinets, hardwood, J&K cabinetry, Top Knobs Ascendra


...and the Design Concept perspective of the new kitchen from the dining room:
Kitchen reno, shaker cabinets, hardwood, J&K cabinetry, Top Knobs Ascendra


And the after MLS photos of the kitchen:
Kitchen reno, shaker cabinets, hardwood, J&K cabinetry, Top Knobs Ascendra

Wall color is Benjamin Moore Chantilly Lace. Cabinetry by J&K Cabinets. Hardware is Top Knobs Ascendra.
Kitchen reno, shaker cabinets, hardwood, J&K cabinetry, Top Knobs Ascendra

The space didn't allow for a 15" trash can cabinet, so I this stainless steel with a foot pedal would fit nicely on the adjacent wall and not be in the way.
stainless steel trash can with foot pedal
                                          Link HERE


I felt the kitchen really needed cabinets on this wall to increase the kitchen storage . Placing the refrigerator in where the pantry was really made the kitchen seem so much larger.
*see that heat register? Something my friend had to deal with since it was in the way of installing cabinets on that wall. 
Kitchen reno, shaker cabinets, hardwood, J&K cabinetry, Top Knobs Ascendra

Kitchen reno, shaker cabinets, hardwood, J&K cabinetry, Top Knobs Ascendra


You can see how beautiful the house is on the Realtor Steve Kinney's listing HERE

Thanks for stopping by!
Pam


*this post contains affiliate links...which means I'll make a small commission should you purchase something after clicking on a link.

Before photos taken by 
Steve Kinney RE/MAX PROFESSIONALS 303-475-8200

Tuesday, June 4, 2024

Mountain Cottage Bathroom Update

 this post contains affiliate links


Slow and steady wins the race...

bathroom reno, bathroom,


Things progress slowly when one person only works two weekends(basically 3 days) a month and a week every 4 or 5 months ....but, it's getting there. 


Last time, the bathroom looked like this:

Framing, rough plumbing and electrical in, pocket door installed.


The bathroom looked like this the middle of March:


Most of the taping and "mudding" had been done by the middle of April.


Several weeks later after sanding, multiple coats of spackle(apply, let dry), then more sanding; the walls had 2 coats of white primer. (May 31st)


After going back and forth texting about the layout of the herringbone pattern last Saturday, most of the large whole tiles are down.
Mr. DIY would have made more progress had I been available earlier in the morning. (I was getting a 4 hour long NAD IV treatment at Icryo and the IV room doesn't have good WIFI reception. )


Meanwhile, I'm looking for some outdoor chairs for our front porch and screened in porch...

Click HERE for the link


Click  HERE for the link


I'm also looking for some durable modern Polywood Adirondack chairs for the Mountain Cottage patio we'll soon have installed.

 Which color should we choose?

Click  HERE for the link

Of course there's plenty else that needs to be done at the mountain cottage, such as mowing about 2 acres, tending to fruit trees, grapevines and blueberry bushes, fixing things that break and of course, cleaning up construction mess.


We're also hoping to get some concrete work done, which I posted about last time. Meeting up with contractors, getting a bid, all takes time...and Mr. DIY is basically doing all of this by himself, while working 50 hours a week and maintaining the house we live in. 


Despite all the work, Mr. DIY still says this is his happy place, especially when sitting on the porch and taking in the view.


Hope you're having a good week! 
Thanks for stopping by for the latest update on our Mountain Cottage Reno.

Pam

You can find more Mountain Cottage Reno projects on the right sidebar.

 this post contains affiliate links...which means I'll make a small commission should you purchase something after clicking on the link.

Monday, October 23, 2023

Mountain Cottage Bathroom Update


*this post contains affiliate links


Thought I'd give everyone an update of the progress of the mountain cottage en suite bathroom.
If you recall, I put together an inspiration board way back in the planning stage. Most of the fixtures have been purchased. The only thing different are the lights and the Shaker door has a horizontal rail. 
mountain cottage, bathroom update, porch makeover, diy
As of Sept 30th, we're  happy to say that Mr. DIY has finished all the framing, rough electrical, rough plumbing and insulation and has passed all of those inspections.

The bathroom currently looks like this:

mountain cottage, bathroom update, porch makeover, diy


mountain cottage, bathroom update, porch makeover, diy


mountain cottage, bathroom update, porch makeover, diy

The red door used to be the front entry door on the porch.

mountain cottage, bathroom update, porch makeover, diy


Just so you understand the layout, I've included a top view
mountain cottage, bathroom update, porch makeover, diy
Here are a couple of perspective renderings.
mountain cottage, bathroom update, porch makeover, diy


mountain cottage, bathroom update, porch makeover, diy

Now that all the inspections have been passed, Mr. DIY can start on finishing work: the flooring, drywall, install 3 doors, the vanity, toilet, lighting, heater, tile on the bath surround. Of course, that will be after Christmas and New Years....There's lots of Fall cleanup and chores to do. 

And, of course, I'm looking ahead to having the whole front third of the mountain cottage plan. The old bathroom will now become the laundry room and a new closet will be built in the foyer. This house will finally have the storage it needs. I'm not sure how the previous owners could live here full time with no linen closets and very little storage. 
mountain cottage, bathroom update, porch makeover, diy

We're also planning on having some concrete work done...
mountain cottage, bathroom update, porch makeover, diy

The new siding has been Zinssered and painted to match the house. One of these days, we'll choose a new color and repaint the whole cottage...and plant some new landscaping.
mountain cottage, bathroom update, porch makeover, diy

Now you're up to date on the Mountain Cottage bathroom project.
Thanks for stopping by,

Pam


*this post contains affiliate links which means I'll make a small commission should you click on the link and purchase something.

Wednesday, October 18, 2023

A Fairy Garden for our Granddaughter

 *this post contains affiliate links...


Several months ago, our daughter posted some photos of a family visit to a local spot in SoCal that had a fairy garden, that our granddaughter loved. That gave me the idea to put together a fairy garden at our house for when she came to visit. 
Of course, I started gathering inspiration for the fairy garden on Pinterest. You can find my Fairy Garden board HERE.
I also started gathering cute supplies on my Amazon Influencer's page. You can find it HERE. You can also see the Fairy Garden supplies I bought from Amazon BELOW.
I also found some cute things on Etsy, Factory Direct Craft . com and Hobby Lobby. 
And, of course, Mr. DIY made a few things.

fairy garden, miniatures, diy fairy garden, magical fairy garden


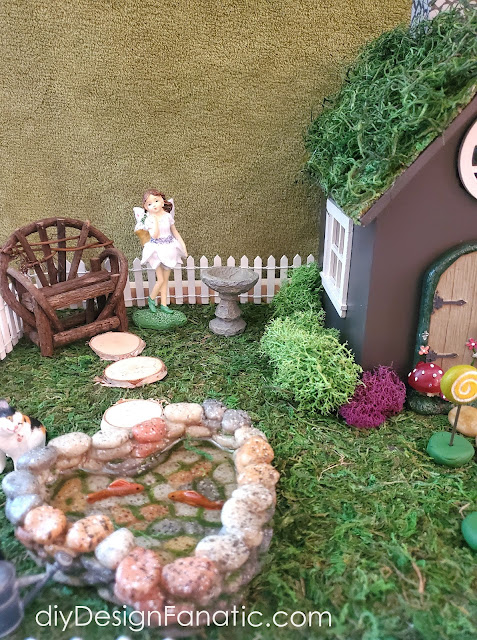
I first purchased a bird house, but it was too small, so I had Mr. DIY build a larger house out of scrap wood he had leftover from his many projects. I had him paint it with the same outdoor paint as our front door. I cut some moss mat to size and then added loose moss over that. Then, came the windows.
The door is from Hobby Lobby and it's not attached.


fairy garden, miniatures, diy fairy garden, magical fairy garden


fairy garden, miniatures, diy fairy garden, magical fairy garden

I used Sculpey clay for the bases of the signs. I formed the base, stuck the sign in to make a hold, then baked it according to directions. Once the clay was cooled, I glued the sign in the hole.

fairy garden, miniatures, diy fairy garden, magical fairy garden


I did the same for the lollypops...
fairy garden, miniatures, diy fairy garden, magical fairy garden


...and the mushrooms.
fairy garden, miniatures, diy fairy garden, magical fairy garden

Mr. DIY made the trays out of some scrap wood and I applied moss mat to it. The moss mat has a slightly sticky back to it.
fairy garden, miniatures, diy fairy garden, magical fairy garden


One tray wasn't enough, so I had Mr. DIY make a second tray. I used two of the many wood rounds we had from a tree we cut down at our mountain house. The wood rounds had previously been used to hold the centerpieces at our daughter's friend's wedding. 
fairy garden, miniatures, diy fairy garden, magical fairy garden

I found the bridge on the Hobby Lobby website.


fairy garden, miniatures, diy fairy garden, magical fairy garden

Instead of putting the Fairy Garden outside, I thought the fireplace hearth was the perfect place for it, just in case it rained or was too hot or the bugs were out. 
fairy garden, miniatures, diy fairy garden, magical fairy garden

Of course she loved it and has spent many hours playing with it rearranging it how she likes. 
I had a lot of fun too putting it all together. 

Thanks for stopping by,

Pam


Fairy Garden supplies found on Amazon:


 *this post contains affiliate links...which means I'll make a small commission should you click on the link and purchase something.