Showing posts with label diy. Show all posts

Monday, October 23, 2023

Mountain Cottage Bathroom Update


*this post contains affiliate links


Thought I'd give everyone an update of the progress of the mountain cottage en suite bathroom.
If you recall, I put together an inspiration board way back in the planning stage. Most of the fixtures have been purchased. The only thing different are the lights and the Shaker door has a horizontal rail. 
mountain cottage, bathroom update, porch makeover, diy
As of Sept 30th, we're  happy to say that Mr. DIY has finished all the framing, rough electrical, rough plumbing and insulation and has passed all of those inspections.

The bathroom currently looks like this:

mountain cottage, bathroom update, porch makeover, diy


mountain cottage, bathroom update, porch makeover, diy


mountain cottage, bathroom update, porch makeover, diy

The red door used to be the front entry door on the porch.

mountain cottage, bathroom update, porch makeover, diy


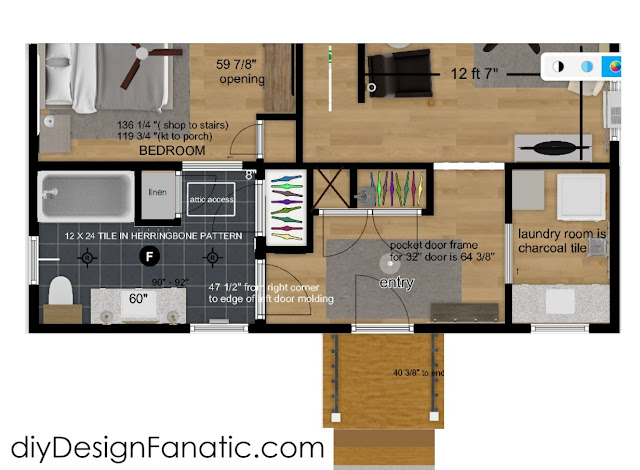
Just so you understand the layout, I've included a top view
mountain cottage, bathroom update, porch makeover, diy
Here are a couple of perspective renderings.
mountain cottage, bathroom update, porch makeover, diy


mountain cottage, bathroom update, porch makeover, diy

Now that all the inspections have been passed, Mr. DIY can start on finishing work: the flooring, drywall, install 3 doors, the vanity, toilet, lighting, heater, tile on the bath surround. Of course, that will be after Christmas and New Years....There's lots of Fall cleanup and chores to do. 

And, of course, I'm looking ahead to having the whole front third of the mountain cottage plan. The old bathroom will now become the laundry room and a new closet will be built in the foyer. This house will finally have the storage it needs. I'm not sure how the previous owners could live here full time with no linen closets and very little storage. 
mountain cottage, bathroom update, porch makeover, diy

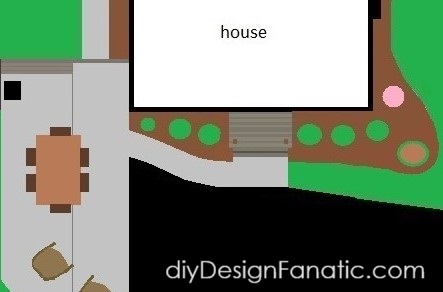
We're also planning on having some concrete work done...
mountain cottage, bathroom update, porch makeover, diy

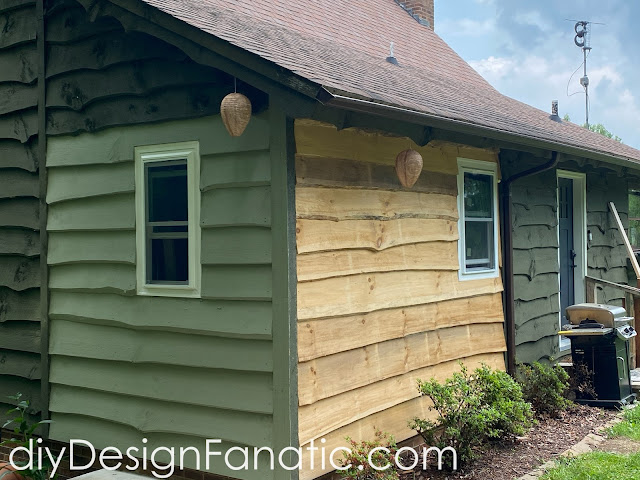
The new siding has been Zinssered and painted to match the house. One of these days, we'll choose a new color and repaint the whole cottage...and plant some new landscaping.
mountain cottage, bathroom update, porch makeover, diy

Now you're up to date on the Mountain Cottage bathroom project.
Thanks for stopping by,

Pam


*this post contains affiliate links which means I'll make a small commission should you click on the link and purchase something.

Wednesday, July 18, 2018

Solar Lights For The Deck Stairs

This post contains affiliate links, which means I'll make a small commission, should you purchase something through one of these links. 


Hey Friends!
I have a simple and relatively inexpensive (under $50) project to share with you today.
solar lights, stairs, diy, farmhouse, cottage, easy, amazon.com
We have a 6ft high crawl space below the main level of our home, so that means we have a few stairs to walk down to get to our backyard. Sometimes Mr. DIY needs to go down to the crawl space at night and those stairs are really dark  and there isn’t a light that shines onto that area, so we set out to do something about it.

I couldn’t take a photo of the stairs at night, because it was too dark, so here’s how it looked after the sun set over the trees…
solar lights, stairs, diy, farmhouse, cottage, easy, amazon.com
We planned to put a light on every other stair, one on the landings and two on the bottom stairs, for a total of 8.
solar lights, stairs, diy, farmhouse, cottage, easy, amazon.com

We ordered these stainless steel solar lights from Amazon:


Mr. DIY made a template out of paper, then pre-drilled some holes where each would go. Here’s what the back of the solar light looks like:
solar lights, stairs, diy, farmhouse, cottage, easy, amazon.com

Here’s the after:
solar lights, stairs, diy, farmhouse, cottage, easy, amazon.com
You can see how dark the stairs are in the following pic…

solar lights, stairs, diy, farmhouse, cottage, easy, amazon.com
It's a little brighter than this when the light on the screened porch is on.


We plan to install the two solar lights we have left at the mountain cottage steps. It’s super dark there when we arrive at night in the Fall. The solar lights will definitely help.
I’m so glad this easy project is finished. Now when we have to go down to the crawl space, the solar lights make it a lot safer!

Thanks for stopping by,
Pam

Monday, October 30, 2017

Making Wood Rounds


Jenny's friend Emily was planning her wedding over the summer and wanted some wood rounds for the centerpieces on the tables for the guests. 
wood rounds, mountain cottage, trees, cottage, cottage style, farmhouse, farmhouse style, diy, diyDesignFanatic.com

I looked high and low for her, desperately trying to find some inexpensive options online and in stores. I found these in HomeGoods, but they were a little pricey at 19.99. X 20 tables and it was a no go.
wood rounds, mountain cottage, trees, cottage, cottage style, farmhouse, farmhouse style, diy, diyDesignFanatic.com

Emily and Jenny thought we might be able to cut some rounds out of the large pile of huge, unsplit oak logs  at our mountain cottage, but most of the logs we had cut were missing the bark.

There are several smaller trees on our property that need to be cut down because in a few years. they'll block our much loved view.  We thought one of the tree trunks might be large enough in diameter and could be cut up in rounds. We hadn't planned on cutting down the trees, though, until the Winter after the leaves had fallen and most likely, not until next year. 

I wasn't sure we'd have enough time to fit that into the list of projects we needed to do, but Tim thought if Jenny, Emily and Aaron (Emily's fiancee) went up and helped him, they could get it all done that day.


Here's a pic of the trees that needed to take down. We thought that one of those trees was large enough to be cut up as rounds.They chose the tree below the arrow. It was a Poplar tree about 50-60 feet tall and only a few years old. Poplar trees grow FAST!
wood rounds, mountain cottage, trees, cottage, cottage style, farmhouse, farmhouse style, diy, diyDesignFanatic.com

Here's how it looks after the tree was cut down. Mr. DIY met Jenny and her friends at the Mountain Cottage on a Saturday and were able to get the job done. It was easy enough to cut the tree down, but getting the logs up the hill to the wood pile next to the driveway, took teamwork. Mr. DIY said he couldn't have gotten it done on one Saturday without their help. 
wood rounds, mountain cottage, trees, cottage, cottage style, farmhouse, farmhouse style, diy, diyDesignFanatic.com


Mr. DIY gave the larger rounds to Emily and Aaron for their wedding and brought home 5 of the smaller ones to me. I was thrilled. Here's how the rounds looked when he brought them home. They were pretty wet and the rounds were rough since they had only been cut with a chainsaw.
wood rounds, mountain cottage, trees, cottage, cottage style, farmhouse, farmhouse style, diy, diyDesignFanatic.com


I set them outside on the table on the screened porch. It was pretty humid over the summer and thought they would dry out slowly.
wood rounds, mountain cottage, trees, cottage, cottage style, farmhouse, farmhouse style, diy, diyDesignFanatic.com


Looking back, I would have stacked them up like this and wrapping them in muslin fabric so they would dry more slowly. You'll see in the next photo that the rounds cracked. I still like them though...
wood rounds, mountain cottage, trees, cottage, cottage style, farmhouse, farmhouse style, diy, diyDesignFanatic.com


Mr. DIY sanded the rounds down for me with a belt sander.  Note to self: do this outside and not in the garage! Dust was everywhere after sanding the first wood round! He sanded the rest outside in the backyard.  I left my wood rounds unfinished, but I might apply some poly in the near future.
wood rounds, mountain cottage, trees, cottage, cottage style, farmhouse, farmhouse style, diy, diyDesignFanatic.com

I used mine for Emily's shower that Jenny hosted at our house. You can see more about the shower HERE:
wood rounds, mountain cottage, trees, cottage, cottage style, farmhouse, farmhouse style, diy, diyDesignFanatic.com

I continue to use the rounds for decoration. Here, you barely see the round, but it raises the green plant to just the right height.
wood rounds, mountain cottage, trees, cottage, cottage style, farmhouse, farmhouse style


Thanks for stopping by!

Pam

Monday, September 18, 2017

How To Install Crown Molding On Full Overlay Cabinets

We spent a week at our Mountain Cottage a couple of weeks ago and one of the projects he finished was installing the crown molding on the cabinets. The cabinets we chose have a full overlay door style, which means that the doors and drawer fronts cover almost all of the 1 3/4" cabinet frame. 

Full overlay cabinet styles require a bit more work when installing crown molding.
Yep, that's just what Mr. DIY needs - more work.
Mountain Cottage Kitchen, white kitchen, Kraftmaid Cabinets, farmhouse kitchen, cottage kitchen, farmhouse sink, wood countertops, open shelves, subway tile, plank ceiling,  diy, diyDesignFanatic.com


Wednesday, September 13, 2017

Maintaining A Gravel Driveway - Mountain Cottage Upkeep

Owning a second home is all fun and decorating...

said no one ever.

There's mowing the lawn, painting, roof repair, fence repair, tree and shrub trimming, septic tank maintenance, and if you have a gravel driveway; driveway maintenance.
We looked into having asphalt installed, but it was $15,000 to $20,000 because our steep driveway is about 300 feet long with a big parking lot at the top. 


We haven't won the lottery yet, so we have to do  maintenance on our gravel driveway.

mountain cottage, cottage, farmhouse, driveway maintenance, gravel driveway, steep gravel driveway, diy, diyDesignFanatic.com


Monday, September 11, 2017

How To Dry Fresh Basil


Drying fresh basil is super easy!

Don't let that fresh basil you purchased for a special recipe go to waste in your fridge! Preserve it by drying it!
If you have an herb garden with fresh basil growing in it, preserve it now because the plant will die off when the weather turns cold!


cottage, cottage garden, farmhouse, harvest, how to dry basil, diy, diyDesignFanatic.com, kitchen


Wednesday, September 6, 2017

How To Make A Wood Drawer Organizer

Unorganized drawers drive me CRAZY.  


I hate highly dislike when you need a pen or pencil and you have to rummage through a pile of supplies until you find what you need. 

Maybe it's just me.

I love perusing The Container Store's website  dreaming of having perfectly organized drawers and closets.

Maybe it's just me.

The problem is...
Drawer organizers  don't always fit your needs perfectly and can be expensive!
I'm going to show you how we made a custom drawer organizer easily and how you can to- even if you don't use power tools. All you have to know how to do is how to use a hammer and pound in a nail!
drawer organizer, diy, build it yourself, cottage, cottage style, farmhouse, farmhouse style, diydesignfanatic.com

Wednesday, August 9, 2017

Distressed Finish Farmhouse Bed

The Farmhouse Bed is finished and our daughter is enjoying sleeping in it in her new apartment!!!

If you remember, our daughter asked Mr. DIY to make her a queen sized bed. He made one for her in 4 days and it took me at least 10 days to finish it. 

We have dinner with our daughter once a week and take turns between her place and ours. It's pretty awesome having a grown up daughter who invites you over for dinner. 
Farmhouse bed, farmhouse style, farmhouse, Farmhouse headboard, cottage, cottage style, distressed headboard, diy, diyDesignFanatic.com


Tuesday, August 1, 2017

How To Make A Farmhouse Bed

*this post contains affiliate links...

Our youngest daughter moved into her own apartment in June and asked Mr. DIY to make her a Queen size Farmhouse bed.
He stopped everything and got right on it. 
This bed requires a moderate level of skill to make and not for beginners.
diy Farmhouse bed, farmhouse bed, diy farmhouse headboard, farmhouse style, farmhouse, Farmhouse headboard, cottage, cottage style, distressed headboard, diy, diyDesignFanatic.com

This Farmhouse bed is a platform bed, which means you only need a mattress and don't need a box spring. We also built this bed higher than usual because our daughter wanted to store containers underneath.

Monday, December 26, 2016

Projects Of 2016

I hope you had a wonderful Christmas celebration yesterday with your family and friends!

The last week of the year is a good time to reflect on all the blessings that you've enjoyed and how far you've come.
When I look back at all we've accomplished this year, it amazing to me and it's only by the grace of God that we've accomplished it all. 

The first half of the year was spent getting our (previous) house in near perfect condition, staged and ready to sell. In 2015, we  anticipated putting the house on the market in May, so we had already started with lightening up the paint in the basement, master bedroom, laundry room and  office. In January of this year, things went into high gear and I worked nearly every day until May sanding and painting nearly all of the trim in the house, repainting the deck and just making everything look brand new. Mr. DIY  bought supplies on the way home from work and there was something to do every night. Getting a big house ready to sell is hard work. 

One big project Mr. DIY worked on was the Master Bath shower tile surround and repainting the Master Bathroom. I love how the frameless shower turned out and it was so easy to clean. 

We didn't neglect the outside of the house. I painted the front door and sidelights, as well as the shutters on the house and Mr. DIY painted the front porch posts. 
The front porch was staged with flowering plants, pillows a new front door mat, and a newly painted basket on the front door. 


When the professional photographer arrived in May, we were exhausted! Nearly every surface was touched up to look fresh, clean and updated. All our work paid off when we received multiple offers after two days of showings.
Brian Stogner

One of the most stressful projects of the year was packing up and moving. The stress of not knowing what would fit in our new downsized house and getting and moving out of a house you've lived in for 16 years and only having 45 days was overwhelming.

I wrote about our crazy, stressful move and gave you a peek at our new house.


Finding a house in just a couple of weeks that fit all of our needs and in the budget wasn't easy. We had put in an offer the previous day on another house when we viewed our current house and quickly rescinded that offer. I'm so glad because that house was a huge fixer and this one was only 2 years old. We were starting off with a clean slate, still a lot to do, but  it is mainly cosmetic, painting and organizing the closets.


The painting in our daughter's room started the day we took posession of our house and before our furniture arrived the next day. Mr. DIY installed cabinets in the laundry room the day the first week after we moved in. I haven't done a blog post on her room yet or the laundry room,  but thought they should be included.

Mr. DIY got busy right away transforming closets. There were plenty of closets, but all of them, including the pantry, only had 4 shelves in them. Mr. DIY started with the linen closet in the Master Bathroom. Lucky for us, it was about the same size as our last house, so all of our things fit right in once the adjustable shelves were added.

After the linen closet in the Master Bath, Mr. DIY added some extra shelving in the hall linen closet.


After that, Mr. DIY added shelves to the pantry in the kitchen and transformed a 2nd coat closet into more pantry space.

The organizing continued in the Garage... Since we were downsizing from a large, 3 car garage, to a small 2 car, Mr. DIY added a whole wall of cabinets.


The wire closet in our daughter's room was replaced with a custom closet that I designed and Mr. DIY installed. Our daughter loved it. 

Our new yard is really small compared to our last house and taking care of it has been so easy! Still, I had to plant an herb garden in our front yard. There will definitely be more landscaping projects for our backyard this Spring.

This brings us up to October.

 Phew!

 It's been one project after another!

In October, we hired a company to encapsulate our crawl space, which is tall enough for us to stand up in. Once encapsulated, would be a huge space to store all of our things that we previously stored in our basement. No blog post and no pics yet. Mr. DIY is finishing up the flooring and we still have to organize the containers on the shelving he built in the space. 

Since cold weather was coming up, Mr. DIY built our cat Buddy a cat cave for the Screened Porch because he spends most of his days out there. 

A fun little project I made for the screened porch was the Lighted Grapevine Orb.

Although, we didn't get a chance the first half of the year to do projects at the Mountain Cottage, we were able to do a few projects the 2 weeks we lived there in between house closings and we've been able to spend a few weekends there this Fall. We're looking forward to doing more projects there in the coming months.  We've finished the countertops and installed all of the subway tile. Mr. DIY still has to build open shelves, install crown molding, build a custom wood hood, custom banquette and a custom chandelier. After all of that, we'll be finished in the kitchen.

This brings us up to December, which is all Christmas decorating. We've still been organizing the crawl space and moving things from the garage to the new storage area. We had our 5th and final trailer/pod with all of our storage in it delivered at the end of September and all of that was stored in the garage. We only have a few more things to move and then we'll be able to park 2 cars in the garage! That is something we never had at our last house, even with a big 3 car garage!

I'm looking forward to 2017 with great anticipation.

May your home and family be filled with many blessings!

Pam

Here are all the links to the above projects...