Showing posts with label cottage kitchen. Show all posts

Wednesday, July 11, 2018

Mountain Cottage Kitchen Decor

Hello friends!
I said last week that adding decorative accessories is the best part of our kitchen reno. It really is!
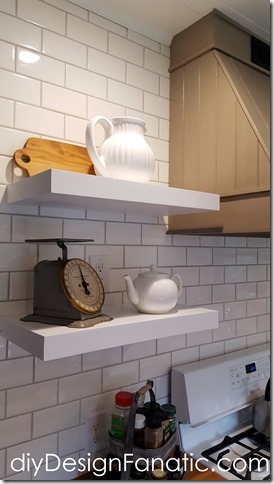
mountain cottage kitchen, farmhouse kitchen, open shelves, wood hood, cottage style, farmhouse style


After my last post, several more Amazon boxes arrived on our porch. The boxes arrived all on the same day and it was Christmas in July. 
I never know if I’m going to like something I haven’t seen in person, but as I opened each box, each item exceeded my expectations.


The first item was a wall clock. You might remember we previously hung a larger clock above the banquette.
Well, it didn’t look good there, so I ordered  a small one to hang above the door across from the banquette.
mountain cottage kitchen, farmhouse kitchen, open shelves, wood hood, cottage style, farmhouse style


So much better and easier to see from the banquette!
mountain cottage kitchen, farmhouse kitchen, open shelves, wood hood, cottage style, farmhouse style


It’s made of plastic, but  looks like distressed metal or wood.
mountain cottage kitchen, farmhouse kitchen, open shelves, wood hood, cottage style, farmhouse style


The space above the window looked like it needed something, so I found this cute sign. The word blessed is printed on grey fabric and sits in a distressed wood frame.
mountain cottage kitchen, farmhouse kitchen, open shelves, wood hood, cottage style, farmhouse style
sign


It’s perfect!
mountain cottage kitchen, farmhouse kitchen, open shelves, wood hood, cottage style, farmhouse style
The green wreath hanging in the window was also found on Amazon. 


I loved the little wood cutting board that was at the mountain cottage and wanted one for our home. I found this one, which is almost the same, except it’s a little darker.
I love it. Now I have a small wood cutting board for both places.
cutting board


 I originally bought this Gothic style faux window for our home, but I felt it would look great in the space above the banquette. I found it at a little shop near us several months ago. 
mountain cottage kitchen, farmhouse kitchen, open shelves, wood hood, cottage style, farmhouse style
The space between the two barn house lights will be next. It needs 3 or 4 smaller decor items since the thermostat is located in an odd space between the lights. We'll see what I can find.


Thanks for stopping by,

Pam


Saturday, June 16, 2018

Cafe Curtains For The Mountain Cottage Kitchen

This post contains affiliate links, which means if you purchase something from one of these links, I'll make a small commission. 

We spent the last week at the Mountain Cottage. Except for a couple of periods of rain, the weather was beautiful!

The week before, I spent several days sewing cushion covers and pillow covers for the banquette and Cafe’ curtains for the Mountain Cottage kitchen.
It feels so good to add some finishing touches  and softness to the kitchen.
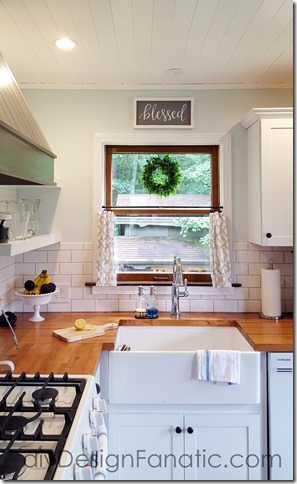
cottage kitchen, farmhouse kitchen, white kitchen, subway tile, wood countertops, cafe curtains

Sorry about the blue tape on the cabinet...Mr. DIY was touching up paint.
cottage kitchen, farmhouse kitchen, white kitchen, subway tile, wood countertops, cafe curtains

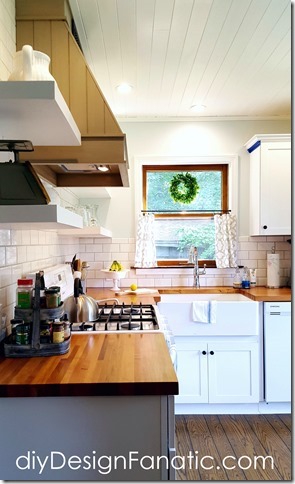
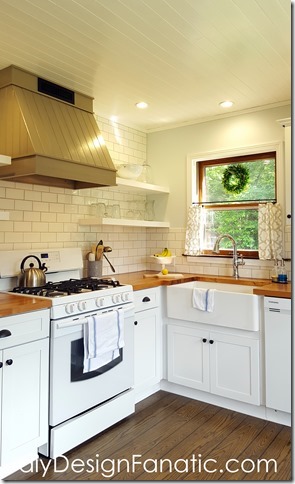
I'm loving how the range hood looks in the kitchen between the open shelves. 
cottage kitchen, farmhouse kitchen, white kitchen, subway tile, wood countertops, cafe curtains


The cafe curtains are very simple and are hung on a tension rod.
We found the tension rod at Lowes and found the fabric at Fabric.com 
cottage kitchen, farmhouse kitchen, white kitchen, subway tile, wood countertops, cafe curtains

I found the faux wreath for the window on Amazon.com. The link is below on the left.


cottage kitchen, farmhouse kitchen, white kitchen, subway tile, wood countertops, cafe curtains


Next time, I’ll share with you the cushion covers and the pillow covers that adorn the banquette!
Thanks for stopping by.

Pam


Monday, September 18, 2017

How To Install Crown Molding On Full Overlay Cabinets

We spent a week at our Mountain Cottage a couple of weeks ago and one of the projects he finished was installing the crown molding on the cabinets. The cabinets we chose have a full overlay door style, which means that the doors and drawer fronts cover almost all of the 1 3/4" cabinet frame. 

Full overlay cabinet styles require a bit more work when installing crown molding.
Yep, that's just what Mr. DIY needs - more work.
Mountain Cottage Kitchen, white kitchen, Kraftmaid Cabinets, farmhouse kitchen, cottage kitchen, farmhouse sink, wood countertops, open shelves, subway tile, plank ceiling,  diy, diyDesignFanatic.com


Saturday, July 22, 2017

Mountain Cottage Kitchen Reno - Built In Banquette Seating

I'm so excited to have this project finished! 


Mr. DIY did a great job building it and he did everything  from building to finishing. The only thing I did was design and consult on the design of the banquette.


Mountain cottage, diy Design Fanatic: Mountain Cottage Kitchen Reno - Built In Banquette Seating, cottage, cottage style, farmhouse kitchen, diyDesignFanatic.com

We've known from day one that we wanted a built in banquette in the kitchen at the mountain cottage. This is the only eating space in the house since there's no dining room. A banquette saves a lot of space and makes sense in a kitchen/dining room combination.
banquette, kitchen reno, cottage, mountain cottage, white kitchen, diydesignfanatic.com

After deciding how long and deep the seats were going to be, Mr. DIY taped it out on the floor just to be sure. (update):After taping the floor, he removed the baseboard heater and will install one to the left of the bench under the windows. 
banquette, kitchen reno, cottage, mountain cottage, white kitchen, diydesignfanatic.com

I really felt there should be a toe kick, so the banquette was made with a toe kick that would accommodate the existing baseboard in the kitchen.

We decided that the banquette would be 21" deep and 17 1/2" high and each seat would be 60" wide.
Since the top would be 3/4" thick and have an overhang, the box is 20" deep and 16 3/4" high, with a 4 3/4" high x 4"deep toe kick cut out. The boxes are made out of plywood.
banquette, kitchen reno, cottage, mountain cottage, white kitchen, diydesignfanatic.com


banquette, kitchen reno, cottage, mountain cottage, white kitchen, diydesignfanatic.com


Using his Kreg Jig, Mr. DIY covered up the toe kick space just so it would look cleaner and nothing would fall through.
banquette, kitchen reno, cottage, mountain cottage, white kitchen, diydesignfanatic.com


Then, he used 2 x 4s for the bracing. We reused these from another project.
banquette, kitchen reno, cottage, mountain cottage, white kitchen, diydesignfanatic.com


He had to cut around the outlets.
banquette, kitchen reno, cottage, mountain cottage, white kitchen, diydesignfanatic.com


banquette, kitchen reno, cottage, mountain cottage, white kitchen, diydesignfanatic.com


He then cut the tops out of plywood. The front and side overhangs are 3/4".
banquette, kitchen reno, cottage, mountain cottage, white kitchen, diydesignfanatic.com

He then cut  the board lengthwise at 2". In retrospect, 2 1/2" would have been better so they will stay open better on the window sill side. He will be adding a support hinge/lid stay later so that the tops will stay open and not fall on someone.
banquette, kitchen reno, cottage, mountain cottage, white kitchen, diydesignfanatic.com


He covered the unfinished edge of the plywood with 3/4" x 1/4" strips cut from 1/4" x 2 1/2" pieces of wood.


banquette, kitchen reno, cottage, mountain cottage, white kitchen, diydesignfanatic.com


He attached the tops with piano hinges.
banquette, kitchen reno, cottage, mountain cottage, white kitchen, diydesignfanatic.com


I wanted the front and sides of the banquette to look like the Kraftmaid cabinet doors, so, after marking where the "doors" would go...
banquette, kitchen reno, cottage, mountain cottage, white kitchen, diydesignfanatic.com


he cut the 1/4" thick poplar boards down to 2 1/4" wide and attached them to the box. At the ends, the sides where it meets the corner were cut down to 2", so that when the side panel was put on (which is 1/4" thick,) they would still be 2 1/4"
banquette, kitchen reno, cottage, mountain cottage, white kitchen, diydesignfanatic.com


He wrapped baseboard and 3/4" base shoe all the way around the banquette.
banquette, kitchen reno, cottage, mountain cottage, white kitchen, diydesignfanatic.com


Here's how clean the inside looks once it was primed and painted.  The tops of the braces and the top edge of the box, as well as the top of seats were finished with a coat of clear poly to minimize sticking.
banquette, kitchen reno, cottage, mountain cottage, white kitchen, diydesignfanatic.com


All finished!
banquette, kitchen reno, cottage, mountain cottage, white kitchen, diydesignfanatic.com

Today, Mr. DIY installed our new fan. I really wanted a square wood X chandelier and he was willing to make it, but our little cottage really needs a fan in the kitchen. I found the fan on Amazon and it is the perfect size (at 44") for the space.
banquette, kitchen reno, cottage, mountain cottage, white kitchen, diydesignfanatic.com


These are affiliate links, which means I'll make a small commission should you purchase through one of these links.


diy Design Fanatic: Mountain Cottage Kitchen Reno - Built In Banquette Seating, cottage, cottage style, farmhouse kitchen, diyDesignFanatic.com, white kitchen


My next project is to make the cushions and pillows for the banquette.
The fabric I wanted won't be in stock for another week, but I already have the foam for the cushions.

Can't wait to get it all finished. Now to find (or build) a table.

Hope you're having a good day!

Pam
Disclaimer: The above post is about how we built our banquette benches. We don't take any responsibility for any errors or results obtained from using this information. Using power tools can result in injury. When using power tools, use safety equipment.

Sunday, May 21, 2017

Mountain Cottage Kitchen Reno - Building The Floating Shelves

Mr. DIY wasn't so sure about building floating open shelves in the kitchen at the Mountain Cottage. I grew tired of him saying he didn't know how the shelves could be strong without having more studs to screw them into.
I never doubted he could build them.
I showed him multiple photos of other bloggers who had built them.

He still doubted.


I told them he could add shelf brackets for added support.

He still doubted.


Here's how he made them:

First, he cut 1 x 1s out of a piece of stock material he already had.
Open shelves, wood countertops, kitchen reno, mountain cottage, cottage style, cottage kitchen, farmhouse style, farmhouse, white kitchen, subway tile


Open shelves, wood countertops, kitchen reno, mountain cottage, cottage style, cottage kitchen, farmhouse style, farmhouse, white kitchen, subway tile

Frames for the shelves were made  out of 1 x 1s


Open shelves, wood countertops, kitchen reno, mountain cottage, cottage style, cottage kitchen, farmhouse style, farmhouse, white kitchen, subway tile


Shelves were then attached to the wall with 3" deck screws with a washer. Right return wall was attached with a molly bolt. Blue tape marks the studs.
Open shelves, wood countertops, kitchen reno, mountain cottage, cottage style, cottage kitchen, farmhouse style, farmhouse, white kitchen, subway tile


1/2" birch veneer plywood was attached top and bottom. They were glued and nailed with 1 1/4" brads. The stick makes sure it's level as the glue dries.
Open shelves, wood countertops, kitchen reno, mountain cottage, cottage style, cottage kitchen, farmhouse style, farmhouse, white kitchen, subway tile


After wrapping the edges with 1/4' thick poplar, the joints and nail holes were filled with wood putty.
Open shelves, wood countertops, kitchen reno, mountain cottage, cottage style, cottage kitchen, farmhouse style, farmhouse, white kitchen, subway tile


Open shelves, wood countertops, kitchen reno, mountain cottage, cottage style, cottage kitchen, farmhouse style, farmhouse, white kitchen, subway tile


Finishing is usually my job, but Mr. DIY primed and painted the shelves. He used Valspar Signature Ultra White in Satin. 
Open shelves, wood countertops, kitchen reno, mountain cottage, cottage style, cottage kitchen, farmhouse style, farmhouse, white kitchen, subway tile


Our not so secret weapon so insure shelves won't stick...We apply this to any horizontal surface where something will placed.
Open shelves, wood countertops, kitchen reno, mountain cottage, cottage style, cottage kitchen, farmhouse style, farmhouse, white kitchen, subway tile


I think the shelves turned out beautifully, don't you?
The shelves are very sturdy and strong and don't move when Mr. DIY yanks on them...
and set heavy bowls, pitchers and cake stands.
He's finally a believer!
Open shelves, wood countertops, kitchen reno, mountain cottage, cottage style, cottage kitchen, farmhouse style, farmhouse, white kitchen, subway tile


There are more photos HERE if you missed my post a few days ago.

Mr. DIY built the banquette this week. Here's a sneak peek...
Open shelves, wood countertops, kitchen reno, mountain cottage, cottage style, cottage kitchen, farmhouse style, farmhouse, white kitchen, subway tile, banquette
He finished constructing and adding the detail to the fronts and sides.
He should finish up painting the next time we come up. 
Then I'll have to make some pillows and cushions.
The hood is our last building project in the kitchen. 
We've been working on the kitchen reno for a long time and it will be good to get it finished!

Hope you have a great week!

Pam


Disclaimer: The above post is about how we built our floating shelves. We don't take any responsibility for any errors or results obtained from using this information. Using power tools can result in injury. When using power tools, use safety equipment.