Showing posts with label Mountain Cottage Kitchen. Show all posts

Friday, March 8, 2019

Mountain Cottage Kitchen

*this post contains affiliate links

Hello Friends! It's been awhile!

Our daughter, fiance and their baby flew out for a visit to help me celebrate my birthday a couple weeks ago. We spent time with our precious granddaughter and oh, is she growing fast and doing new things every day. 
Our youngest stayed over and it was nice having a full house for a change.


So much fun!

This past weekend, Mr. DIY and I (and our cat Buddy) drove up to our mountain cottage. 
Mr. DIY has been going up on many weekends to work on the downstairs  bathroom temporary reno.
I hadn’t been up to the cottage since October, so I was glad to get up there and organize a few things and put up some accessories that have been waiting for me.

I really love how our little cottage kitchen turned out and how all the different elements have come together: 
white cabinets, butcher block countertops, subway tile, open shelves, custom wood range hood, banquette, farmhouse accessories…and hopefully someday – a custom wood table and some french bistro chairs.
farmhouse kitchen, cottage kitchen, white kitchen, subway tile, custom range hood, open shelves, kitchen decor


After I removed a thick layer of dust on the floor and some furniture, I put up my lovely metal lemons sign from Shady Oaks Farm, and set out the white tea kettle I received for Christmas. 
I think it looks perfect.
farmhouse kitchen, cottage kitchen, white kitchen, subway tile, custom range hood, open shelves, kitchen decor


I looked for months for the perfect something to fit in the space between the range hood and stove. I finally bought a metal tray and after I received it I found the metal lemons sign. I loved it so much I had to order another one because I wanted one for the home we live in. 

Maybe someday we’ll install a backsplash at our house – if I ever decide on tile – it’s complicated because I really don’t like the granite the previous owners chose.
First world problems, I know.
farmhouse kitchen, cottage kitchen, white kitchen, subway tile, custom range hood, open shelves, kitchen decor


I just love the open shelves Mr. DIY built and installed. 
He’s going to build some for the bathroom.
farmhouse kitchen, cottage kitchen, white kitchen, subway tile, custom range hood, open shelves, kitchen decor


farmhouse kitchen, cottage kitchen, white kitchen, subway tile, custom range hood, open shelves, kitchen decor


farmhouse kitchen, cottage kitchen, white kitchen, subway tile, custom range hood, open shelves, kitchen decor


farmhouse kitchen, cottage kitchen, white kitchen, subway tile, custom range hood, open shelves, kitchen decor


Our cozy little mountain house kitchen makes me feel happy, especially with Spring so close and the flowering trees starting to bloom outside the kitchen windows.


Here are more projects from the kitchen reno.

Mountain Cottage Range Hood

Open Shelves


Built In Banquette

Plank Ceiling

Vintage Pantry


Pam


*this post contains affiliate links, which means I'll make a small commission should you purchase something from one of these links. 

Friday, June 8, 2018

Building A Custom Range Hood

Last time I showed you the custom range hood Mr. DIY build for our kitchen at the Mountain Cottage.
I can’t tell you how excited we are to have it finished!
cottage, white kitchen, mountain cottage, farmhouse style, farmhouse sink, wood range hood, open shelves, wood countertop, plank ceiling


Before the range hood was installed, there was a big empty space above the range, between the open shelves

cottage, white kitchen, mountain cottage, farmhouse style, farmhouse sink, wood range hood, open shelves, wood countertop, plank ceiling


According to the Samsung Range specs, any combustible material had to be at least 30” above the range grates. I designed and redesigned the hood a couple of times. I really wanted the hood to angle in on the sides, but since the ceiling is only 8 ft, it just didn’t look good.
When I finally decided I liked the way the 1/4 scale drawing looked, I had Mr. DIY build a mock up hood out of cardboard to see if I liked the way it looked.


cottage, white kitchen, mountain cottage, farmhouse style, farmhouse sink, wood range hood, open shelves, wood countertop, plank ceiling


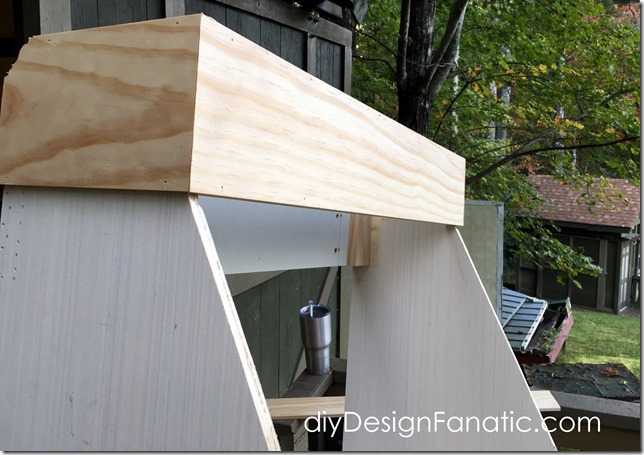
To build the box of the hood, he cut the sides out of 1/2 plywood.
cottage, white kitchen, mountain cottage, farmhouse style, farmhouse sink, wood range hood, open shelves, wood countertop, plank ceiling


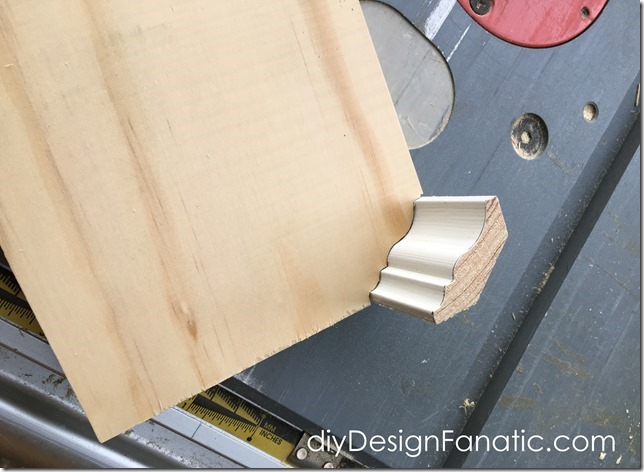
The small crown on the ceiling was already up, so he used a piece of the crown and coped the top/back of the hood box to match.
cottage, white kitchen, mountain cottage, farmhouse style, farmhouse sink, wood range hood, open shelves, wood countertop, plank ceiling 

The front cross pieces and the back cleats are cut from 3/4 plywood. cottage, white kitchen, mountain cottage, farmhouse style, farmhouse sink, wood range hood, open shelves, wood countertop, plank ceiling


Then, he glued and  nailed the s 4 s (3/8” x 4” wide ) over the top part from behind.
cottage, white kitchen, mountain cottage, farmhouse style, farmhouse sink, wood range hood, open shelves, wood countertop, plank ceiling


He did the same for the bottom.
cottage, white kitchen, mountain cottage, farmhouse style, farmhouse sink, wood range hood, open shelves, wood countertop, plank ceiling


Here’s how it look it looked when he finished.
The top part of the hood is 4 3/4”  to accommodate a vent grill and the bottom is 5 1/2”cottage, white kitchen, mountain cottage, farmhouse style, farmhouse sink, wood range hood, open shelves, wood countertop, plank ceiling


After that, he added S 4 S’s ripped down to 2 1/2"”
cottage, white kitchen, mountain cottage, farmhouse style, farmhouse sink, wood range hood, open shelves, wood countertop, plank ceiling


He used the miter saw to cut the planks on the angle.
cottage, white kitchen, mountain cottage, farmhouse style, farmhouse sink, wood range hood, open shelves, wood countertop, plank ceiling


cottage, white kitchen, mountain cottage, farmhouse style, farmhouse sink, wood range hood, open shelves, wood countertop, plank ceiling

He cut planks for the front piece.
cottage, white kitchen, mountain cottage, farmhouse style, farmhouse sink, wood range hood, open shelves, wood countertop, plank ceiling


You can see how he attached the planks to 2 cleats. He made the front part of the hood removable, so that it’s removable, just in case the hood vent needs servicing. The front panel is held onto the hood with magnets.cottage, white kitchen, mountain cottage, farmhouse style, farmhouse sink, wood range hood, open shelves, wood countertop, plank ceiling

Here’s a closeup of the magnets.cottage, white kitchen, mountain cottage, farmhouse style, farmhouse sink, wood range hood, open shelves, wood countertop, plank ceiling


He cut trim pieces 3/8” x 3/8” to  finish it off.
Since the hood doesn’t vent outside, the hood filters and then recirculates. We purchased an iron vent grill from Signature hardware.
cottage, white kitchen, mountain cottage, farmhouse style, farmhouse sink, wood range hood, open shelves, wood countertop, plank ceiling

cottage, white kitchen, mountain cottage, farmhouse style, farmhouse sink, wood range hood, open shelves, wood countertop, plank ceiling


For the finish, I mixed MinWax Provincial with Rustoleum Driftwood stain and applied several coats.
cottage, white kitchen, mountain cottage, farmhouse style, farmhouse sink, wood range hood, open shelves, wood countertop, plank ceiling


cottage, white kitchen, mountain cottage, farmhouse style, farmhouse sink, wood range hood, open shelves, wood countertop, plank ceiling
I didn’t show the hood insert, but we found one on Amazon.  I looked at a lot of different websites, but Amazon had the best price for the dimensions we needed.

If you missed the last post about the Mountain Cottage kitchen, you can find it HERE.

Pam
Disclaimer: The above post is about how we built our range hood. We don't take any responsibility for any errors or results obtained from using this information. Using power tools can result in injury. When using power tools, use safety equipment.

Monday, September 18, 2017

How To Install Crown Molding On Full Overlay Cabinets

We spent a week at our Mountain Cottage a couple of weeks ago and one of the projects he finished was installing the crown molding on the cabinets. The cabinets we chose have a full overlay door style, which means that the doors and drawer fronts cover almost all of the 1 3/4" cabinet frame. 

Full overlay cabinet styles require a bit more work when installing crown molding.
Yep, that's just what Mr. DIY needs - more work.
Mountain Cottage Kitchen, white kitchen, Kraftmaid Cabinets, farmhouse kitchen, cottage kitchen, farmhouse sink, wood countertops, open shelves, subway tile, plank ceiling,  diy, diyDesignFanatic.com


Saturday, July 22, 2017

Mountain Cottage Kitchen Reno - Built In Banquette Seating

I'm so excited to have this project finished! 


Mr. DIY did a great job building it and he did everything  from building to finishing. The only thing I did was design and consult on the design of the banquette.


Mountain cottage, diy Design Fanatic: Mountain Cottage Kitchen Reno - Built In Banquette Seating, cottage, cottage style, farmhouse kitchen, diyDesignFanatic.com

We've known from day one that we wanted a built in banquette in the kitchen at the mountain cottage. This is the only eating space in the house since there's no dining room. A banquette saves a lot of space and makes sense in a kitchen/dining room combination.
banquette, kitchen reno, cottage, mountain cottage, white kitchen, diydesignfanatic.com

After deciding how long and deep the seats were going to be, Mr. DIY taped it out on the floor just to be sure. (update):After taping the floor, he removed the baseboard heater and will install one to the left of the bench under the windows. 
banquette, kitchen reno, cottage, mountain cottage, white kitchen, diydesignfanatic.com

I really felt there should be a toe kick, so the banquette was made with a toe kick that would accommodate the existing baseboard in the kitchen.

We decided that the banquette would be 21" deep and 17 1/2" high and each seat would be 60" wide.
Since the top would be 3/4" thick and have an overhang, the box is 20" deep and 16 3/4" high, with a 4 3/4" high x 4"deep toe kick cut out. The boxes are made out of plywood.
banquette, kitchen reno, cottage, mountain cottage, white kitchen, diydesignfanatic.com


banquette, kitchen reno, cottage, mountain cottage, white kitchen, diydesignfanatic.com


Using his Kreg Jig, Mr. DIY covered up the toe kick space just so it would look cleaner and nothing would fall through.
banquette, kitchen reno, cottage, mountain cottage, white kitchen, diydesignfanatic.com


Then, he used 2 x 4s for the bracing. We reused these from another project.
banquette, kitchen reno, cottage, mountain cottage, white kitchen, diydesignfanatic.com


He had to cut around the outlets.
banquette, kitchen reno, cottage, mountain cottage, white kitchen, diydesignfanatic.com


banquette, kitchen reno, cottage, mountain cottage, white kitchen, diydesignfanatic.com


He then cut the tops out of plywood. The front and side overhangs are 3/4".
banquette, kitchen reno, cottage, mountain cottage, white kitchen, diydesignfanatic.com

He then cut  the board lengthwise at 2". In retrospect, 2 1/2" would have been better so they will stay open better on the window sill side. He will be adding a support hinge/lid stay later so that the tops will stay open and not fall on someone.
banquette, kitchen reno, cottage, mountain cottage, white kitchen, diydesignfanatic.com


He covered the unfinished edge of the plywood with 3/4" x 1/4" strips cut from 1/4" x 2 1/2" pieces of wood.


banquette, kitchen reno, cottage, mountain cottage, white kitchen, diydesignfanatic.com


He attached the tops with piano hinges.
banquette, kitchen reno, cottage, mountain cottage, white kitchen, diydesignfanatic.com


I wanted the front and sides of the banquette to look like the Kraftmaid cabinet doors, so, after marking where the "doors" would go...
banquette, kitchen reno, cottage, mountain cottage, white kitchen, diydesignfanatic.com


he cut the 1/4" thick poplar boards down to 2 1/4" wide and attached them to the box. At the ends, the sides where it meets the corner were cut down to 2", so that when the side panel was put on (which is 1/4" thick,) they would still be 2 1/4"
banquette, kitchen reno, cottage, mountain cottage, white kitchen, diydesignfanatic.com


He wrapped baseboard and 3/4" base shoe all the way around the banquette.
banquette, kitchen reno, cottage, mountain cottage, white kitchen, diydesignfanatic.com


Here's how clean the inside looks once it was primed and painted.  The tops of the braces and the top edge of the box, as well as the top of seats were finished with a coat of clear poly to minimize sticking.
banquette, kitchen reno, cottage, mountain cottage, white kitchen, diydesignfanatic.com


All finished!
banquette, kitchen reno, cottage, mountain cottage, white kitchen, diydesignfanatic.com

Today, Mr. DIY installed our new fan. I really wanted a square wood X chandelier and he was willing to make it, but our little cottage really needs a fan in the kitchen. I found the fan on Amazon and it is the perfect size (at 44") for the space.
banquette, kitchen reno, cottage, mountain cottage, white kitchen, diydesignfanatic.com


These are affiliate links, which means I'll make a small commission should you purchase through one of these links.


diy Design Fanatic: Mountain Cottage Kitchen Reno - Built In Banquette Seating, cottage, cottage style, farmhouse kitchen, diyDesignFanatic.com, white kitchen


My next project is to make the cushions and pillows for the banquette.
The fabric I wanted won't be in stock for another week, but I already have the foam for the cushions.

Can't wait to get it all finished. Now to find (or build) a table.

Hope you're having a good day!

Pam
Disclaimer: The above post is about how we built our banquette benches. We don't take any responsibility for any errors or results obtained from using this information. Using power tools can result in injury. When using power tools, use safety equipment.

Sunday, May 21, 2017

Mountain Cottage Kitchen Reno - Building The Floating Shelves

Mr. DIY wasn't so sure about building floating open shelves in the kitchen at the Mountain Cottage. I grew tired of him saying he didn't know how the shelves could be strong without having more studs to screw them into.
I never doubted he could build them.
I showed him multiple photos of other bloggers who had built them.

He still doubted.


I told them he could add shelf brackets for added support.

He still doubted.


Here's how he made them:

First, he cut 1 x 1s out of a piece of stock material he already had.
Open shelves, wood countertops, kitchen reno, mountain cottage, cottage style, cottage kitchen, farmhouse style, farmhouse, white kitchen, subway tile


Open shelves, wood countertops, kitchen reno, mountain cottage, cottage style, cottage kitchen, farmhouse style, farmhouse, white kitchen, subway tile

Frames for the shelves were made  out of 1 x 1s


Open shelves, wood countertops, kitchen reno, mountain cottage, cottage style, cottage kitchen, farmhouse style, farmhouse, white kitchen, subway tile


Shelves were then attached to the wall with 3" deck screws with a washer. Right return wall was attached with a molly bolt. Blue tape marks the studs.
Open shelves, wood countertops, kitchen reno, mountain cottage, cottage style, cottage kitchen, farmhouse style, farmhouse, white kitchen, subway tile


1/2" birch veneer plywood was attached top and bottom. They were glued and nailed with 1 1/4" brads. The stick makes sure it's level as the glue dries.
Open shelves, wood countertops, kitchen reno, mountain cottage, cottage style, cottage kitchen, farmhouse style, farmhouse, white kitchen, subway tile


After wrapping the edges with 1/4' thick poplar, the joints and nail holes were filled with wood putty.
Open shelves, wood countertops, kitchen reno, mountain cottage, cottage style, cottage kitchen, farmhouse style, farmhouse, white kitchen, subway tile


Open shelves, wood countertops, kitchen reno, mountain cottage, cottage style, cottage kitchen, farmhouse style, farmhouse, white kitchen, subway tile


Finishing is usually my job, but Mr. DIY primed and painted the shelves. He used Valspar Signature Ultra White in Satin. 
Open shelves, wood countertops, kitchen reno, mountain cottage, cottage style, cottage kitchen, farmhouse style, farmhouse, white kitchen, subway tile


Our not so secret weapon so insure shelves won't stick...We apply this to any horizontal surface where something will placed.
Open shelves, wood countertops, kitchen reno, mountain cottage, cottage style, cottage kitchen, farmhouse style, farmhouse, white kitchen, subway tile


I think the shelves turned out beautifully, don't you?
The shelves are very sturdy and strong and don't move when Mr. DIY yanks on them...
and set heavy bowls, pitchers and cake stands.
He's finally a believer!
Open shelves, wood countertops, kitchen reno, mountain cottage, cottage style, cottage kitchen, farmhouse style, farmhouse, white kitchen, subway tile


There are more photos HERE if you missed my post a few days ago.

Mr. DIY built the banquette this week. Here's a sneak peek...
Open shelves, wood countertops, kitchen reno, mountain cottage, cottage style, cottage kitchen, farmhouse style, farmhouse, white kitchen, subway tile, banquette
He finished constructing and adding the detail to the fronts and sides.
He should finish up painting the next time we come up. 
Then I'll have to make some pillows and cushions.
The hood is our last building project in the kitchen. 
We've been working on the kitchen reno for a long time and it will be good to get it finished!

Hope you have a great week!

Pam


Disclaimer: The above post is about how we built our floating shelves. We don't take any responsibility for any errors or results obtained from using this information. Using power tools can result in injury. When using power tools, use safety equipment.