Friday, April 30, 2010

Projects Accomplished!!!

Yesterday I told you about the little surprises in the basement and how they kept me from doing the projects I had planned for last weekend. If you missed it, you can read about it here. I did get those two things finished & am happy to cross them off of my list! We went to Lowe's and picked up some spray paint. This time I wanted to try Rustoleum's Espresso Brown because Lynda over at Focal Point used it on a patio project and it came out great. Go check it out when you get a minute. I have to tell you that this can is much easier on the hands to use, but it is a bit more costly at $6.98.

My first project was the artwork in my upstairs bath. Since the walls were beige, some contrast was definitely needed, so I painted the accessories dark brown. If you notice in the photo the frame on the picture is gold.


So, I thought it would look better painted brown. Here's what it looked like Before:
Here's  after ....the frame goes much better now.

Ahhh, that's better, don't ya think?
My second project was the bench on our basement patio. I want to show you the whole patio finished so I'm just going to give you a sneak peak.
I'm so excited to get this space spruced up because it is my FAVORITE place to sit in my whole backyard. So, I'm off to Lowe's AGAIN to get some more spray paint and some plants. I'm glad they are only 5 minutes away. 
Hope everyone has a great weekend!
Pam

Thursday, April 29, 2010

Life is what happens to you while you're busy making other plans.

That quote is by John Lennon and how it is so true sometimes! Take this for example: Last Saturday I had a few projects planned ... cleaning out and painting the first 1/3 of the garage floor,
painting the artwork frame in the upstairs bath
and staining this bench and sprucing up the basement patio where it sits.

And THAT is where the quote comes in! ... Here's my excuse reason for not doing my projects...

On Saturday I went down to the basement and noticed a musty smell and that the de-humidifier was not running. So, being the wonderful Mr. Fix It that he is, Mr. DIY Fanatic went down to the basement a few hours later that evening & the hose was clogged so the water couldn't automatically go down the sump pump and the bucket was full. He takes the bucket out of the dehumidifier  and goes to dump it in the tub and I hear him call my name really dragging it out with his voice rising at the end of it ...."Paaaaaaaam"? 
So, I go into the bathroom and look into the tub and see a cute little baby opossum. I immediately text my girls. Jess comes running down two flights of stairs from her room to see it.
Thinking there might be more, we went into the storage room and old playroom to look and sure enough, out comes another, then another. Jess put on gloves and started putting them in the tub one by one until
There were NINE!!!
We had been so busy picking up the babies that we hadn't gone into the closed off unfinished part of the basement where we keep my cat Buddy. (it's a long story as to why we keep him down there, too). Buddy had been spending the last 3 weeks outside, since we thought he was leaving puddles in his (1400 sq ft unfinished) room. But, we soon realized that he wasn't the culprit, it was the mama opossum. She had gotten in there when we left the window open for Buddy to come in and out, but when we kept him outside when the weather turned warm and we locked the window, the mama opossum was trapped inside. With all my busyness- going to Los Angeles and Prom, I didn't get down to clean the basement. I probably wouldn't have seen the mother anyway during the day because opossums are nocturnal.

So, to get to the point of why I didn't get to my projects ...Since the babies are too small to release and we have to keep them for a few weeks, Mr. Fanatic built them an impromptu cage out of scrap lumber he had. 


Then we spent most of Sunday cleaning and disinfecting our entire 2000 square foot basement! Only 400 sq ft of it is finished and the babies weren't in that part of it ... much.
Today, I am finally getting to my projects :)

How's that for an excuse!!!

So, do you think the baby possums are cute or creepy???? It's funny, but they have different personalities. There is one who is the defender of them all who is always snarling and a really cute one Jess named Lulu who is sweet, doesn't ever snarl and lets you pet her. She also likes to be at the top of the heap of possums and is very adventurous. I guess I never thought of possums having any type of personality.


Pam 

P.S. Did you know that opossums are the only marsupials in North America?


Click HERE to see the day we released them into the woods.
possum, possums, marsupials, diy


Tuesday, April 27, 2010

Graduation Party Inspiration

Mr. Fanatic and I love to throw parties!!! Because of all the redecorating/remodeling activity going on at our house, there hasn't been a lot of partying going on around here lately! Here's a photo of my youngest daughter's 15th birthday party a year and a half ago. We've had a few parties since then, but this was the last themed party that I decorated.


When Trader Joe's opened up in Charlotte, we had a Trader Joe's party to celebrate.

This June my oldest daughter is graduating from High School, so this big event definitely calls for a celebration!

While out in California we found some pink & green colored lanterns at Fabric Barn. You can see what we purchased if you click here. My daughter chose the colors...I really wanted turquoise & green, but it's her graduation party, so pink & green it is.


Would love to hear any other suggestions for cute ideas for a graduation party from all of you who either have thrown one or who have gone to another memorable party! Would love suggestions. Please let me know!!!

Thanks for stopping by,

Pam


Sunday, April 25, 2010

Upstairs Bath Progress

I wish I had a true before of the upstairs bath, but I don't. I can only tell you that it had lavender walls and Waverly floral rugs & shower curtain. (Update: my sister Lynne emailed me & sent me a lovely before photo. It is below the next photo.) We painted it back in January a neutral beige because we are going to put our house on the market soon. About a month ago we tiled the floor with the same tile as the Master Bath. It was much easier to do this bath than our Master!


Here is the bathroom painted lavender.

Here's what it looked like after we painted.Uhhh, can you say BORING? This was the first room in the house to be BEIGE. So, I knew I had to do something!
Here's the lovely vinyl floor...before the tile.
Here's the tile floor installed. It looks a lot warmer and feels so good on your feet!
I would love to frame out the mirror in a dark painted color, but it would add another project (moving the light fixture down). I also have to find some interesting accessories for the counter. The artwork on the opposite wall is my next project.  The frame is going to get a fresh coat of dark paint!

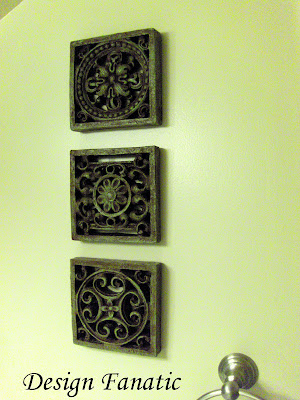
I replaced the gold framed artwork with these faux stone reliefs which were in my hallway. I never really liked them there, so I painted them green & then a brown over it.
Love the cost .... $0
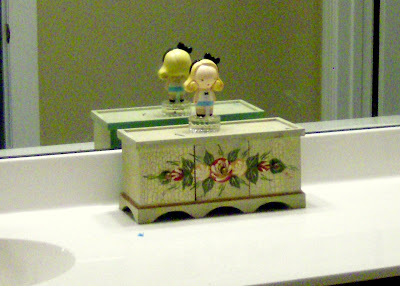
I also painted the little drawers that hold cotton balls & Q-tips. Here's the before:
I think it still needs something. Maybe a different color on the edge and on the little balls on the drawer fronts.
I still have a little work to do in this bath, but it has definitely come a long way!
Hope everyone had a terrific weekend!

Thanks for stopping by,

Pam

Linking up with 
Remodelaholic for Remodelaholics Anonymous Meeting
Romantic Home for Show and Tell Friday
Bobbypins Boardwalk for Boardwalk Bragfest
Finesse Your Nest for Shop the House Sunday
Between Naps on the Porch for Metamorphosis Monday
DIY Showoff for DIY Project Parade 
It's So Very Cheri for Spotlight Yourself
Domestically Speaking for the Power of Paint Party 
Blue Cricket Design for Show and Tell
Room To Inspire for Be Inspired
Shabby Chic Cottage for Transformation Thursday
My Backyard Eden for Make It Yours Day 

giveaways

HookingupwithHoH

Prom 2010

It has taken me a day to recuperate with all the running around we did on Prom day which was Friday! Hair & nail appointments, picking up flowers, photos at the park with two separate groups, etc. made for a long day! Then of course we waited up until they arrived home safely and to hear how  Prom was! I didn't get to sleep until about 4 am! Next year will be easier with just one daughter going to Prom. Don't they all look beautiful & handsome? They all had a great time!


Thanks for stopping by,
Pam

Thursday, April 22, 2010

Functional Storage

I hesitate to show you this project because our bonus room/office gets used a lot for homework, making crafts, sewing, small painting projects, etc. Several years ago Mr. Fanatic built me a beautiful 4 ft x 6 ft work island that sits in the middle of the room & there is always a project or two on it.This room is always being used. Mr. Fanatic uses the nook near the window as his office. It is NOT a pretty room and I am NOT going to show it to you just yet. This room & the garage are the last rooms to get cleaned up & made pretty because we have so much stuff in them & both of the rooms are a catch-all while we get our house ready to sell. In January my husband installed a closet in this room so that we could list it as a 5 bedroom.


This is what it looked like before adding the closet. The builder originally spec'd this room for a closet, but my husband's office was in this corner before we moved things around, so we had the builder leave it out. Guess I should have tidied up those bookcases before I took the photo : /


Here's what the inside looked like after he finished the project. We had to move on to another project so we waited for another weekend to install an organizer.


Problem was .... this is what it ended up looking like for a couple of months. There is also a 4 ft stack of boxes of fabric on the left. It just kept getting messier every time I had to dig something out for a project.

So, last week week my husband built in an organizer.


And now it looks like this.


This is much better, but if we were staying in the house we would have spent the extra $150+ and built removable shelves all the way down to the floor in the center. But, at least now I can get to all my boxes without rummaging through all the others and without making a huge mess of the closet : )

(The dress is one of my oldest daughter's prom dresses that I am currently working on. Funny -- it is really a teal GREEN, not blue as it appears in the photo.)

Last night I was looking at the closet rods and thinking ... hmmmmm. In our NEXT office I might have Mr. Fanatic add 6 or so rods for my wrapping paper. Wouldn't that be swanky! What do you think????


Tomorrow is Prom and I've finished altering the dress above & adding straps to both my girls dresses. My oldest is going to another school's Prom on Saturday & I still have to add straps & hem that dress, so today I will be spending the day in my office. Tomorrow will be a day of primping - getting hair and nails done. What fun! 


Thanks for stopping by,


Pam

Wednesday, April 21, 2010

Spray Paint Magic

I love, love love, to change things with spray paint! Here's proof.
 The watering can wasn't always red. I found it at Marshalls, but it definitely needed some color. So, I went to my painting cabinet and pulled out some primer a paint.


I had this little table outside on my patio in the woods that I had never even put a sealer on so it ended up looking like this.


I painted the watering can first and loved it, so I put it out on my newly spruced up deck.


But, after seeing how bright the red was, I just couldn't paint the little table with it. So, it sits out on the patio in the woods still painted primer grey.  I think I like it. What do you think? Should I just be BOLD and paint it red or should I find a light blue and paint over the primer grey???


Tuesday, April 20, 2010

Solar Patio Lights

I guess since everyone is celebrating earth day, a post on solar patio lighting is apropos. I just chose solar lights because they were easy to install, don't add to the electric bill, they serve the intended purpose & they look great!
As most of you know, I am getting my house ready to sell. We are also planning to throw a  High School Graduation party for my oldest daughter in June. For both of these reasons I am decorating & sprucing up my home & garden. Our patio on the edge of our woods has always needed lighting since we use it often at night.
 
So, a whole aisle full of solar patio lights  at Walmart on a recent visit caught my eye. They had several different styles in different price points. There were also 3 different finishes in this style light.I purchased 12 of these lights for $5 each and brought them home.

Before I installed them I tested one of the lights out to see if they would work since they were going to be installed in a shaded area. On the "test" day the sun never even came out, but the light collected enough sunlight to burn the light & it was still lit at 11 pm.
Installing these lights is really easy. The first thing that needs to be done to activate the light is take off the cap & pull out the orange strip.
Next, pull the stake out of the bottom part of the tube & attach it with the point down. No tools needed :)

Then you just stick it in the ground where you want it placed. That's it. No wires & no electricity needed : )


Don't they look great?
Just had to throw in a photo of my little birdies I found on an anniversary weekend up in the mountains. I love those little guys.


The lights aren't super bright, but they provide enough light so that we can walk back to the house in the dark without tripping on anything and I am very happy with them. I have also seen similar solar lights at Lowe's, Home Depot & Target. Some are as low as $3 each.
I love working out in the garden any chance I get and am decorating & planting some flowers on basement patio & the patio in the woods. I hope to show you those soon. Hope you will come back for a visit soon.

Thanks for stopping by,

Pam