Showing posts with label Before and After. Show all posts

Monday, August 18, 2014

How To Make A Liner For A Basket


In between doing projects for the Mountain Cottage, I've also been trying to keep up with projects that need to be done at home. 
Painting the Laundry Room has been on our project list for a lonnnnngggg time.  The paint was purchased last March, hangs head in shame.  
Well, about a month ago,  Mr. DIY came home from work one day and was surprised that I had already started. One morning I just couldn't take it anymore and decided to open the can of paint. There was no going back once I cut in the corners! 
I still have one more project to do before the new Laundry Room is revealed. 

If you remember, the Laundry Room looked like this...


The new paint color is lighter and brighter and the old baskets that I keep Laundry Room essentials in didn't look good with the new paint. 


So, just like the wall art I painted (you can click HERE if you missed it), I used a couple of cans of Rust-Oleum Paint and Primer to paint the baskets white. 


Here's how I made the liners:
The old basket liners were taken out of the baskets and I started to measure them, but found it so much easier to measure one of the baskets. 


I measured height, width and the bottom, then made a pattern  for each side and added 1/2" for seam allowance all the way around. I also added 3" for the fold over on the top. The 3" also included 1" for a seam allowance. 


Since the pattern was very large and wanted the pattern in a specific place, I placed the pattern paper over the fabric until it looked good, then I cut out the fabric.


You can either sew the top finished edge first like this- fold under 1" and fold 1/2" of that under and sew or...


...you can sew the all the sides together first, then fold the top finished edge over the side seams and sew the top edge last. 
I always have to remind myself...right sides together!
I had to rip out one seem on this project because I wasn't paying attention! This is why when I sew, the seam ripper is my best friend. 

On the first basket liner, I sewed the top edge first. 


On the 2nd and 3rd basket, I sewed the side seams first then sewed the top last. 
I think I like the top seam sewn last. 


Once you sew the sides together and the top seam, then sew the bottom to the top.


Place the liner in the basket to see how it fits.


Here's a look at the baskets all finished. 


This could also be done as a no sew project if you don't know how to sew, just follow the same steps above. 


In the last photo, you see the wall paint(although it's more minty than gray) and you see a peek of the final project on my list for the Laundry Room.

Looking forward to showing you the finished Laundry Room...hopefully in a couple of weeks.
I'm off to SoCal for a week again, (by myself this time) to help my dad with cleaning and organizing his home.
Follow me on Instagram for what's happening behind the scenes.

Leave me a comment and tell me what your favorite sewing project (or no sew project) is!


Pam

Tuesday, February 7, 2012

My DIY Weight Loss

Hope you all had a fantastic weekend! Mr. Fanatic and I worked on some more raised beds so we can expand our organic vegetable garden. Spring will be here before you know it and we have to get the cool weather veggies in the ground soon.

 Today I thought I'd tell you how I lost 25 pounds on my own~ ya know I do a lot of things diy, and this was one of them. 


Where do I begin?...

In the past ten years I gained some extra weight and it started to make me feel uncomfortable. It wasn't only that I didn't like the way I looked, but it was causing me physical pain, as well.
So, last Spring I made
a goal that I was going to lose weight starting in June after we got back from a trip to Savannah. My goal at first was not to lose 25 pounds, it was to lose 10.  I wasn't sure how I was going to do it, because I didn't eat very much to begin with and didn't understand how my goal was going to happen.

This was my typical day's intake of food before:

Tea and Bagel for breakfast
sandwich for lunch
chocolate snack at 3 pm
Typical dinner: chicken, rice or potato and veggie
Maybe dessert

That's it!
I wasn't sure how I could gain weight on that, but ya know I'm a couple years(almost) past 50 and one thing I've learned is: you can't eat like you did when you were younger. (Plus I have no functioning thyroid ~I'm on thyroid meds ~ and am post menopausal-sorry if that's TMI)

So how was I going to lose weight now???
I had lost some baby weight after my kids were born 18 years ago by increasing my protein and lowering my carbs. Since that worked for me then,  I thought I'd try it again. A few of my friends lost weight following Weight Watchers and I could try that if my diet wasn't successful.

 I didn't take a "before" picture last June, but here's a photo of my youngest daughter and me on Venice Beach in Spring of 2010. I was wearing size 12/14 and Large to XL.


We had a photographer take family photos in May of 2011~Here's a photo of me a month before I started my new diet. 
Portrait Creations


Here I am at the "I Love Thrifting" event in July.  By this time, I had been on the low carb diet for just a few weeks and had lost a couple pounds
RashonCarraway.com
For the first couple of weeks I didn't lose much, but then did some "googling" and watched Dr. Oz and learned some things. Those extra things started working  and I started losing 1-2 pounds a week. Switching to only having protein for breakfast made all the difference in the world.
Here's the short version of how I what I did. It may or may not work for you and if you want more nitty gritty details, just email me.

I had a Jay Robb protein shake for breakfast and waited an hour or so and then had a protein snack
(Some days I had 3 scrambled eggs, but no carbs first thing.)
I limited my carbs to 100 per day.
I took some vitamins ( D, Magnesium, B6, probiotics, etc.)
Took some extra fiber when I remembered, around dinner time (per Dr. Oz)
Periodically used a colon cleanse 

That's about it.
I ate pretty much whatever else I wanted.... even bacon and ranch dressing and ice cream etc. I just didn't go overboard on the calories, but I didn't count calories, just carbs. I ate whatever I wanted, but counted my carbs and once 100 carbs was reached, only protein could be eaten.

I did not exercise at all. Ok, I tried for a week, but it didn't help me lose any more weight and I had to go take a 3 hour nap on the days I exercised. Couldn't afford to take a 3 hour nap, so I stopped exercising. I've tried to lose weight before by exercising, but I ended up gaining weight. Sorry, not worth it! Your experience may vary.

To keep track of the carbs  I wrote everything down I ate for two weeks just to make sure I didn't go over my 100 carb limit. After that I pretty much knew how many carbs were in what and I knew how to eat. FYI: that stoneground, whole wheat bagel I ate every day for breakfast was 60 carbs.With the tea with milk, I had been eating 72 carbs! No wonder I was getting fat!

Here's a typical days intake of food on a 100 carb a day diet:

Jay Robb whey protein shake for breakfast
(update: I have switched to Source Naturals True Whey Protein)
sunflower seeds or almonds for a snack
1/2 sandwich or  a burrito or cheese and crackers for lunch(I don't like to cook, remember?)
fruit snack around 3 pm if hungry
regular dinner ~ Chicken  and vegetables or 1 medium size burrito
Maybe dessert (If no starch for dinner) or a protein snack after dinner
Sometimes I forget to eat lunch until 3pm, so I skip the snack. 

This low carb diet was pretty difficult for the first 3 weeks or so. After that I lost my sugar cravings and no longer craved my 3 o'clock chocolate snack. If I got a craving for something sweet I would eat 3-5 jellybeans(yes, I wrote them down). It's amazing how a few jellybeans would stop the craving for something sweet. 

I  can go to Five Guys and get a double cheeseburger and go out to eat. It's just a different way of eating. A double cheeseburger is ok, but the fries are not. When we would go to a nice restaurant I would substitute the potato for a green vegetable or salad. One night after going out to Carrabas I had 20 carbs left, so we went to Walmart and searched the aisles for a 20 carb ice cream bar! I think it was Hagen daz. Being committed to a program is the only way stick to it.

After losing 10 pounds, my next goal was 15, then 20. Losing 20 pounds was so exciting because I had NEVER, EVER, done that before.

By the end of November of last year I had lost 25 pounds! It took me 5 1/2 months to do it, which is not very fast, but all things considered, it's pretty darn good! The holidays were a little difficult and the 100 carb limit was suspended, but I only gained back 2 pounds and have since lost those, plus a few more.


Here's a photo taken on Saturday:
 I now wear a size 8 and Medium.


A pair of my previously tight jeans now fits like this...


Right now I'm on a maintenance lower carb diet and limit my carbs to 150 a day.  My goal is to lose 5 to 10 pounds more and will go back to a 100 carb limit again in a month or two.
I would love to be a size 6 again!

Well, there you have it!

That's my diy weight loss story.

Pam

PS: you have to get enough sleep every night in order to lose weight. I sometimes use Melatonin to help me fall asleep. As you get older your body produces less of it, so supplementing is sometimes needed.
*Be sure to speak with your doctor if you are taking any medications before you add any vitamins to your daily regimen because some vitamins and minerals can interact with medications.


Wednesday, November 30, 2011

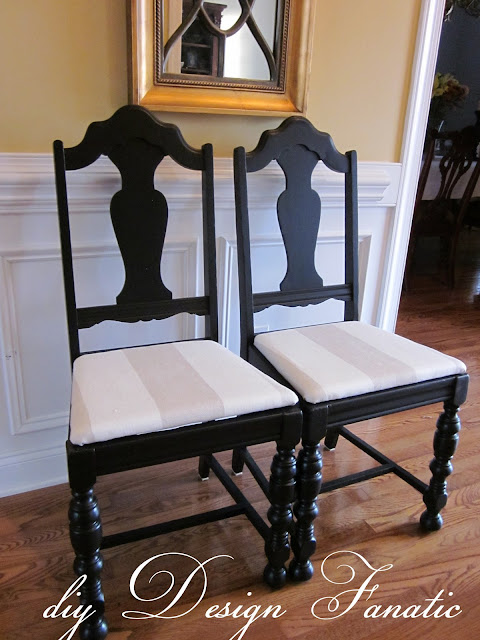
Antique Chairs Makeover

 I'm  impressed by how many of you have already been decorating for Christmas already. I still need a few days to get in the Christmas spirit. I've been enjoying being inspired by all of your beautiful decorating ideas and am looking forward to more!

On Sunday I revealed the antique chairs from my grandmother's basement.
Today, I'll show you how I painted and recovered the seats.  Reupholstering dining room chairs is

Remember, they looked were in pretty bad shape and looked like this:

Since they were already sanded,  they didn't need any prep, other than to dust them off. After a couple of coats of black paint, they were looking pretty good.

The fabric was worn beyond recognition and came off pretty easily.


Cotton batting was used on the original chairs and Mary Jo's had some in stock. It is so soft! 

Since the cotton batting was so thin, I used 4 layers of it. Three layers were cut the same size as the wood seat and the fourth layer was cut 2" larger on all sides.

The batting was attached with a staple gun.


The fabric was cut larger all the way around, as well.


Voila! Antique Chairs are finished!

Hopefully, there will be time to make two pillows in the midst of Christmas decorating!

Update: you can see the finished pillows by clicking HERE

Pam 

Sunday, August 14, 2011

I Give Up!!!

Hey everyone! 
Do you ever have a difficult time trying to find a specific piece of furniture for your home? 

I've been looking for an antique dresser that I can refinish for my foyer. I just don't seem to have enough storage for my tablecloths, napkins and placemats and all of that is crammed into my dining room buffet. I've searched and searched on Craigslist for nearly a year trying to find an antiques dresser that's about 40-42" wide x 20 or so inches deep and 30-32" high. I know they're out there because I see them every week on linky parties where they've been beautifully transformed. Alas (sigh), I cannot find one for my own. (drama goes here ~ hand to the forehead). 


Finally this weekend I had Mr. Fanatic bring down the dresser from my oldest daughter(who moved to California)'s room. I figured it wasn't perfect, but it wasn't being used and I could use it while I keep looking
for right one.

Here's what that space looked like before:

And most recently, it looked like this:

Here's what it looks like now:

Unfortunately, there isn't an outlet on this side so I can't have a working lamp on the dresser ...sounds like another project for Mr. F.
Sorry honey!


I think I need a big plain mirror for this space as well....


It works ok, for now.
Now back to working on the family room. The main part of our house is a total mess. Hope you'll come back to see it!

Pam 

Joining: 


Sunday, June 5, 2011

A Place For The Poppies

I shared with you last week about the Wonderful Gift my oldest daughter painted for me last week...
For those of you who didn't see that post, here's the painting...

I wanted to find a good spot for it...in a room where I'd get to see it every day. The foyer came to mind since I had a grouping of things where it might fit.


Had to lighten up the shell, so I took it outside and painted it Heirloom White.

Here's the little vignette after:
Not sure if this is it's perfect place, but for now, it's hung. Would love to paint the game table below the painting since it has some damage to the finish. It's definitely going on my short list of projects.

Mr. Fanatic and I had a wonderful and relaxing time in Savannah celebrating our (postponed) 25th wedding anniversary this past weekend. I love that town and highly recommend it...will tell you about it soon.
Hope you had a fantastic weekend, too!

Pam