Showing posts with label Painted Furniture. Show all posts

Monday, October 20, 2014

A Sweet Gift And A New Vintage Dresser

Happy Monday Everyone!

Hope you had a nice weekend.
Had to share something sweet a neighbor did for me. 


The doorbell rang the other day and I thought it might be a neighborhood kid selling a fundraiser of some sort.  It took me awhile to get to the front door, but when I went got there, these little lovelies were on the door mat. 

I knew there was only one person who could have left them, so hollered out "Thank you Sydell!" 
My neighbor was still outside and walked back over and we talked for a bit. She's growing these beauties in her yard and sells them to a  local retail shop. 


I put these gorgeous dahlias in a pretty crystal vase and set them on the table in the Breakfast Room. 


I thought they'd look prettier on the vintage dresser that came to live with us last month. The dresser was Mr. DIY's when he was a boy. Mr. DIY helped his mom move into a smaller apartment and she was downsizing to one dresser, so he brought it home. 


I love the detail on the dresser. 


Originally the dresser had more flowery details like the one the coordinating tall dresser that my mother in law kept, Both dressers were purchased from a garage sale way back when, but Mr. DIY's mom scraped off the frilly flowers since it was going into a boy's room. Mr. DIY took photos of the detail with his cell phone and sent them to me. 

Sorry this is blurry. 


The dresser is missing a knob, so I think I will try to find some crystal ones and put those on the top drawer and move the other knob down the the bottom drawer. 

I've been enjoying the beautiful dahlias on our "new" vintage dresser. Wasn't that sweet of my neighbor to share the flowers with me?


Pam

Thursday, September 4, 2014

DIY Pottery Barn Knockoff Storage Bed... All Dressed

Thanks for coming back today to see the bed at the mountain cottage all dressed up. It's really not fancy, with it being the upstairs attic bedroom at a mountain cottage and all. We meant for it to be comfortable. 


Monday, July 23, 2012

Side Table Paint Makeover

Oh, if only painted wood outdoors didn't require maintenance. Who am I kidding? What fun would that be? A little peeling paint is a great excuse to try out a new paint color!


 I found this  little side table several years ago at either TJ Maxx or HomeGoods. The wood stain needed some help after a few seasons outside on our patio in the woods, so  I painted it  blue, then found it a new home on the basement patio. It was looking a little ragged and it needed a little freshening up...


 ...so, I painted it Fern green by Rustoleum. I've loved this spray paint ever since using it on my Front Porch this past Spring.


Maybe one of these days I'll break down and paint the  bench. What do you think?


I'm always amazed at how a coat of paint can change everything!
What needs painting at your house that you can't wait to get finished?

Pam

Wednesday, November 30, 2011

Antique Chairs Makeover

 I'm  impressed by how many of you have already been decorating for Christmas already. I still need a few days to get in the Christmas spirit. I've been enjoying being inspired by all of your beautiful decorating ideas and am looking forward to more!

On Sunday I revealed the antique chairs from my grandmother's basement.
Today, I'll show you how I painted and recovered the seats.  Reupholstering dining room chairs is

Remember, they looked were in pretty bad shape and looked like this:

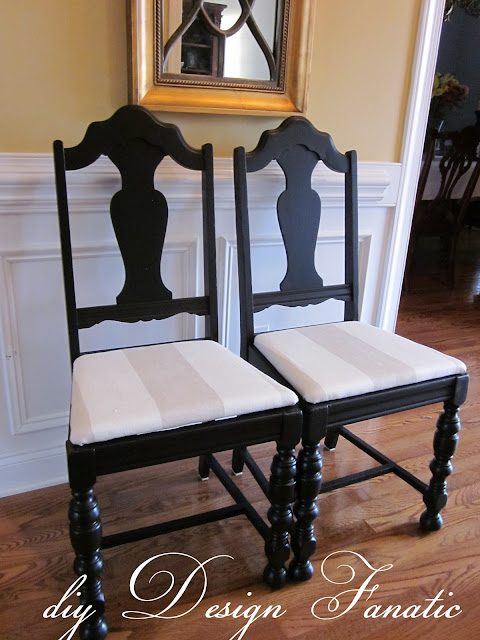
Since they were already sanded,  they didn't need any prep, other than to dust them off. After a couple of coats of black paint, they were looking pretty good.

The fabric was worn beyond recognition and came off pretty easily.


Cotton batting was used on the original chairs and Mary Jo's had some in stock. It is so soft! 

Since the cotton batting was so thin, I used 4 layers of it. Three layers were cut the same size as the wood seat and the fourth layer was cut 2" larger on all sides.

The batting was attached with a staple gun.


The fabric was cut larger all the way around, as well.


Voila! Antique Chairs are finished!

Hopefully, there will be time to make two pillows in the midst of Christmas decorating!

Update: you can see the finished pillows by clicking HERE

Pam 

Sunday, November 27, 2011

Do It Yourself Project: Antique Chair Makeover

Hope y'all are doing well and had a great weekend. 
I'm glad I get to show you this projects before all the Christmas decorating rush starts. Here's a peek at what I've been working on...


It all started when I wanted to make an upholstered bench like this for our foyer. Seems like a very simple one weekend project for Mr. Fanatic and I to do, but the problem is, he has a long honey do/project list already and I didn't want to add to it right now.

One Kings Lane


I'm a little ~ ok, a lot~ embarrassed to say that I've had these two chairs for like, forever....They've been in my basement for 11 years and I had them in my garage in California for a couple of years before that. I originally found them in my grandmother's basement a couple of years before we moved to North Carolina. I thought if I finished them both the same that I could put them side by side in our foyer and they could suffice instead of a bench.
As you can see, they've been sanded a bit, but that's as far as I got....until now. 


Here's what they look like now:


Last Tuesday, I finally made it to Mary Jo's out in Gastonia. I was originally looking for a light linen, but only found this large striped linen.


I also found two other fabrics for pillows I'm going to make for the chairs. The price of fabric sure has gone up. Either that, or I have expensive taste.


The fabric on the right is flocked anywhere you see black..

I can't wait to get started on the pillows!

I'll show you how I transformed these antique chairs some time this week. If you aren't a follower, you can become one by clicking on the Google Friend Connect on my sidebar.

Pam

Wednesday, October 5, 2011

Vintage Table For The Shabby Chic Bedroom

A couple of days ago I showed you how I transformed the little table from my grandmother's basement. You can see it HERE if you missed it. Here's a little peek at where it's new home is...


The table has a special place in our youngest daughter's bedroom, right next to her chair with the Paris Market pillow.

I put her lamp from Target with the custom shade slipcover I made her last year on it. Not sure if this lamp will stay here since my daughter likes this one on her nightstand.


Here's how the little table looks in the room. It's painted the same color as the bookcases we made(better). If you missed how we took some ugly bookcases we found on Craigslist and transformed them, you can find the post HERE. I think these bookcases are my all time favorite project that we've done.
The backs of the bookcases and the little table are painted in Valspar Nautical in a satin finish.


Here's the lamp that my daughter prefers.  We found it at Ikea on our last trip there.
I've made quite a few things for my daughter's Shabby Chic bedroom in the past couple of years. If you'd like to see them all, just click on "youngest daughter's bedroom" in the labels section on my sidebar.

While you're over on the sidebar, become a follower, if you aren't one already, so you don't miss any of my upcoming projects. You can also follow along on Facebook or Twitter.


Thanks for stopping by,

Pam