Showing posts with label Tutorial. Show all posts

Wednesday, November 30, 2011

Antique Chairs Makeover

 I'm  impressed by how many of you have already been decorating for Christmas already. I still need a few days to get in the Christmas spirit. I've been enjoying being inspired by all of your beautiful decorating ideas and am looking forward to more!

On Sunday I revealed the antique chairs from my grandmother's basement.
Today, I'll show you how I painted and recovered the seats.  Reupholstering dining room chairs is

Remember, they looked were in pretty bad shape and looked like this:

Since they were already sanded,  they didn't need any prep, other than to dust them off. After a couple of coats of black paint, they were looking pretty good.

The fabric was worn beyond recognition and came off pretty easily.


Cotton batting was used on the original chairs and Mary Jo's had some in stock. It is so soft! 

Since the cotton batting was so thin, I used 4 layers of it. Three layers were cut the same size as the wood seat and the fourth layer was cut 2" larger on all sides.

The batting was attached with a staple gun.


The fabric was cut larger all the way around, as well.


Voila! Antique Chairs are finished!
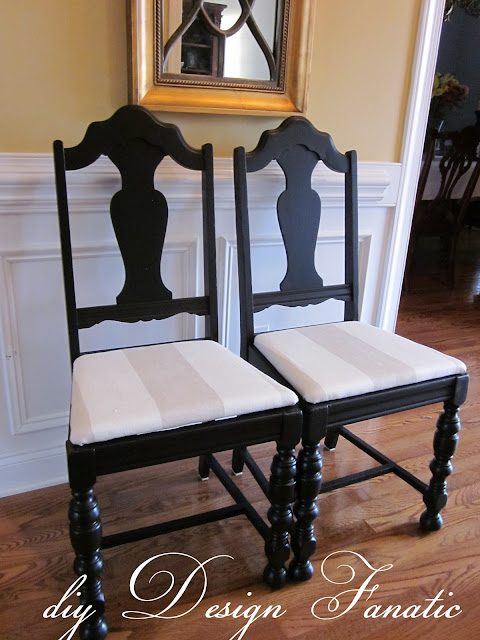
Hopefully, there will be time to make two pillows in the midst of Christmas decorating!

Update: you can see the finished pillows by clicking HERE

Pam 

Sunday, August 1, 2010

Embellished Pillow

I'm finally getting around to a little finishing touch that I have wanted to do for a long time. A few months ago, our youngest daughter's room was finished... or at least it was presentable. I still had a few little things on the list to do & today I finally got around to making some contrasting fabric flowers for the pillow on her bed.


My daughter really wanted the colors in her room to be green and blue, however, we didn't find any blue accessories that we liked. I thought we could add some blue flowers to the pillow that I found at HomeGoods awhile back.

So, off to Hobby Lobby I went & found 3 cute fabrics and cut one strip out of each - the length of the fabric. I wanted the blue flower to be larger, so I cut the blue fabric 2 1/2 inches wide and the other 2 strips a little over 2" wide.
Then I folded the fabric in half and pressed it.


Next I basted a large stitch by hand on the raw edge of the fabric and gathered the fabric up.


To begin the flower, take the end which will be the center of the flower and fold it down like this:

Then just wrap it around like this...

Turn it upside down and stitch each together until you come to the end.

Here's what the flowers look like when finished:


And, here's what the pillow looks like now:
Better?
I purchased enough of the contrasting fabric to make a few more pillows ... I just have to find some cute trim for the edges!
Hope you all had a great weekend!

Pam

Tuesday, July 27, 2010

A Framed Letter


Last week I told you how it was difficult for me to take all of my photos down upon advice I've read from Realtors and home stagers. You can read about it here if you missed it.  I never put a photo in one of the frames on my night table and didn't want to put it away because it is so pretty.


 It's a big heavy frame and holds a 4 x 6 photo. I felt a little silly leaving an empty picture frame out even if it was pretty, and I started thinking... that a letter would look good in it.

Up to the office I went to print a black capital letter R in 250 pt in the Times New Roman font on cardstock ...

... cut it to size and put it inside the frame.

What do you think?
I think I like it! The best part about it is that it didn't cost me anything :)

Have a wonderful Tuesday!

Pam


Sunday, March 7, 2010

Mirror Makeover


Several years ago we replaced the plain builder grade vanity mirror with this classic gold one I found at Target. These walls used to be red, but since we are going to put our house on the market, we painted the small powder room a neutral color. 
The mirror didn't look right, especially with the dark iron accents. So I decided I would spray it with an oil rubbed bronze spray paint.


I hesitated a little bit when I took the mirror down because the finish is so pretty. But, I pressed on.


I taped up the edge and put newspaper over the whole thing. I tested the spray paint on a picture frame, but didn't like the way it looked, so I did some web surfing & several people suggested Rub and Buff Spanish Copper. So... off to Hobby Lobby I went.


 It was very easy to apply it with a rag. Make sure you wear gloves. You do just as the name says ; rub it on, (let dry) and buff it.


The finish looked too much like antique gold (left side of frame) - not oil rubbed bronze, so ...... I mixed some black, brown and a brown metallic craft paint together and rubbed it on. I let it sit for about a minute & then rubbed off the excess. It looked much better. (bottom of the mirror)


Here is the finished project! The darker finish goes much better with the other dark accessories in the bathroom. Now I need to get some new towels!


I will post the before and after of my tiny powder room at another time, so stay tuned ....

Pam