Showing posts with label mountain cottage bedroom. Show all posts

Monday, June 22, 2020

How To Store Your Stuff - Closet Edition

Hello Friends!

This is How To Store Your Stuff - Closet Edition

I have a simple solution to adding more space to your closet
The closet in our Mountain House downstairs bedroom is only 19" deep.. 
That's a problem because 24" is the depth space you need to hang clothes on a hanger. 
You may have minimal hanging space in your closet like we do and need  more space for clothing.

Mr. DIY added some super simple and relatively inexpensive shelving to add more storage space to our closet and you can too. 

storage space, closet, add storage space to closet, mountain cottage, simple project


Mr. DIY added something similar in the Master Closet at our previous house.
Link to this post will be at the end of this post. 
storage space, closet, add storage space to closet, mountain cottage, simple project


Several years ago, there were so many projects on the Mountain Cottage reno list, and we thought we would build a  custom closet at a later date, so we bought 2 bookcases from Ikea and set them in the middle of the closet. 

The problem was that they were too deep and blocked getting to the hanging items.
But, we lived with it for several years. 
storage space, closet, add storage space to closet, mountain cottage, simple project


Mr. DIY decided to make a platform for the bed in this room with them about 6 months ago and then we were left with no place to put folded items, since there isn't a dresser in the small room. 
storage space, closet, add storage space to closet, mountain cottage, simple project


We decided to save Mr. DIY's time and a little cash by foregoing the custom shelving and just installing simple shelves in the center.
They are awesome! We both couldn't believe how simple they were.
Why didn't we do this sooner?
storage space, closet, add storage space to closet, mountain cottage, simple project

Mr. DIY had already installed a few shelves and a closet rod for long items on the left side of the closet. I place the rod at 60" from the floor for long hang.

19" of long hang is plenty for a weekend home.
storage space, closet, add storage space to closet, mountain cottage, simple project


Here's you can see the shelf uprights and shelf standards in this photo.
We bought 11" deep shelves and brackets to fit.
storage space, closet, add storage space to closet, mountain cottage, simple project

On the right side of the closet, Mr. DIY installed 2 closet rods. The lower one is 40" from the floor and the higher one is 40" above that.
You can see that the 11" shelves make it easy to reach the hanging items.
If we had regular closet doors, instead of bifold doors, there would be even more space to reach in, but since we will be adding on a bathroom and proper closet in a few years, we won't be replacing them.
storage space, closet, add storage space to closet, mountain cottage, simple project

Now we just need some cute baskets to put socks, underwear and small items in.
storage space, closet, add storage space to closet, mountain cottage, simple project

Simple,  relatively inexpensive and functional.
A great way to add more space to your closet.

The cost for the 8 shelves was less than $200

2 - Shelf Upright - 72" each - $12.98 each = $25.96
2 - Shelf Brackets PER shelf - about $7 each -=$112
Shelf - 36" x 11.75" - about $7 each = $56
 

If you'd like to see how we added more storage space in the closet at ourlast house, you can see it by clicking HERE.
storage space, closet, add storage space to closet, mountain cottage, simple project


Thanks for stopping by!

Pam

Monday, March 23, 2015

The Upstairs Attic Bedroom At The Mountain Cottage


We were up at the mountain cottage this weekend and the weather was a bit warmer. 
It's so nice to not have to walk around the house all bundled up just to stay warm!
We currently have a gas fireplace, but can't wait to change it out for an efficient wood burning stove, but that won't be for some time.
Mr. DIY was busy working on the kitchen reno, patching walls and changing out electrical outlets for shiny new Decora ones. Next time we'll prime the walls, then paint. After that we'll he'll be installing the cabinets. We're not sure when that will be because we need to spend some time at our house getting it ready for sale. 


Meanwhile, I wanted to share a few changes to the upstairs bedroom at the mountain cottage that make it feel  a little more cozy. 

Monday, November 3, 2014

A Simple Mountain Cottage Bedroom


The downstairs bedroom at the Mountain Cottage has come a long way. It's not 100% finished yet, but it's starting to come together nicely. 
mountain cottage bedroom


The room was really dark with the country blue wallpapered walls and frilly ruffled curtains covering most of the windows. If you'd like to see what steps we went through to get that wallpaper off the wall, you can see it HERE.  


The vintage ladder holds Mr. DIY's sarape. 


After taking several weekends to paint the closet doors,  they were finally installed in the opening. It's amazing how much bigger the room feels now. Before, the doors were stained a dark brown. 


We moved the little vintage cabinet into the corner. A little lamp was initially put on top, but it didn't look quite right. We plan to put a small flat screen inside the cabinet. 
mountain cottage bedroom


I found two of these night stands on Wayfair.com. They were a great price and two of them will fit on either side of a queen size bed on this small wall, but it will be tight. I'm thinking of painting them a slate gray.
The rug is a new addition and I love how it makes the room feel a little more cozy. I ordered the rug from Rugs USA.com

Even though this bedroom is small, it will eventually get a queen size bed. We aren't quite ready for guests yet, since most of the Mountain Cottage is still a construction zone, so for now, a twin will do. 


The lamp with the blue lamp shade looks better on the vintage cabinet.  In my last post, I showed you how we fixed the inside of the cabinet and replaced a missing piece. You can see it HERE.


Mr. DIY couldn't resist changing up the vintage ladder vignette and making it his own. 
lol. Looks more like the wild, wild west with the sarape and rifle. 
Slowly things are getting checked off the list. Still need to make a trip to Ikea for some curtains and I think I have the perfect artwork for above the bed.  
Hope your week is off to a good start!


PS: I found the little cabinet and ladder at Kiki's Kottage in Pineville, NC
Pam


Wednesday, October 29, 2014

Fixing Our Vintage Cottage Cabinet

I found this cute vintage cabinet finished with an Annie Sloan Chalk Paint and distressed waxed finish way back in April of this year. I knew the minute I saw it in the showroom that it was perfect for the downstairs bedroom at our mountain cottage and that it was coming home with me.

 It looked super cute in the showroom and I didn't notice it was missing something. Do you see what it's missing?


Monday, September 29, 2014

STEALING FLOOR SPACE TO BUILD A CLOSET

*this post contains affiliate links


 Because we took out the original closet in the upstairs bedroom at the mountain cottage and built a half bath in it's place, we needed to add a closet in some unused part of the room. The corner near the entry door was the most logical space.
As always, we started with a plan...

build a closet, Closet organization, closet storage, storage, custom closet, diy

Tuesday, September 23, 2014

NEW DRESSER FOR THE MOUNTAIN COTTAGE BEDROOM


I love that I get to show you something pretty for the upstairs bedroom at the Mountain Cottage. Y'all know I love Craigslist and scour the furniture and antiques section several times a week. One of the furniture pieces I've been looking for is a low, wide dresser with rectangular lines in the drawers. 

Well, a while ago, I found such a gorgeous dresser and it was perfect. 
mountain  cottage, attic bedroom, cottage style, bedroom decor

It was in perfect condition and the finishes were perfect and I didn't have to do a thing to it. Yup. Zip. Zero. Nada.

Tuesday, September 16, 2014

OUR MOUNTAIN COTTAGE RETREAT, ONE YEAR UPDATE

It's hard to believe that we've had a whole year of enjoying the beautiful view on the porch at our mountain cottage. Time has flown by so quickly. We've learned a few lessons in the past year about having a house in the mountains and all the trials and tribulations (and blessings) of  owning a house in a truly rural setting.
A year ago this week, we set out to transform a tiny little mountain cottage into a lovely little retreat.


What's it really like to own a second home retreat?

Well, today, I'm going to show you the good and the bad- the pretty and the downright ugly. 
I'm going to keep it real and show you that owning a 2nd piece of property  isn't always easy.
We haven't accomplished as much as we would have liked, but things take more time when the house is two hours away, you can only visit on half of your weekends, do nearly everything yourselves and have a pretty small budget.
Having said that, we've worked on quite a few projects, which I would like to share with you today.

The view from the back porch where we take our breaks and where Mr. DIY and I share meals when the weather is nice.

We never tire of the scenery and our view of the Blue Ridge Parkway makes it worth every sore muscle.

Monday, September 8, 2014

Adding More Storage -Building a Built In -Bookcase


I keep saying over and over that every project at our mountain cottage is designed with storage in mind. 
Our mountain cottage is a small house at under 966 square feet, but I think it's actually less than that. Adding more storage was lacking in every single room when we purchased the house and we're trying to remedy that feature. Most homes may not be as small as the mountain cottage, but..
Who couldn't use more storage?
It's so important to build in storage space in every room. Just look around your house and see where you can steal a few inches here and there. I bet you can!


Mountain cottage, mountain cottage bedroom, Storage, Storage Shelves, bookcases, built in bookcase,cottage, cottage style, farmhouse, farmhouse style, diyDesignFanatic.com

Thursday, September 4, 2014

DIY Pottery Barn Knockoff Storage Bed... All Dressed

Thanks for coming back today to see the bed at the mountain cottage all dressed up. It's really not fancy, with it being the upstairs attic bedroom at a mountain cottage and all. We meant for it to be comfortable. 


Tuesday, April 22, 2014

Decorating Turning Point

Hey everyone!

I hope you had a nice Easter with your family and/or friends. 
If you've been stopping by regularly, you know we're right in the middle of a messy project over at the mountain cottage. I'm sure you've been in the middle of a project when it seems like it's been going on forever and ever, and there's no end in sight.
We're at a turning point at the mountain cottage and things are going to start looking pretty. 

The bed Mr. DIY built for the downstairs bedroom is in the painting stage...

I've actually been sleeping on a real mattress, instead of an air mattress...

We bought some Expedit bookcases for the closet and now I can unpack my suitcase...

I found some linens and a big fluffy down like comforter, plus some really comfy pillows...

and today, I found a cute store nearby that sells vintage furniture and I bought a few things for the downstairs bedroom. 

Woo hoo!

Just in case you're in the Charlotte area, you can visit the cute little vintage store called Kiki's Kottage in downtown Pineville, North Carolina. It just opened up last month. I found it by scouring the furniture section of the Charlotte Craigslist. (I've been know to spend a little time on there)
http://en.wikipedia.org/wiki/Pineville,_North_Carolina


Took a few pics  of the inside of the store to share and will tell you what I found at the end...


It's a good thing that the mountain cottage is a teeny tiny house since the budget is pretty small for furniture and accessories. It's pretty overwhelming to have to purchase everything for a whole house, even if it's a teeny tiny one.

Been looking for a big basket for the living room to hold some  cuddly throws to keep us warm on those cold days and nights in the Fall and Winter. I haven't been able to find a basket I liked, but this rustic looking wooden box with rope handles might be a great alternative. I'm pretty sure Mr. DIY can make one of these with some of the leftover wood from some other projects. I think some industrial wheels might look good on it, as well. 


Here's another cute little decorated room at the shop. I might have purchased something in this pic. 


I am resisting the temptation to purchase lamps  before the major pieces of furniture get put in the rooms. LOVE that lamp! (Especially the finish)


The shop had a couple of great ladders on display. 
I've been looking for a ladder for either the downstairs bathroom, the upstairs bedroom or the living room. 
This one was a little large for our teeny tiny mountain cottage. 


I ended up getting this fabulous ladder. Not sure which room it will go in, but it's going to look great in one of them. 


Here's the little beauty I got! It's going in the downstairs bedroom and will either hold clothes or a little tv. Depends on whether or not we can get another little tall and slim dresser in the room. 
Kiki's Kottage

Kiki's Kottage


Can't wait to get these two beauties up to the mountain cottage and see how they look in the space. 


Head on over to my Mountain Cottage board on Pinterest to see more of my inspiration for our teeny tiny house. 
Hope you're having a great day!!!


Pam


You can see more beautiful furniture on Kiki's Kottage Facebook Page


ps. Just so you know, Kiki's Cottage did not compensate me in any way...I just love sharing cute little shops with y'all. 

joining:

Tuesday, October 22, 2013

Mountain Cottage Bedrooms Update

Mr. Fanatic took a week off of work and we spent it at the Mountain Cottage and started working on the first part of the renovations.
A very strange thing happened there...I woke up early and went to bed early (I'm naturally a night owl and sleep until 8 or 9) and Mr. F stayed up later than usual and slept in late.
Not sure what that means, but I found it odd. 

 We were pretty busy all week, but took a few breaks out on the porch with the view of the mountains. 
The view from the cottage is ever changing, especially throughout the day. 
The trees were showing the first signs of Fall. Last weekend, more of the trees were turning gold and there were a few pops of red. 

 We started on the two bedrooms.
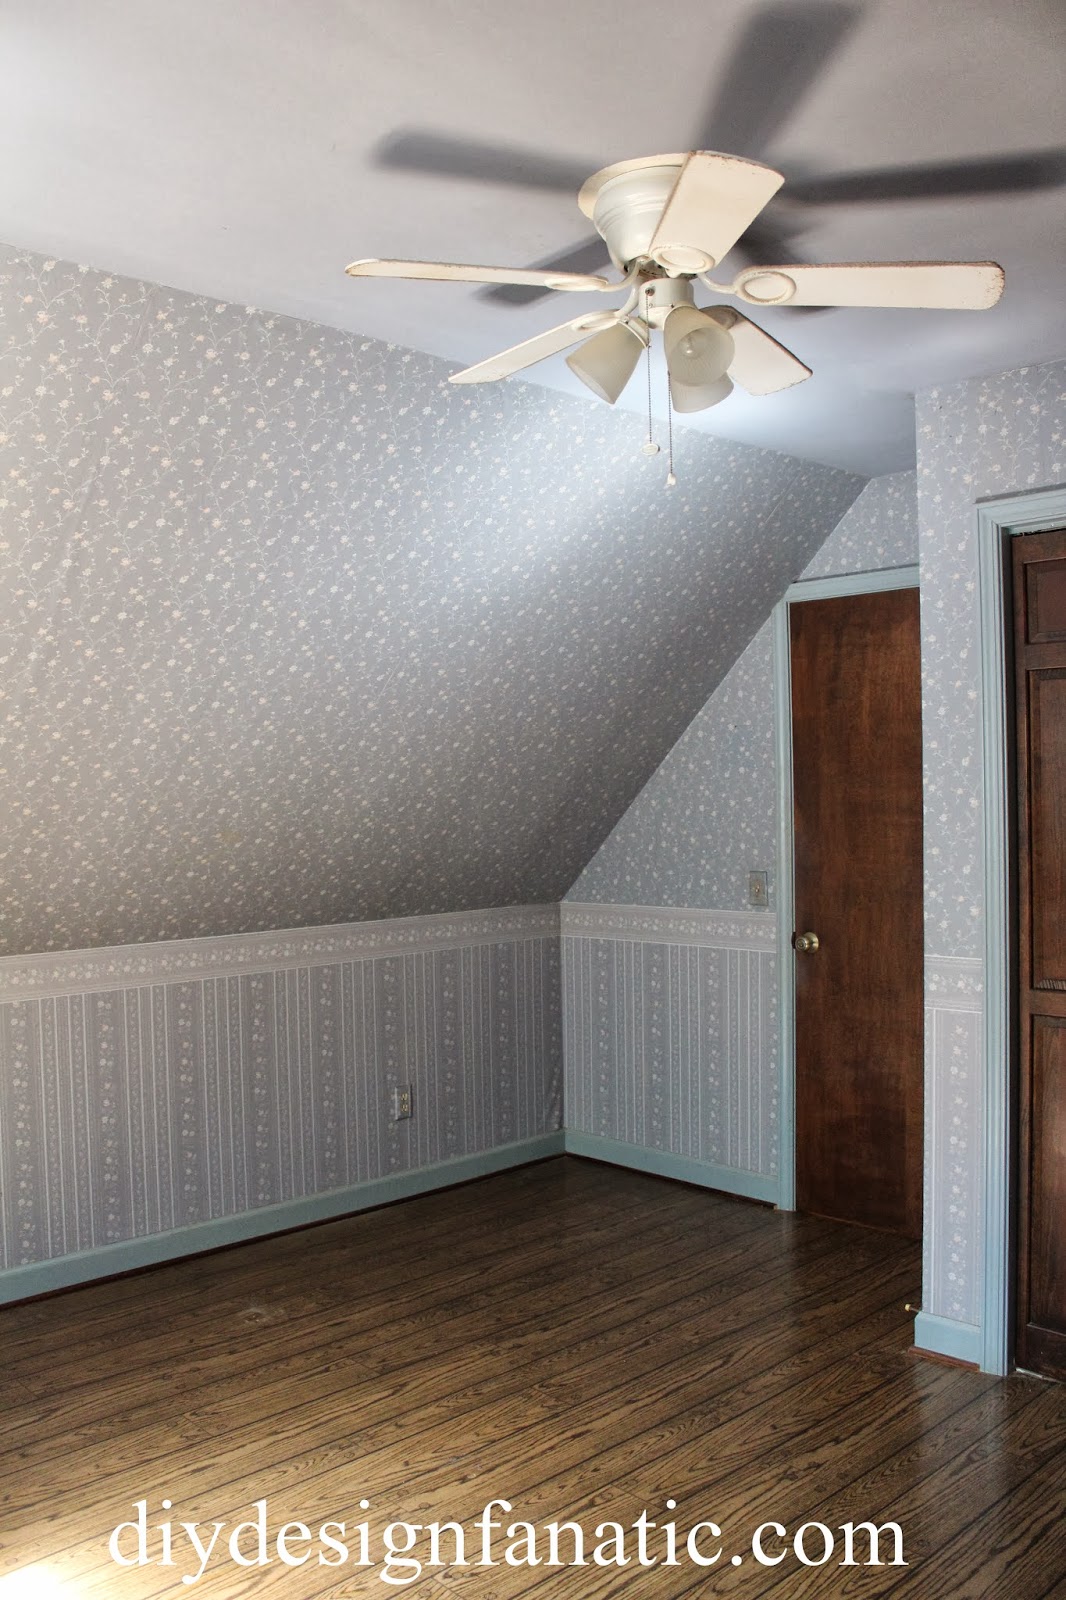
 Both the downstairs and upstairs bedrooms were wallpapered in blue. 


The blue really made the rooms dark and the curtains didn't let much light in through the windows. 
benjamin moore, decorator white,
Downstairs Bedroom

 Uhhhh, I hate wallpaper. More on that later...
benjamin moore, balboa mist
upstairs bedroom


 Here's the view looking back at the door.
upstairs bedroom

I really love those bifold closet doors, but the room would look much better if they were a lighter color. We are going to make the closet space a foot deeper and create a half bath. Nothing like stumbling down the stairs in the middle of the night to use the one bathroom.  We will put in a small closet to the left of the entrance door and put in some floor to ceiling shelving(behind doors) on the left side where the closet is now.
benjamin moore, balboa mist
upstairs bedroom
We thought we were going to get lucky with removing the wallpaper, when it came off in sheets on the knee wall in the upstairs bedroom. 
Ha! We were wrong.
upstairs bedroom

We removed the wallpaper on a previous weekend, then patched the walls. It wasn't easy to remove at all. We spent the whole weekend removing the wallpaper in the two bedrooms. We scored the wallpaper and spraying it with a warm solution we purchased specifically for this purpose. 

It. was. awful.

 I have to confess I was thinking VERY bad thoughts as I was removing little strips of paper from the walls. 

After we finished removing the wallpaper and patching,  I was on Instagram and saw that HomeRight had a steam machine that not only cleans, but removes wallpaper.
Really?
Right then and there, I sent HomeRight a message about our Mountain Cottage reno.  They  said they would send me a steam machine so I could review it when we remove the wallpaper in the Kitchen and bathroom. We will also be using it to clean the other rooms without wallpaper. 
I was so happy the day it arrived! Can't wait to try it out.
benjamin moore, decorator white,
downstairs bedroom

Since there was a sticky orange residue on everything in the house (that I believe was nicotine) and because we think the trim paint was oil based, we painted all of the surfaces with Zinsser oil based Cover Stain.
Wow, I had forgotten how strong the oil based Zinsser smelled.
Guess I should back up a bit and let you know that after removing the wallpaper, we washed all of the surfaces that hadn't been covered by wallpaper. We used a 50/50 solution of white vinegar and water. 
From our findings on the internet, some recommend either a bleach solution or ammonia solution to remove nicotine residue (never put bleach and amonia together~ these were separate solutions).
The closet walls in the downstairs bedroom had orange spots halfway up the wall and the vinegar solution took it right off. 
A coat of Zinsser Cover Stain was applied after washing and rinsing the trim and ceiling. 
benjamin moore, decorator white,
downstairs bedroom

Once we were finished with the Zinsser, we couldn't wait to get the paint on the walls.
benjamin moore, decorator white,
upstairs bedroom

When we went to the paint store, we saw Benjamin Moores brochure for their paint colors for 2014 and thought that A Breath Of Fresh Air would brighten up the downstairs bedroom.

After painting the ceiling and letting it dry, I started to cut in, A Breath Of Fresh Air kinda looked like the color of the wallpaper we had just taken off.
benjamin moore, decorator white, a breath of fresh air
downstairs bedroom

So, we had to go back to the paint store because of the color change in the downstairs bedroom and because we needed more ceiling paint because we had decided to paint the angled part of the ceiling in addition to the top part of the ceiling in the upstairs bedroom
We took a little detour and found this picturesque farm...I'm going to have to go back some time and bring my good camera with me. This photo was taken with my cell phone.
Wouldn't you just love to live in that white farmhouse with the red barn on the hill?
benjamin moore, decorator white, boone nc


Here's the downstairs bedroom painted white.

benjamin moore, decorator white,
downstairs bedroom
 The room is soooo much brighter now. Here's the other side of the downstairs bedroom after one coat of Benjamin Moore Decorator White in eggshell on the walls and 2 coats of Decorator white in semigloss on the trim. 
Ahhh, so much brighter and better. We are planning for Mr. Fanatic to build in a custom closet system. Can't wait. It will be so nice to hang up my clothes in the closet.
benjamin moore, decorator white,
downstairs bedroom


In the upstairs bedroom, we decided to paint the top part of the ceiling and the angled part of the ceiling with the ceiling paint. It was the house brand that we purchased at Boone Paint and Interiors
We are extremely happy with the coverage and I believe it was only $17 a gallon.
The walls are painted with Benjamin Moore Balboa Mist.
benjamin moore, decorator white, balboa mist
upstairs bedroom
 So much better than the blue wallpaper, don't you think?
upstairs bedroom


 Did you notice that Mr. F replaced all the outlets?

  
and the lightswitches :)


Here are the before and after photos side by side...
benjamin moore, decorator white,
downstairs bedroom


benjamin moore, balboa mist
upstairs bedroom.

Both bedrooms now seem so fresh and clean! It's amazing what a couple of coats of paint will do. 
Can't wait to get started decorating the downstairs bedroom.
The upstairs bedroom will have to wait until the bathroom is finished.

I'll leave you with a common scene at our Mountain Cottage. Three deer came by a couple of times a day. One day a 4th deer came by, but momma chased her off. Every time they'd show up, one of us would holler to the other "the ladies are back". 
They are fun to watch. 
Once day we came downstairs and saw 7 wild turkey in the yard.


Hope you'll stop by tomorrow to hear about some other projects we accomplished while we were at the Mountain Cottage for a week.

Pam